New work in progress…I am taking up the challenge to drape in tissue paper. During WWII there was rationing of consumer goods including fabrics like cotton and silk. To conserve resources for the war effort, fashion schools and books about patternmaking taught students how to drape in tissue paper instead of muslin. The technique was used by author Nellie Weymouth Links in her 1947 book “Precision Draping”. I taught myself the method during Lockdown 2020 except at the time I used muslin. I think it is time I learned how to do it in tissue paper. If I am successful, I will save a lot of money! The new project is a blouse with a blouse yoke. The kind of blouse yoke I will make is for the lower part of the blouse. It is described in Claire Schaeffer’s “Couture Sewing Techniques”. The pattern is derived from a skirt pattern. The yoke holds the upper part of the blouse neatly in place and fits smoothly under the skirt. I will post a screen shot of the sketch and half toile when completed..
Photos of work in progress
First pattern of bodice and blouse yoke draped in tissue paper.
“Preccision Draping” by Nellie Weymouth Link
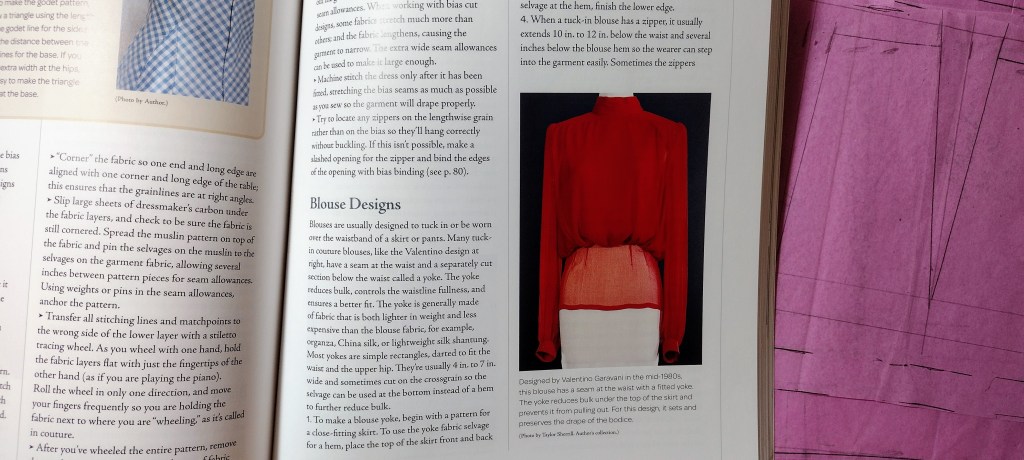
Photo of blouse with blouse yoke. From “Couture Sewing Techniques” by Claire Schaeffer.
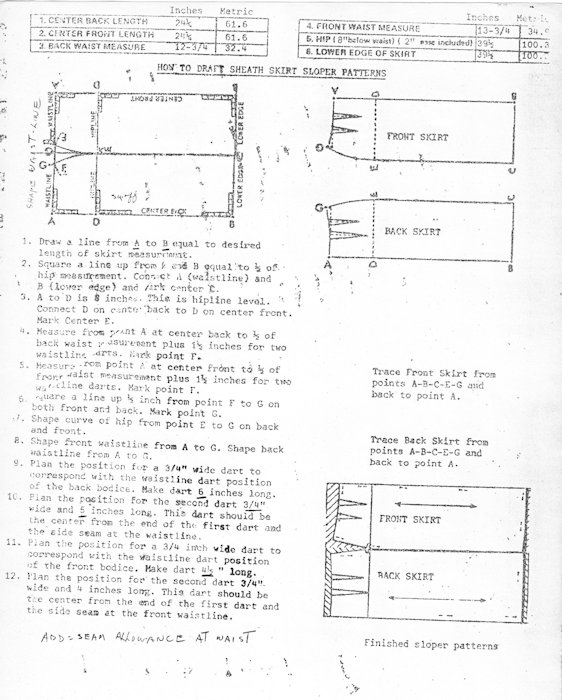
Close-up of the vintage pattern drafting instructions circa 1960s.
On 6th January 2022, I posted screen shots of an original 1960s pattern drafting instruction sheet. Since the original is faded, I typed up the instructions along with my comments. The instructions are the simplest flat pattern drafting instructions I’ve used so far. In this posting I evaluation the half-toile created using the measurements for a Misses Size 4. Please click this link for the pattern drafting instructions
Evaluating the Results
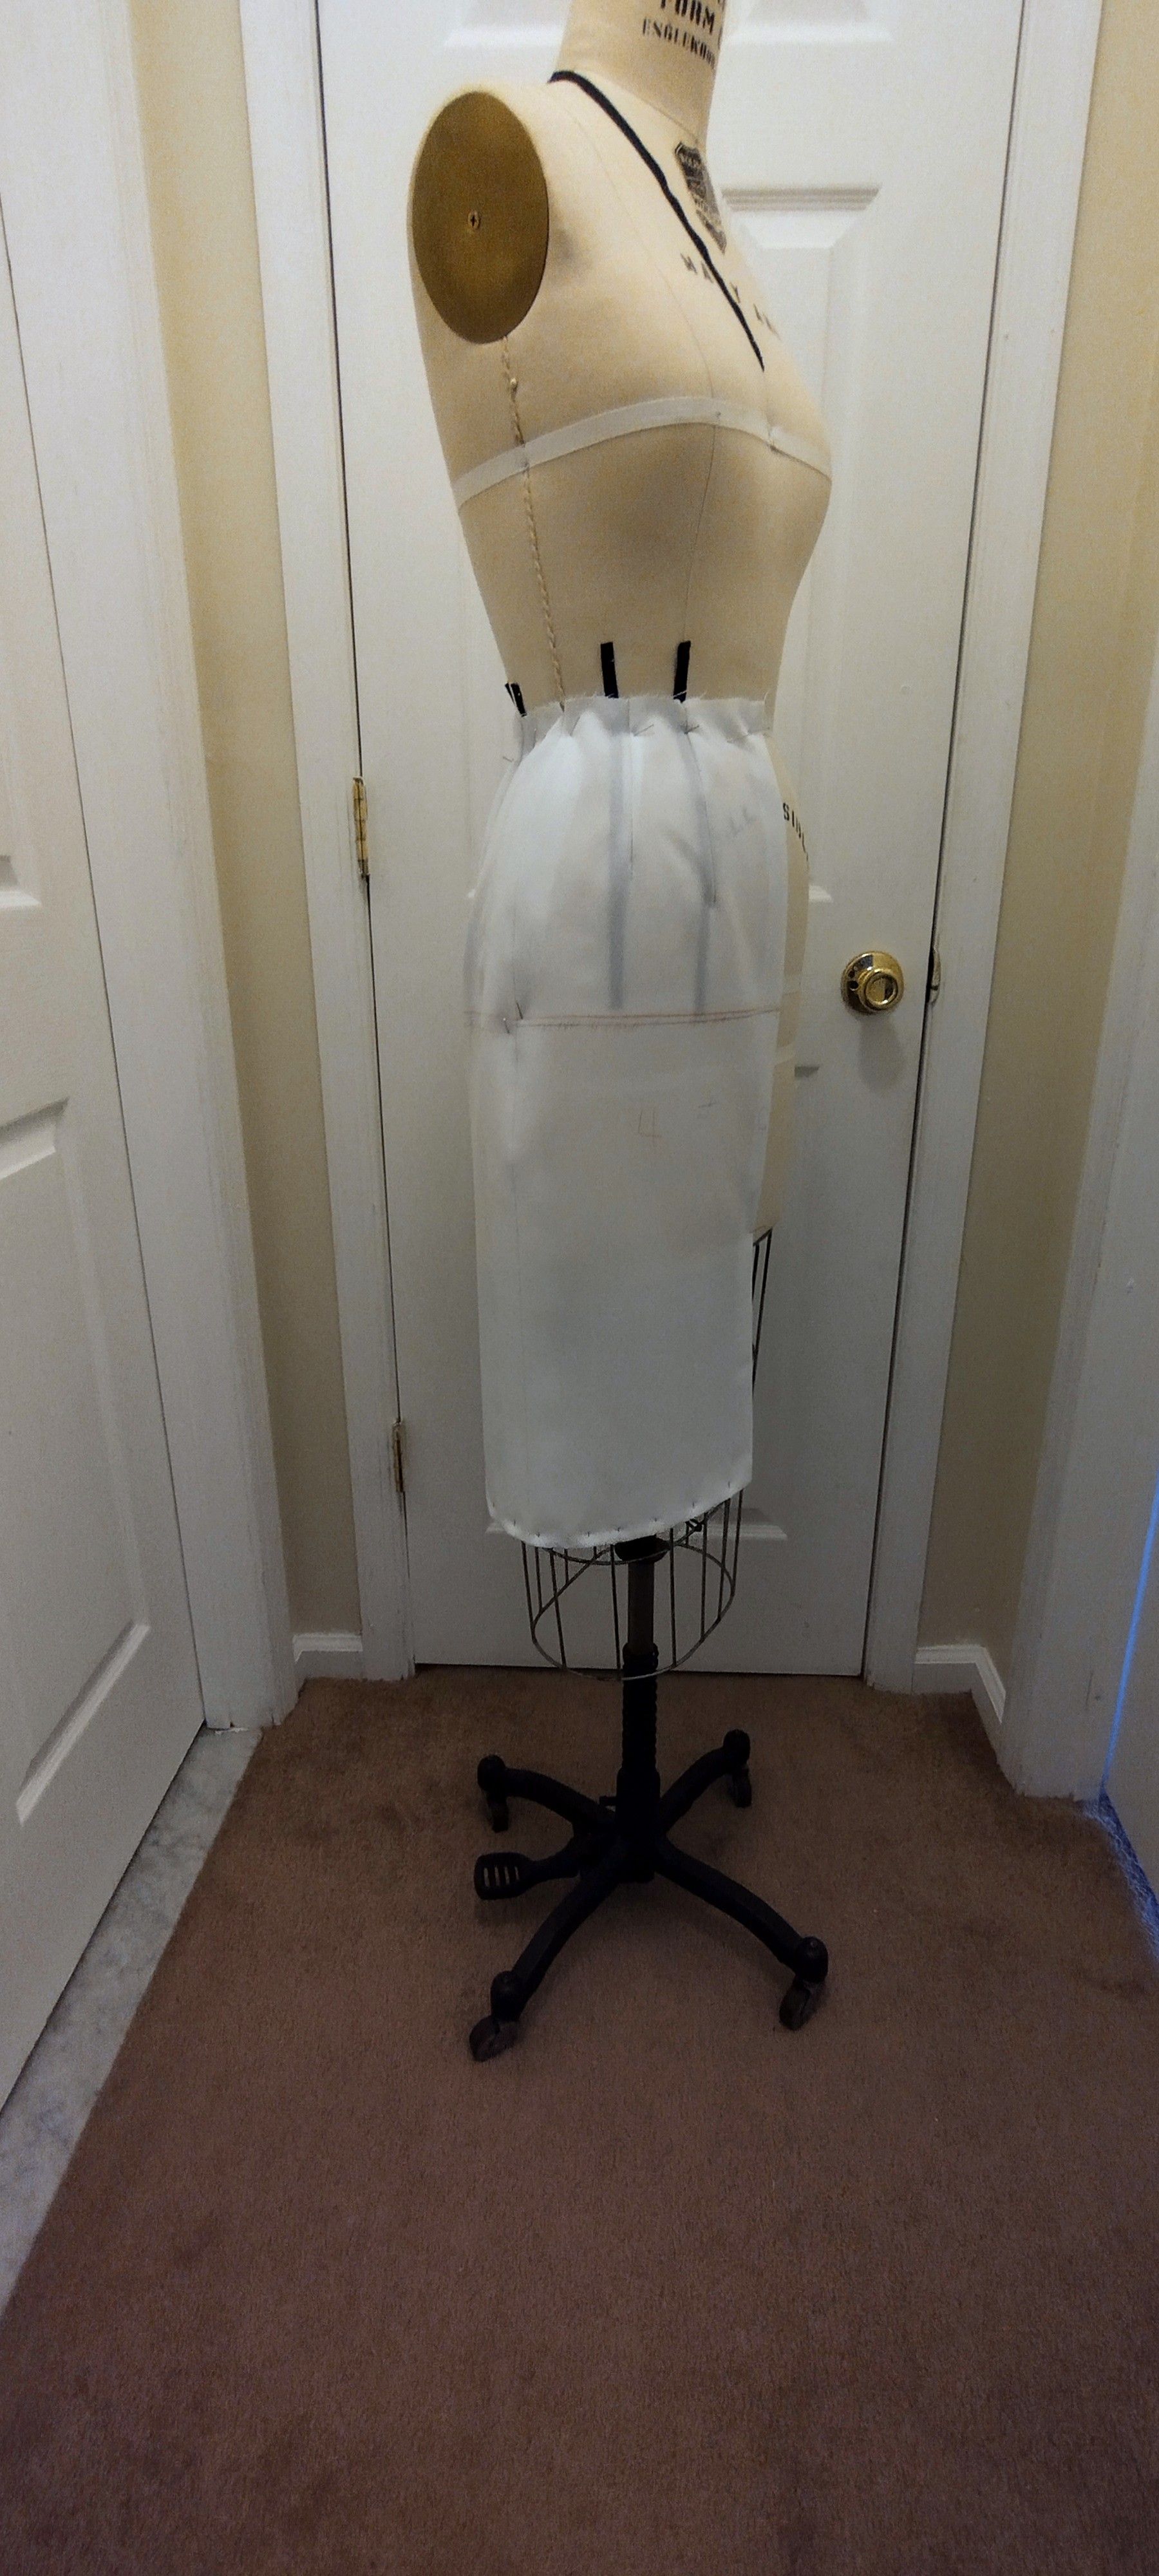
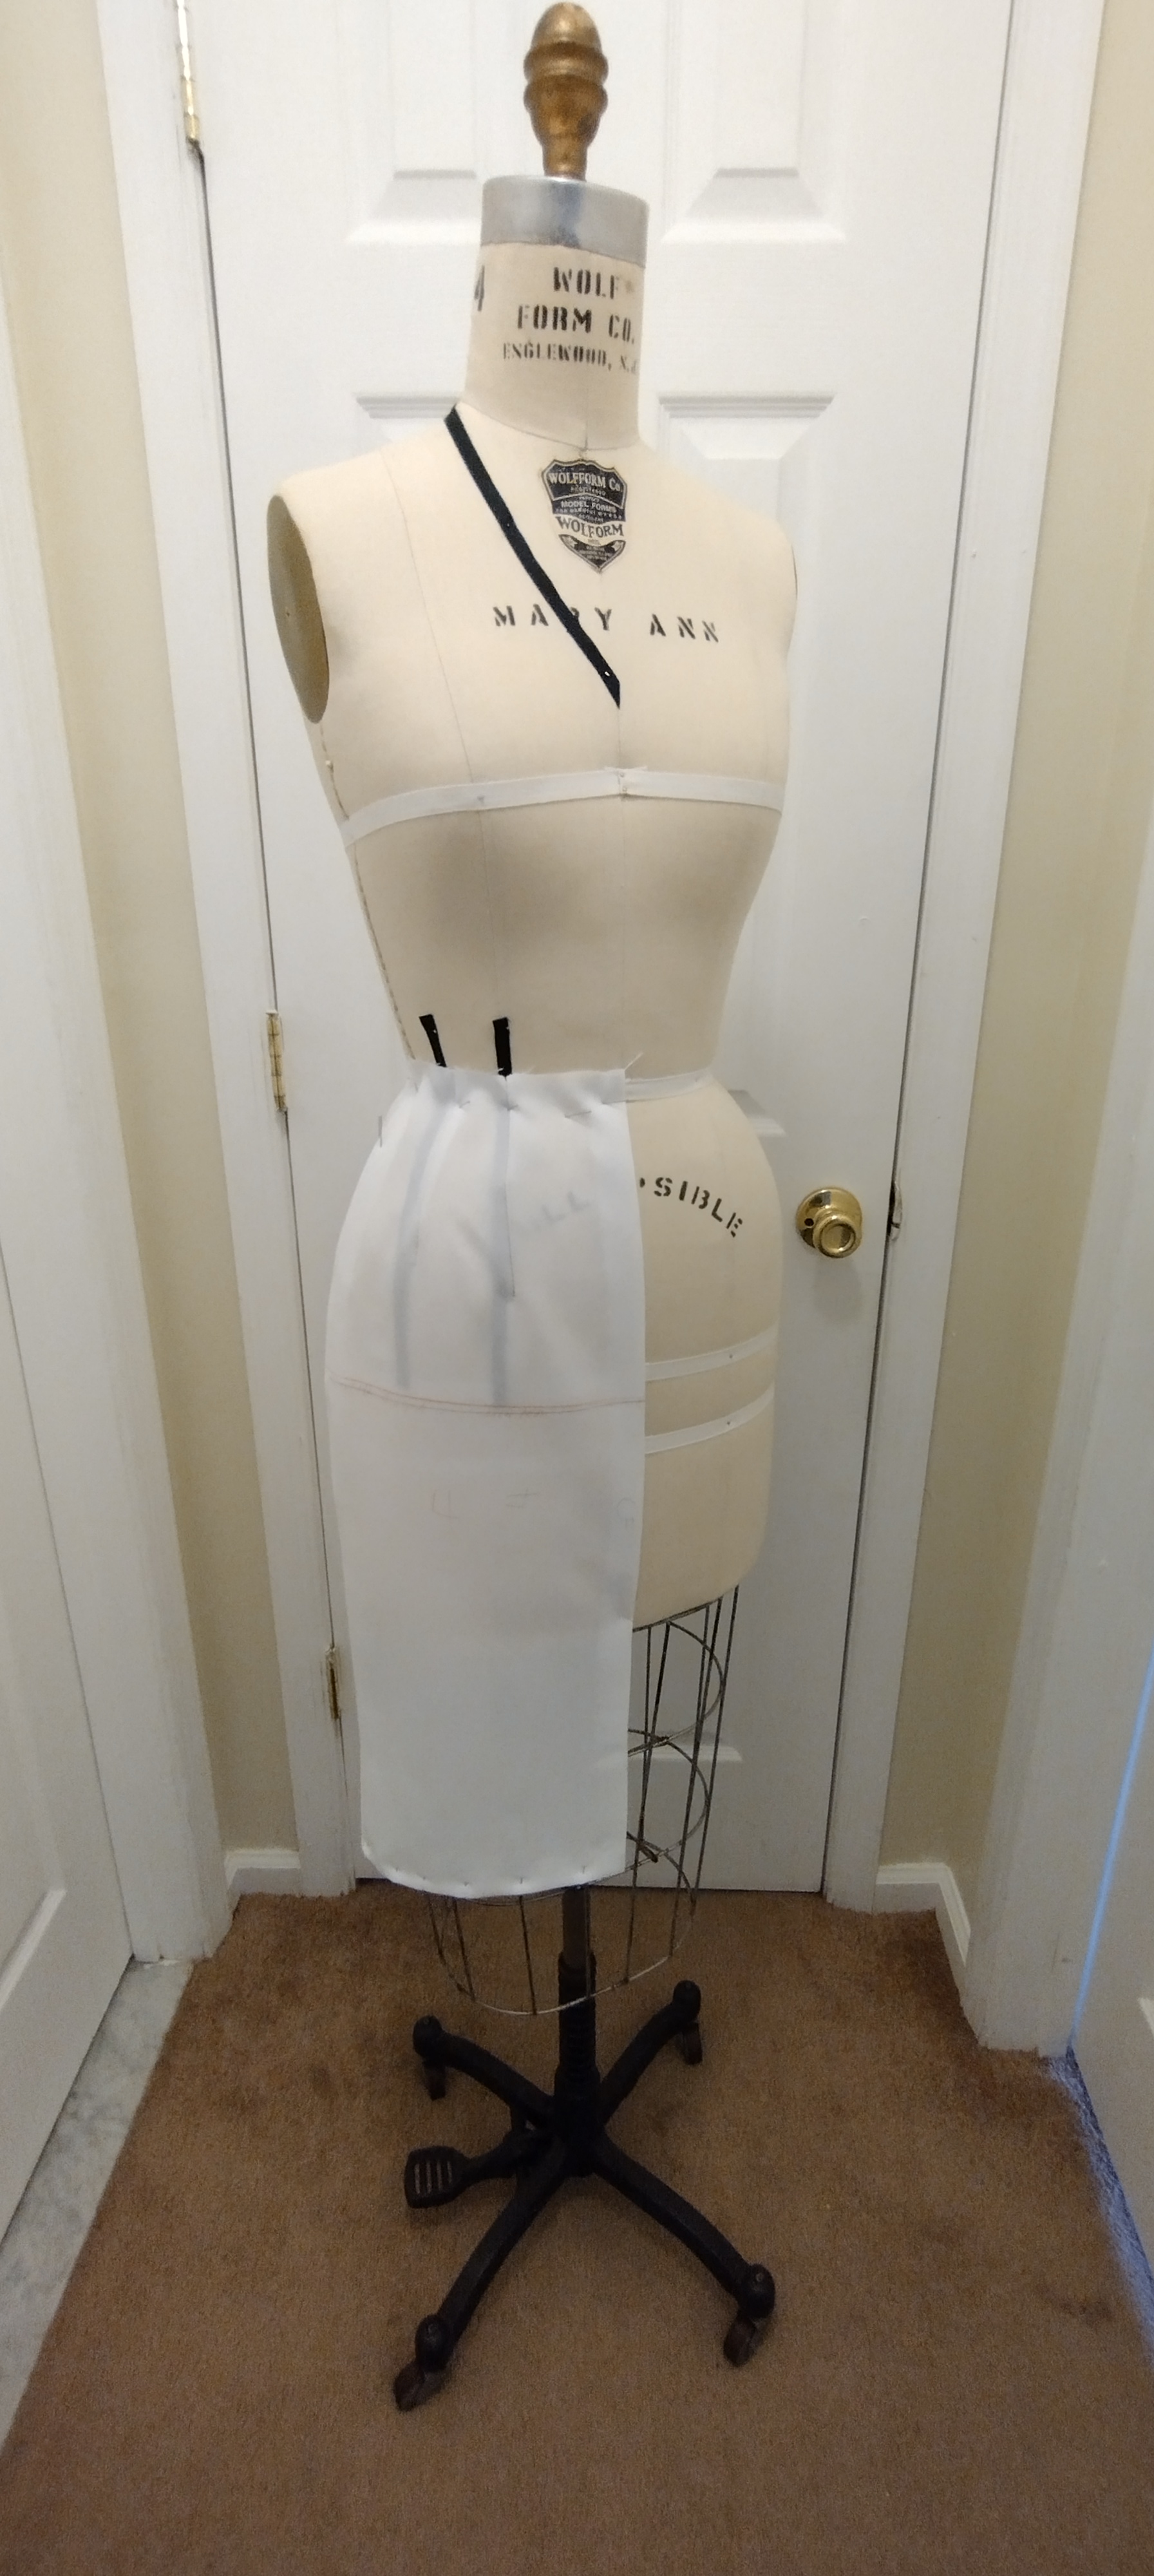
Front (l) and back (r) views of the sheath skirt half-toile.
The instructions about dart placement referred to a basic bodice with a vertical dart under the bust. The position of the first dart for skirt front and back had to align with that dart on the bodice. I used the measurement from Center Front to Princess Line and the waist. For the back skirt I measured from Center Back to the Princess Line at the back waist. The second dart was located in the center between the princess line and side seam .
I am very pleased with the fit of the skirt. The drafting instructions state that 2 inches is added to the hip measurement for ease. However, no ease is factored in for the waistline. Considering that I will use a waistband and perhaps a lining I knew ease at the waist was essential. I also know the blouse I envision for the outfit will be tucked in. I added 1″ to the waistline and then drafted the skirt.
Views of the half-toile to show how hip curve looks.
The only correction I have to make is mid-way along the hip curve. Once the curve has a more even line the pattern will be ready for cutting the fashion fabric.
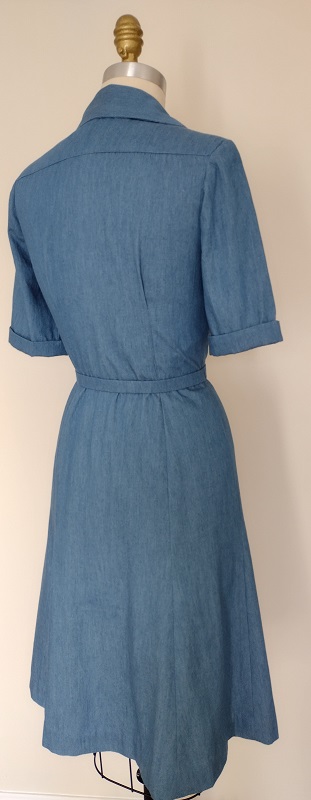
In this posting I share some of the fitting and sewing techniques I used to refine my favorite denim sheath skirt. The skirt is made with a bottom weight 100% cotton denim by Kauffman. The fabric was laundered and dried prior to marking, cutting and sewing.
The pattern was developed entirely through draping in cotton muslin.
The skirt had several parts of the construction done by hand. The blouse was purchased online.
Fit is Everything!
To give the skirt more style ease I had to add extra width at waist, hip and hemline. Some sewing books say extra width can be added at the side seam. I found that it is better to open the pattern between the second dart and the side seam. You measure the mid-way point between the dart and the side seam. Draw a vertical line from waist to hem. Then open 1/4 of the total amount of style ease needed. This alteration is the same for front and back of the basic sheath skirt pattern.
In the photo of the back pattern piece for the skirt you can see the place where the cut was made and extra paper added to the pattern between the second dart and the side seam.
Note: The pattern for the skirt was made using Precision Draping by Nellie Weymouth Link. I gained weight since the time the original drape and pattern was made. This necessitated the need for the alteration.
Dressmaker Finishes for a Refined Look
A slot zipper application was used. I followed the hand sewing technique detailed in Couture Sewing by Claire Schaeffer. Instead of using a prick stitch or back stitch, the zipper is sewed into the seam using tiny running stitches. To further secure the zipper in place, the zipper tape is fell stitched only to the side seams, at the edges. The zipper stop is covered by a lightweight piece of lining fabric. I used a small piece of lace hem tape instead.
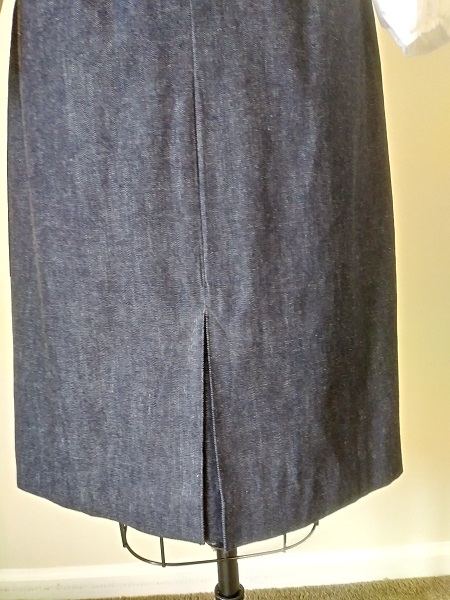
A kick pleat with insert was made in.center back seam. It provides ease of movement as well as a finishing touch. The top of the kick pleat is stitched into place using a triangular shape. A kick pleat is more refined than a high slit at center back of the skirt. That is why this skirt works well for casual dress days at work or an outside meeting with business associates.
All seams were pinked and then edge stitched. Wrights Flexi-Lace tape provided a finish for the hem and kickpleat.
These pattern drafting instructions were given to me by a student who attended the Traphagen School of Design in the 1980s. It was a private design school in New York City. The instructions are very simple when you take the time to read them through before you start drafting your pattern. Make a muslin to test the fit before using this as the basis pattern for any pencil skirts or other designs based on the basic skirt sloper. The basic sheath skirt (a/k/a pencil skirt, slim skirt, wiggle skirt) has not changed. This pattern can serve as a sloper for vintage or modern skirt designs.
Measurements Needed
Center Back Length (from center back waist to desired length of skirt) Center Front Length (from center front waist to desired length of skirt) Back waist measure (from side to side seam at back) Front Waist Measure (from side to side seam at front) Hip Measurement – 7 to 9 inches below waist-use widest circumference. Add 2″ of ease to measurement. Lower Edge of Skirt (this measurement is determined by the hip circumference plus 2″ ease
Important Note: Look at the complete diagram. The rectangle runs from point A back to point A front at waistline. Point B back runs to point B front. Point A to B in the back and Point A to B in the front is the skirt length. I found it easier to start with a large rectangle where A-A and B-B equals the complete hip measurement plus 2 inches of ease. So draw A-A for the waist. The draw A to B for center back. Draw B to B for lower edge. Then from B in lower edge of front draw a straight line up to A front.
Then proceed to step 2.
1. Draw a line from A to B equal to desired length of skirt measurement.
2. Square a line up from A and B equal to 1/2 ofequal to 1/2 of B (lower edge) and mark center C.
3. A to D is 7 to 9 inches below waistline. This is the hipline level. Connect D on center back to D on center front. Mark Center E.
4. Measure from point A at center back to 1/2 of back wait measurement plus 1 1/2 inches for two waistline darts. Mark point F.
5. Measure from point A at center front to 1/2 of front waist measurement plus 1 1/2 inches for two waistline darts. Mark point F.
6.. Square a line up 1/2 inch from point F to G on both front and back. Mark point G.
7. Shape curve of hip from point E to G on back and front.
8. Shape front waistline from A to G. Shape back waistline from A to G.
9. Plan the position for a 3/4″ wide dart to correspond with the waistline dart position of the back bodice*. Make dart 6 inches long.
10. Plan the position for the second dart 3/4″ wide and 5 inches long. This dart should be the center from the end of the first dart and the side seam at the waistline.
11. Plan the position for a 3/4 inch wide dart to correspnd with the waistline dart position of the front bodice*. Make dart 4 1/2″ long.
12. Plan the position for the second dart 3/4 wide and 4 inches lont. This dart should be the center from the end of the first dart and the side seam at the front waistline.
13. Cut out sloper. This sloper must have 1/2″ seam allowances added at waistline, side seams and center back. Add hem allowance at bottom of skirt. The hem for the basic skirt is usually 2″
I am releasing my pattern for the Alice Elizabeth dress into the public domain. You are free to download and size it up or down in a graphics program. You can alter the design. I also give permission to use it privately or commercially.
This is a basic pattern that you can use as the basis of your own rendition of the style.
Please refer to the following posting for further details and as a guide to whether or not you want to make the dress with closures like I used or that are on the original 1950s dress.
Alice Elizabeth dress – Construction details on my interpretation of the Pat Perkins dress
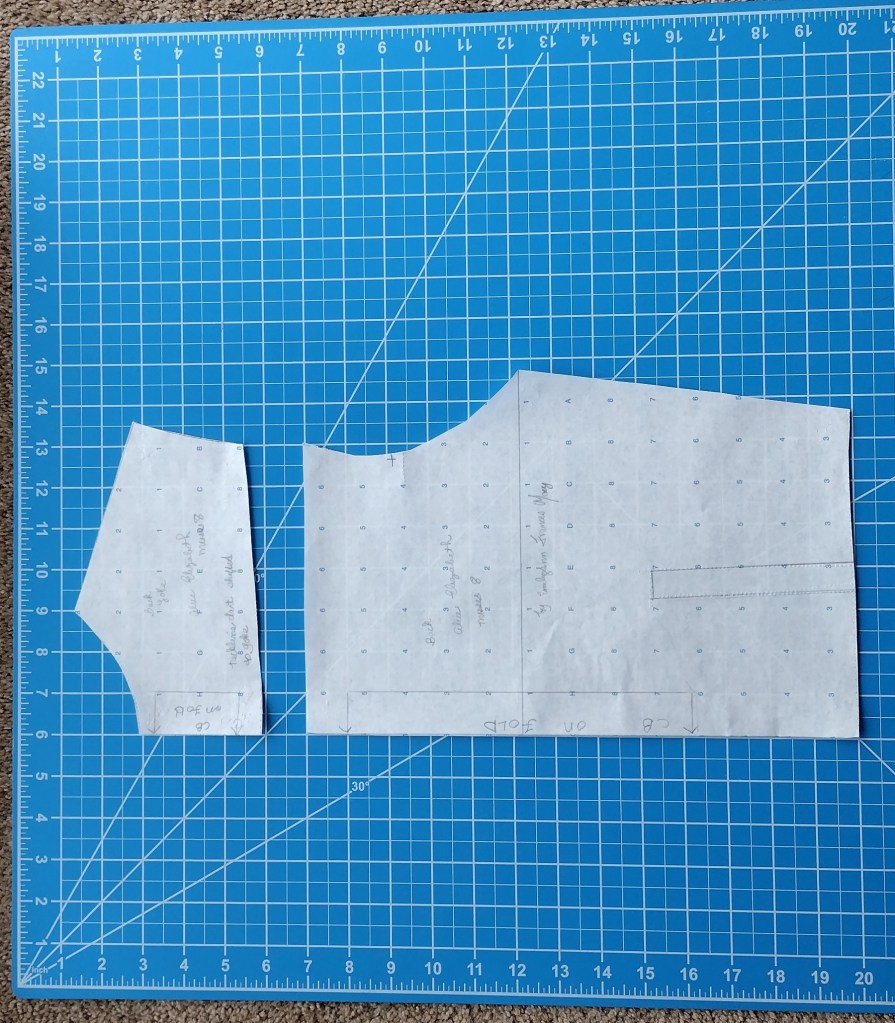
This pattern was created using a combination of draping and flat pattern making based on the 1947 technique, Precision Draping. A Wolf Form in Misses 8 was used. The resulting dress can be labelled a Misses 6/8.
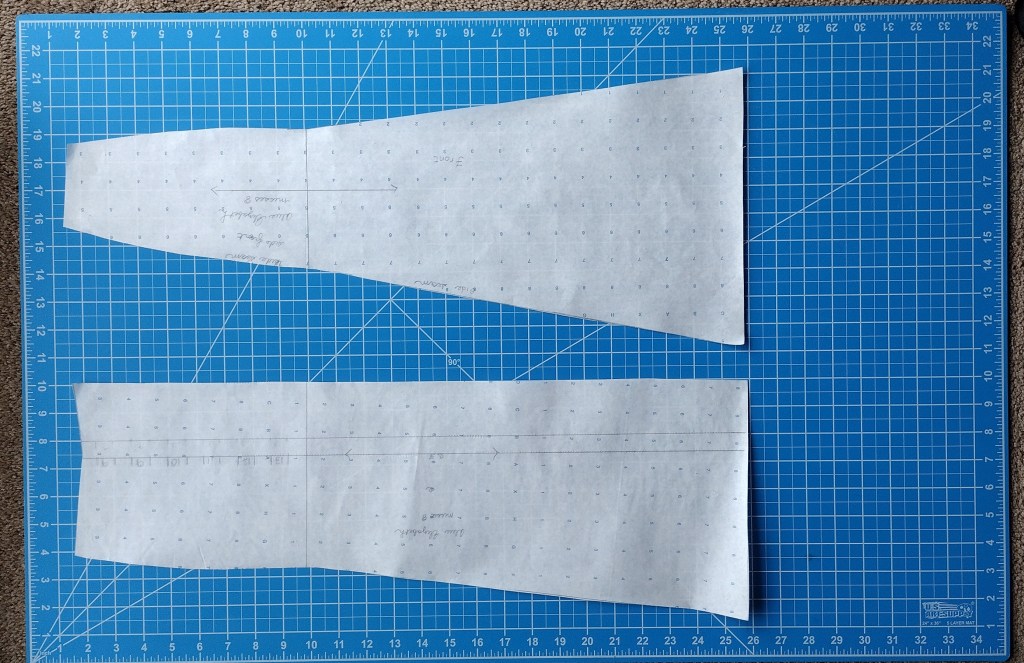
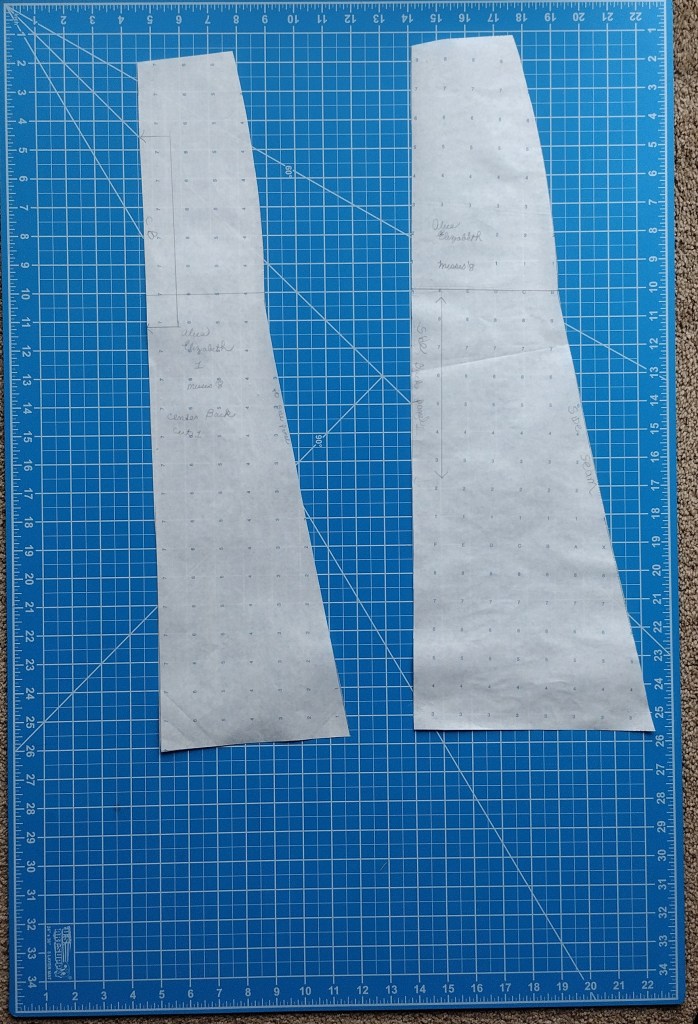
The pattern is showed on a cutting mat using inches. All pattern pieces do not have seam allowances.
Bodices
Front Bodice
Back Yoke and Bodic
Six-gore Skirt
Frong of six-gore skirt.
Back of six-gore skirt
All-in-one sleeve
All-in-one sleeve
Top collar, under collar, front interfacing
Top collar and bottom collar. Interfacing front bodice and skirt.
The dress pattern and design is based on a 1950s house dress by Pat Perkins that I bought during Lockdown 2020. I wanted to create a basic pattern to dervice this and future retro inspired clothes I make. I bought the dress from a vintage seller on Etsy and posted a detailed style analysis . I had plenty of time during lockdown to learn about different vintage draping and patternmaking systems. I chose to teach myself Precision Draping from the book of the same title by Nellie Weymouth Link.
The dress consists of a fitted bodice with two vertical dart tucks on each side of the bodice in front. The skirt is six gores with a very moderate flare at the bottom. The Pat Perkins dress has buttons and loop closure down center front. A metal zipper was sewn into the left seam from 2″ under the arm until the hip line using a lapped application.
I do not like side seam zippers for two reasons. First they can be uncomfortable. Second they interfere with the flow of the underarm seam and skirt side seam. Since fitted clothing often falls on the bias at the side seams the potential for distortion exists. I hand sewed six button holes in the front of the bodice.
My reasons for avoiding buttonholes on the entire dress is that it would spoil the look of simplicity and efficiency the house dress is supposed to convey. I had not thought about using a hidden zipper when the dress was in progress. Now that it is finished I have a hidden zipper in mind for the future. It is a simple application I will detail when it is in progress. I used snaps because the front portion of the skirt looks better. The eye is drawn upwards to focus on the striped buttons and self-fabric belt. I do not care for metal eyelets and prongs in a belt so I used snaps to fasten the belt.
The edge of the front facing, the waistline stay and hem were finished with navy blue Flexi-Lace by Wrights. Seams were pinked. I chose these finishes because they are similar to home based seamstresses used in the 1950s. The Flexi-Lace tape was completely stitched by hand to the waistline seam using a running stitch at the waist and edge for flexibility. I used a cross-hatch stitch to join the stay to side seams and dart tucks.
The dress is made from 100% cotton chambray. It is very soft with a good drape. To support the dart tucks more a small edge stitching was used.
A back yoke was used to eliminate the neckline dart on the basic back bodice pattern. That too was edge stitch. On the inside, the yoke is interfaced and lined. The dart tucks in the back are also top stitched.
The collar is a basic collar pattern with a high stand. The undercollar and interfacing are cut on the bias. The sleeves have all-in-one cuffs.
Accessories
I chose understated accessories in sterling silver to keep to the everyday quality I want this outfit to have. The earrings have a pretty filigree. A small silver necklace, about 16″ long, with tiny beads would also look good with this dress.
Ballerina flats in navy blue complete the outfit. They pick up on the color of the stripes on the buttons. The overall impression of this outfit is meant to make the wearer attractive in a modest, understated fashion just as house dresses were intended in the 1950s.
In this posting I share progress photos of a new dress developed through a combo of flat patternmaking and draping. The photos featured are of the half-toile to test the fit.
Combination Technique: Draping and flat patternmaking
95% of this toile was made using a flat pattern. I used the Misses Size 8 sloper to create the fitted bodice, semi-fitted skirt and basic unfitted sleeve.
3/4 view of half-toile.
The flat pattern for the bodice front had the horizontal side dart closed and vertical dart opened. The construction of the bodice shoulder, back yoke, back tuck and side seams were completed. After steam pressing the bodice was pinned to the form. The excess dart intake below the bust was draped into two vertical tucks each 3 1/8″ high and about 1 1/2″ wide. I like the softer look of the tucks over the dressmaker dart under the bust.
Front view of half-toile..
I am very pleased so far with the 6 gore skirt. It was created by closing the darts of the basic semi-fitted skirt. The skirt front and back were cut along the lines of the dart and below the dart. Each piece then had extra width added at the hemline along front and back princess lines and side seams. I find the fit of this kind of gored skirt even more flattering than that of the 6 or 8 gore skirt created through flat patternmaking.
The collar was simple, easy flat patternmaking as was the sleeve. The next posting will be published once the fitting toile is complete.
Giving a Name to the Dress
As I work on a new project and gather the notions and fabric, I develop an image of who the dress will be for. I choose a name to create a sense of space between my self and what is coming to expression. This permits me to think whether or not improvements are needed. When I am too close personally and emotionally to a project become too attached. That is not good because it prevents perception of where the fit or creative result is lacking. This dress is called Alice. I will add a middle name once I feel more of the character of the dress emerging.
The basic fitting shell for the Misses Size 8 was draped. A toile was made twice each time refining the fit. When the basic Size 8 was turned into a sloper I then went on to customize it for myself.
Why not draft a custom made pattern?
I have been drafting patterns to my own measurements and have become very comfortable with the system I use. During the COVID-19 related furlough from my job this past Spring I decided it was time to take on a few challenges.
I am weak in the making of alterations. Since my dress form is a standard Misses 8, I decided to take on the challenges of draping and altering a Misses 8 for myself. I am between a Misses 6 and 8 for the bodice. For a skirt I am between a Misses 8 and 10.
I also have fitting challenges resulting from a small bustline, concave chestline and sloping shoulders. There were a few challenges I wanted to take up on the time I had to stay home from March until June 2020.
Working with Oaktag
The goal of using sloper was on my To Do list since 2018. The large roll of oaktag I bought from Steinlauf & Stoller moved with me from Brooklyn, NY to Linden, NJ waiting to be used. Being tightly rolled up for 2 years made it difficult to get into a workable state for making a sloper.
I had to roll the oaktag out on the floor and keep it in place with heavy books. I then cut the oak tag into length and width suitable to each pattern piece. To stop the curling I pressed each piece of oak tag by covering them with a thick towel. Then I used a steam iron to press flat.
The ends still curled so I laid the pressed oaktag pieces on top of each other onto the floor. The I piled heavy books evenly across them.
After two days the oak tag was flat enough. The pattern pieces were laid on top and the markings transferred. I cut out the darts because I want to try pivoting the pattern pieces to change the dart intake when working on transformations.
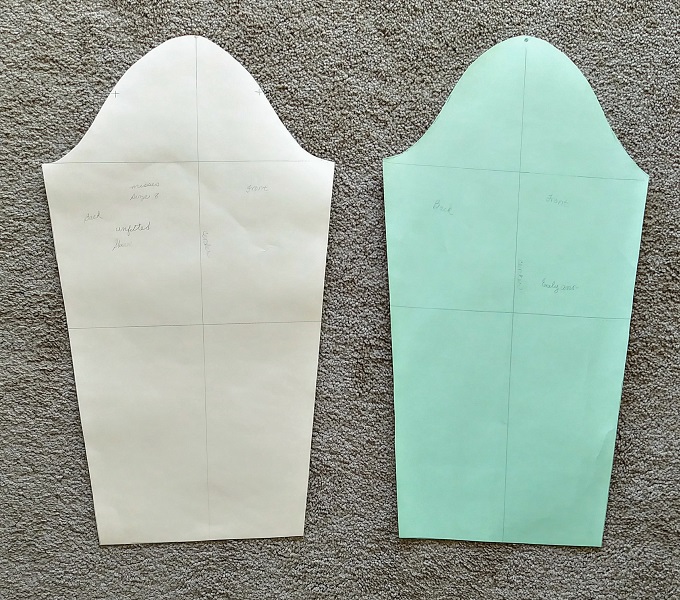
Finished Slopers
The white slopers are for the standard Misses Size 8. The green are mine. You can immediately see where my figure differs from the standard. I have to get a hole puncher. Then the hooks from which to hang the sloper pieces.
Bodice and Skirt Slopers. Misses Size 8 left. Size 8 altered to my figure on right.
Misses Size 8 unfitted sleeve on left. Sleeve adjusted to my figure on right.
Size Misses 4 measurements are used as an example.
Waist=23″
Front Skirt Length=24″ (40″-16″=24″)
Calculate One Fourth of the Waist Measurement: 1/4 of 23″=5 3/4″
Add to the measurement obtained:
1 3/4″ in case of waist measurement from 22 to 26″
2: in the case of waist measurement from 26 to 30″
2 1/4″ in the case of waist measurement from 30 to 34″
2 1/2″ in the case of waist measurement from 34 to 38″
For Misses Size 4 the waist measurement to use is 5 3/4″ + 1 3/4″=7 1/2″
Drafting the Half Circle Skirt Pattern
Make a Right Angle and apply on both sides the result obtained from adding the ease to one fourth of the waist measurement. For Misses size 4 that is 7 1/2″. Refer to pattern illustration. The 7 1/2″ down from the corner are points A-B and A-C.
From B following the A-B line, apply the measurement of the Front Skirt Length. (example, Misses Size 4=24″). Mark the Skirt Length as Point D. Points B-D become Center Front and Center Back of Skirt.
From C following the A-C line, apply in the same manner the measurement of the Front Skirt Length Mark the Skirt Length as Point E. Points C-E are Side Seams of Skirt.
Fold the skirt pattern in half by bring A-B-D over to A-C-E. Crease.
Fold the skirt pattern in another half. Crease.
Open the pattern. The three fold lines represent the rays of the pattern.
From A measure down the A-B distance along the other creases. Mark with a dot. See pattern illustration. Mark each dot F, G, H.
Join points B-F-G-H-C by means of a curve to get the curve of the waistline.
From Points F, G, and H measure down the skirt length along each crease. Mark with a dot. You will mark them I, J, K. Refer to pattern illustration.
Connect D-I-J-K-E for hemline curve.
Cut out the pattern. The grainline can be along B-D when placed on the fold for Center Front and Center Back.
Notes
I advise creating a fitting toile since you may need to adjust the waist at the side seams. Half Circle and Full Circle Skirts cut into the bias. The waistline may stretch a little.
To stabilize the waistline, stay stitch after cutting. Do not hang the skirt up until the waistline is finished with a facing or waistband. Then hang the skirt for 2 days or more so that the drape sets in.
A lapped side zipper is one of my favorite closures. It does not interfere with the drape and the flares.
The measurements used in this pattern are for a Misses Size 4. They are used to provide an example. You will substitute your own measurements to draft your custom pattern.
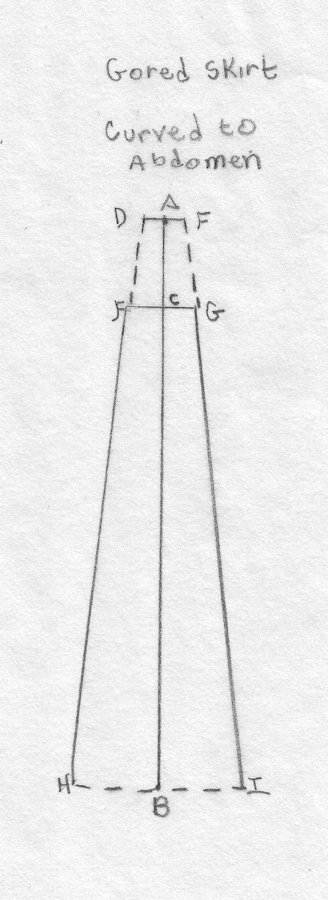
The Flattering Qualities of a Gored Skirt
Gored skirts are flattering to all figure types, especially when the pattern is drafted to your own measurements. This is because the pattern is drafted with a slight curve from waist to abdomen or waist to hipline. After the slight curve, the line becomes straight and ends however many inches from the center of the skirt that you want. The greater the width of the hemline the more flare and movement the gores will have.
The point at which the curve stops is best determined by your own hip and abdomen measurements. In general these are the guidelines:
If your hips are larger than your abdomen let the flare start at the hipline. If this is your body type, then you will use the measurement Waist to Hip line for points A-C.
If your abdomen is larger than your hip let the flare start at the abdomen. In this case you will use the measurement Waist to Abdomen for Point A-C.
The Front Skirt Length used is completely up to you. A length of 27-30” will give you a retro looking skirt reminiscent of the 1930s. To achieve such an effect use the diagram for creating a Trumpet Skirt with flare starting at the hip line.
Style Ease to add to measurements
For a gored skirt add 1-2” of ease for the abdomen or hipline. To the waist add about 1/2″ of ease.
Measurements (used for an example) for a Gored Skirt Pattern
The measurements used here are for a Standard Size Misses 4. They are used as an example. Substitute another Standard Size or your personal measurements.
Waist 24”+ 1/2″ ease=24 ½”
Abdomen Circumference 35”+1” ease=36” OR
Hip Circumference 36”+ 1” ease=37”
Waist to Abdomen 4” OR
Waist to Hip 8”
Front Skirt Length 28”
Drafting Instructions for a six gore skirt
You will be dividing the waist, abodomen or hip measurement by six. If you want to create an 8 gore skirt you will then divide by 8. If you’re up to it you can also create 10 or 12 gore skirts. The number of gores you want will determine the number by which the waist and hip or abdomen are divided.
The diagrams show the completed skirt pattern when the pattern is cut and opened. To draft we will need to draw only half the pattern.
Cut a sheet of pattern paper the front length of the skirt plus 5-6”. The width should be about 20 inches.
6 gored skirt pattern
1. Draw a vertical line equal to the Front Skirt Length. Label A at the top and B at the bottom.
2. Fold the paper along the A-B line. You will draft with the pattern paper fold on your right hand side and the paper towards your left hand side.
3. From A mark down the length of Waist to Abdomen or the Waist to Hipline Measurement. Dot this and mark as point C.
For a Misses Size 4 skirt with flare from Abdomen Point C is 4” down from A.
For a Messes Size 4 skirt with flare from Hipline Point C is 8” down from A.
4. Take the Waist plus ease measurement and divide by the number of gores wanted. In this sample pattern the Size 4 waist plus ease measurement is 24 1/2″. So the calculation for a 6 gore skirt is 24 1/2″ divided by 6 equals 4.08”. Round off to 4”.
5. Apply half of the amount derived from the calculation performed in Step 4 and measure out from Point A. Label Point D.
6. Take the Abdomen plus ease or Hipline plus ease measurement and divide by the number of gores. For a trumpet skirt in Misses Size 4 the Hipline measurement will be used. So the calculation is:
Hipline plus ease is 37 divided by 6 equals 6.16. Round off to 6”.
7. Apply half of the measurement obtained in Step 6 and draw a straight line from Point C. Label Point F.
8. Using the hip curve position the part with the slightest curve against points A and F. Draw a very slight curve. It should not be too pronounced of a curve but not a straight line either.
9. Taking a tape measure, place the start of the tape measure at Point D, continue past Point F and from Point F straight down until the Front Skirt Measurement is reached. Dot this as point H.
10. Connect Point B to H with a slight curve.
Trumpte skirt pattern.
12. If you want a dramatic flare or are drafting the Trumpet Skirt pattern, measure out from Point H 1” or more. The greater the amount you measure out the greater the flare will be at the hemline. I find 1 to 1 1/2″ good enough. Mark the new Point H and redraw the line from F to the new point H.
Connect Point B with the new Point H by a slight curve.
13. Cut out the pattern and open it up. The gored piece is now completed. This represents one gore of the six gore skirt. You will have to cut 6 pieces. To make it simpler, fold the pattern piece again and cut two more pattern pieces if you like.
14. 1/2” seam allowances are added when the fabric is cut.
IMPORTANT: I strongly advise making a muslin to test the fit and amount of ease. This will save you so much effort once the fashion fabric is cut.
Grainline for this pattern
The vertical A-B line can be used as the lengthwise grain line.


You must be logged in to post a comment.