Six Gore Skirt Drafting Instructions
Before drafting this skirt pattern please see How to Take Measurements.
The measurements used in this pattern are for a Misses Size 4. They are used to provide an example. You will substitute your own measurements to draft your custom pattern.
The Flattering Qualities of a Gored Skirt
Gored skirts are flattering to all figure types, especially when the pattern is drafted to your own measurements. This is because the pattern is drafted with a slight curve from waist to abdomen or waist to hipline. After the slight curve, the line becomes straight and ends however many inches from the center of the skirt that you want. The greater the width of the hemline the more flare and movement the gores will have.
The point at which the curve stops is best determined by your own hip and abdomen measurements. In general these are the guidelines:
- If your hips are larger than your abdomen let the flare start at the hipline. If this is your body type, then you will use the measurement Waist to Hip line for points A-C.
- If your abdomen is larger than your hip let the flare start at the abdomen. In this case you will use the measurement Waist to Abdomen for Point A-C.
- The Front Skirt Length used is completely up to you. A length of 27-30” will give you a retro looking skirt reminiscent of the 1930s. To achieve such an effect use the diagram for creating a Trumpet Skirt with flare starting at the hip line.
Style Ease to add to measurements
For a gored skirt add 1-2” of ease for the abdomen or hipline. To the waist add about 1/2″ of ease.
Measurements (used for an example) for a Gored Skirt Pattern
Please see posting “How to take Measurements” if you want to use your personal measurements. To use Standard Size measurements go to my posting with Standard Misses measurements for Sizes 4 through 20.
The measurements used here are for a Standard Size Misses 4. They are used as an example. Substitute another Standard Size or your personal measurements.
- Waist 24”+ 1/2″ ease=24 ½”
- Abdomen Circumference 35”+1” ease=36”
OR - Hip Circumference 36”+ 1” ease=37”
- Waist to Abdomen 4”
OR - Waist to Hip 8”
- Front Skirt Length 28”
Drafting Instructions for a six gore skirt
You will be dividing the waist, abodomen or hip measurement by six. If you want to create an 8 gore skirt you will then divide by 8. If you’re up to it you can also create 10 or 12 gore skirts. The number of gores you want will determine the number by which the waist and hip or abdomen are divided.
The diagrams show the completed skirt pattern when the pattern is cut and opened. To draft we will need to draw only half the pattern.
Cut a sheet of pattern paper the front length of the skirt plus 5-6”. The width should be about 20 inches.
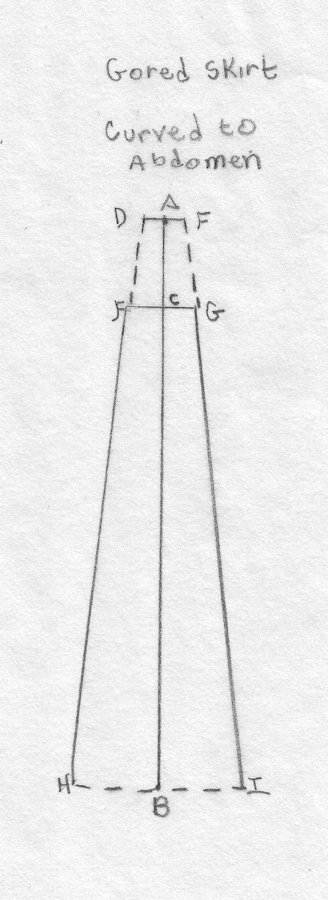
1. Draw a vertical line equal to the Front Skirt Length. Label A at the top and B at the bottom.
2. Fold the paper along the A-B line. You will draft with the pattern paper fold on your right hand side and the paper towards your left hand side.
3. From A mark down the length of Waist to Abdomen or the Waist to Hipline Measurement. Dot this and mark as point C.
For a Misses Size 4 skirt with flare from Abdomen Point C is 4” down from A.
For a Messes Size 4 skirt with flare from Hipline Point C is 8” down from A.
4. Take the Waist plus ease measurement and divide by the number of gores wanted. In this sample pattern the Size 4 waist plus ease measurement is 24 1/2″. So the calculation for a 6 gore skirt is 24 1/2″ divided by 6 equals 4.08”. Round off to 4”.
5. Apply half of the amount derived from the calculation performed in Step 4 and measure out from Point A. Label Point D.
6. Take the Abdomen plus ease or Hipline plus ease measurement and divide by the number of gores. For a trumpet skirt in Misses Size 4 the Hipline measurement will be used. So the calculation is:
Hipline plus ease is 37 divided by 6 equals 6.16. Round off to 6”.
7. Apply half of the measurement obtained in Step 6 and draw a straight line from Point C. Label Point F.
8. Using the hip curve position the part with the slightest curve against points A and F. Draw a very slight curve. It should not be too pronounced of a curve but not a straight line either.
9. Taking a tape measure, place the start of the tape measure at Point D, continue past Point F and from Point F straight down until the Front Skirt Measurement is reached. Dot this as point H.
10. Connect Point B to H with a slight curve.

12. If you want a dramatic flare or are drafting the Trumpet Skirt pattern, measure out from Point H 1” or more. The greater the amount you measure out the greater the flare will be at the hemline. I find 1 to 1 1/2″ good enough. Mark the new Point H and redraw the line from F to the new point H.
Connect Point B with the new Point H by a slight curve.
13. Cut out the pattern and open it up. The gored piece is now completed. This represents one gore of the six gore skirt. You will have to cut 6 pieces. To make it simpler, fold the pattern piece again and cut two more pattern pieces if you like.
14. 1/2” seam allowances are added when the fabric is cut.
IMPORTANT: I strongly advise making a muslin to test the fit and amount of ease. This will save you so much effort once the fashion fabric is cut.
Grainline for this pattern
The vertical A-B line can be used as the lengthwise grain line.

One thought on “How to draft a pattern for a gored skirt”
Comments are closed.