Dressmaking Past & Present is a new feature at Pour Moi. Fashion History provides us with inspirations for our personal style. Understanding and learning about techniques used in the past and the present helps us find a variety of methods for possible use in our own projects.
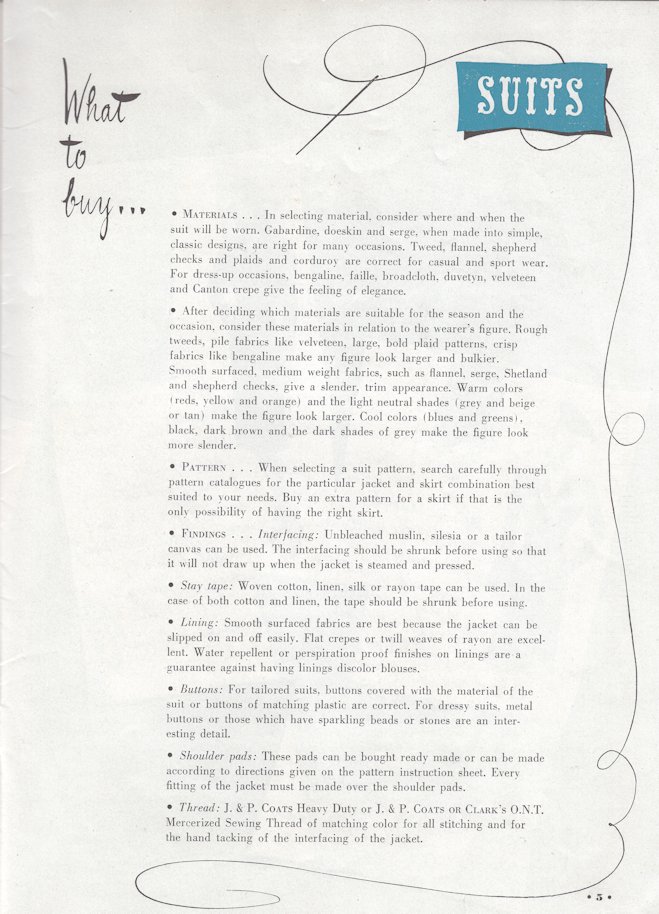
This week, I put up some scans from a small booklet published by Coats & Clark in the 1940s. Dressmaker’s Suits have some tailoring but not to the extent that a fully tailored suit does. Here are some recommendations from the booklet that can help the dressmaker achieve the look in each illustration.
“Tailoring” by Coats & Clark – Tips for sewing a dressmaker’s suit
Last Spring I began development of a walking skirt and short dolman sleeve blouse based on two vintage pattern illustrations. I studied the wardrobe basics of 1940s everyday women’s wear. Clothing in the early to mid-1940s had to be functional. Fabrics, threads and notions were not easily available due to rationing. All resources, including textiles, were prioritized for the use by the troops and initiatives to move the American people towards victory in the war. This meant great sacrifice and rationing of many necessities.
Americans received ration coupons for clothing, food, shoes and other items needed for daily life. To get a new blouse, for example, so many ration book coupons had to be used for the purchase. One had to be very careful with how they used their allotment of coupons. When they were gone, there was a wait until the government issued new ration books.
This is why many everday clothes of the WWII period and shortly thereafter had a minimum of details. Everything had to be functional. Because of this simplicity, it was important to buy clothes that fit well and were well made. They had to last for a long time.
Development of the outfit
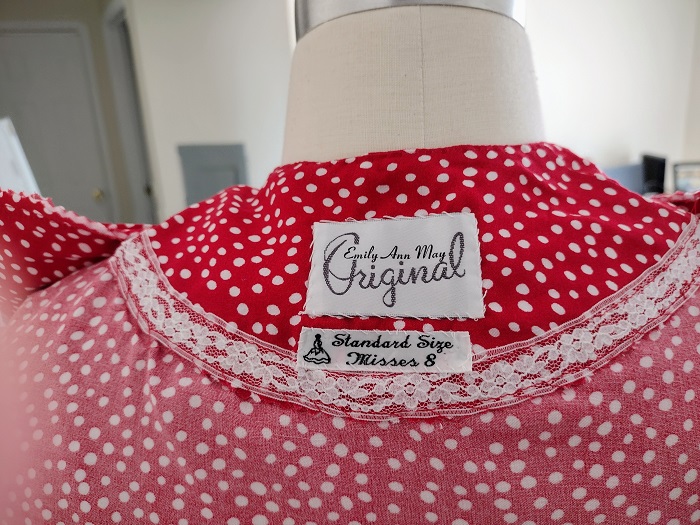
I took inspiration from two 1940s pattern envelope illustrations. The pattern was developed using a Misses Size 8 sloper developed through Precision Draping. Further draping was done on the basic blouse to develop the dolman sleeves.
The blouse features a shoulder dart, short dolman sleeves and a round neckline. As I developed the pattern and tested the toile, I learned that I needed a shoulder pad to support the shape of the sleeve on the shoulder line. Omitting the shoulder pad caused the sleeve to droop and the entire blouse looked tired. My solution was to purchase very thin, regular set-in sleeve shoulder pads and use them for the blouse. I had to experiment with the placement until they looked just right. In the end, the shoulder pad extended about 1/4″ past the shoulder line. The shoulder pads are about 1/4″ thick.
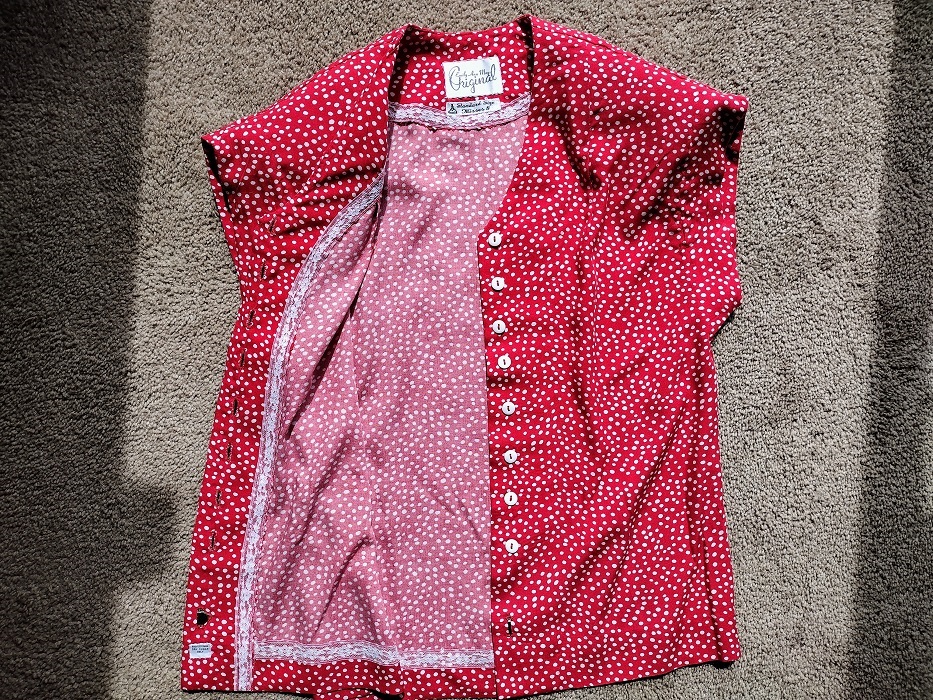
I lowered the neckline of the blouse so I could wear a locket or chocker with the blouse if I wanted to. I selected a very silky, dotted print. To create some visual interest I used 1/2 wide white buttons sewn on with red thread. The contrast worked with the red background and the white dots on the fabric.
I think that 1940 walking skirts are much more figure flattering than pencil skirts. Most 1940s skirts curve over the hip and slightly extend out from there to the hemline. This is not the cookie-cutter A-Line skirt of the 1960s. This is more a slim skirt with a nice built in movement. The skirt moves very nicely when walking. I added kick pleats in front and back to get the most movement out of my skirt.
Fabrics, sewing and finishing details
The front facing of the blouse is in one with the blouse front. A separate facing piece is used for the back. The fabric is very slippery and needed gentle shaping for the neckline and blouse front. I cut the cotton batiste used for the interfacing on the true bias. This worked well with the fluid properties of the fabric. Seams were stitched together, pinked and then stitched again away from the edge. All seams were pressed to the back. Wrights Flexi-Lace was used to finish facing, sleeve hem and blouse hem. The entire facing was slant stitched by hand to the blouse using a fine hand sewing needle and small stitches that were not too tight.
The bias cut batiste interfacing has 1/2″ extra past center front. This creates a soft roll on the front of the blouse. The sleeve edges have a 3/8″ bias cut interfacing that extends past the hemline to create a soft fold when hemmed. The sleeves also are finished with Wrights Flexi-Lace.
The skirtis a lightweight blend that needed body to support the kick pleats. For this reason I choose to underline the skirt. Seams were pinked and straight stitched 1/8″ from the edge. The edges around each kick pleat and the hem are finished with Wrights Flexi-Lace. To add some visual interest I backed the kick pleat insert with the blouse fabric. On the back of the skirt I placed the size and designer labels on the kick pleat. The kick pleat is catched stitched to the underlining at the top.
The skirt has a side lapped zipper application that is hand stitched into place. The waistband uses Banroll to maintain the shape.
The dolman sleeve has a low armhole opening. This blouse is very comfortable but the bra shows just a little if the arm is raised. If this is a problem a camisole or slip can offer some more coverage. Personally this does not matter to me, as I do not think that many people are going to be looking under my arms and into my blouse.
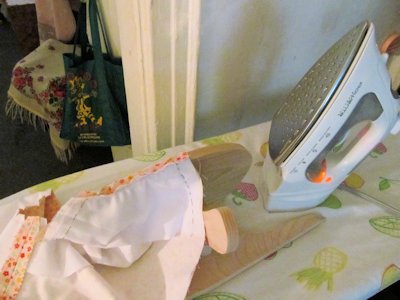
Since the fabric was very slippery, easing the facing into the proper position created problems. I had to place the blouse inside out on the dress form. Then I pinned and basted the facing into place and after that the hem.
The finishing touch is a custom made label and size label. This always gives me a great sense of accomplishment. I recommend getting your own custom labels for your own creations.
Photos of me wearing the Linda skirt and blouse
Linda was a popular name for girls in the 1940s. I chose this name because it conveys a sense of the everyday which this outfit is meant to do. The emphasis is on fit and a flattering result. I am delighted with this vintage inspired outfit because it can work today and any day in any year.
The finished pattern diagram is available in this posting. It may be copied and sized in your graphics program. I release the pattern into the commons for anyone to use. Always test the pattern and make adjustments where needed.
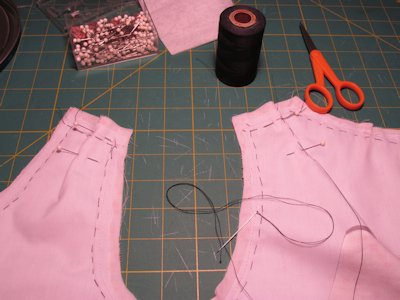
The neckline and armholes of the 1950s styled Dirndl Dress were finished with an all-in-one facing. The instructions I followed are from Reader’s Digest Complete Guide to Sewing, seventh printing, July 1980.
Preparation
I cut the interfacing for the neckline and the armholes separately. The interfacing can be cut on the bias to give the armholes and neckline a little more flexibility when the facing is turned to the inside. If you do this be sure to stay stitch the armholes and neckline of the dress after basting the interfacing to the wrong side of the bodice.
Pin and baste interfacing by hand to the bodice pieces. Do not sew the side seams of the bodice yet.
Sewing the all-in-one facing
1. Pin and hand baste side seams of bodice front and back pieces. Machine stitch. Remove the basting threads. Steam press side seams open.
2. Pin into place small tucks at the mid-point on the shoulder lines of front and back bodice. Hand baste into place.
3. Pin, baste and stitch side seams of facing. Remove basting threads. Steam press side seams of facing open.
Finish lower edge. I used a straight stitch to sew flexilace into place at the top edge. Then I used a zig-zag stitch to sew the edges together.
4. With right sides together, pin the facing to the bodice. Shoulder lines are not stiched yet. The bodice remains flat. Baste by hand up to the intersection of armhole and shoulderline and intersection of neckline with shoulderline. The stitching stops slightly before the seamline of the shoulder. Machine stitch.
Remove basting threads.
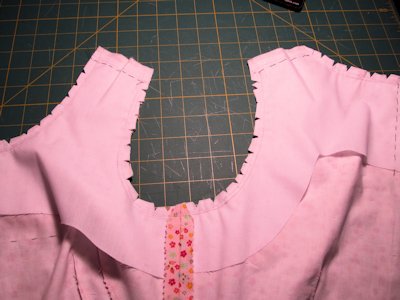
5. Clip and notch armholes and neckline.
Finger press seams open.
6. Use a Tailor’s Curve to steam press seams of armholes and necklines open.
Turn facing to inside of garment.
7. It is time to understitch the facings so they do not roll and become exposed on the outside. Make sure the seam is turned towards the facing before stitching.
Instead of machine stitching the facing along the armhole and neckline on the facing, I hand sewed it into place using a prick stitch.
8. The facing is almost complete! Make sure it lies flat. Keep the tucks at the shoulder in place.
9. Turn back facing at shoulder lines. Release the tucks and work the ease into each shoulder line. Pin front and back shoulder lines together. Hand baste into place. Stitch.
Remove basting stitches. Steam press shoulder seams flat. Then press them through the opening. Baste the facing over then slip stitch together.
10. Tack the facing in place at the side seams.
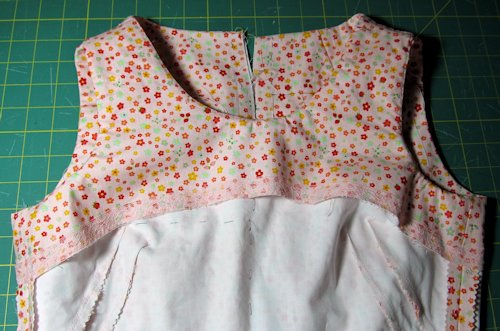
Place the completed bodice onto a dress form to evaluate the results. The facing should rest secure on the bodice and not show on the outside.
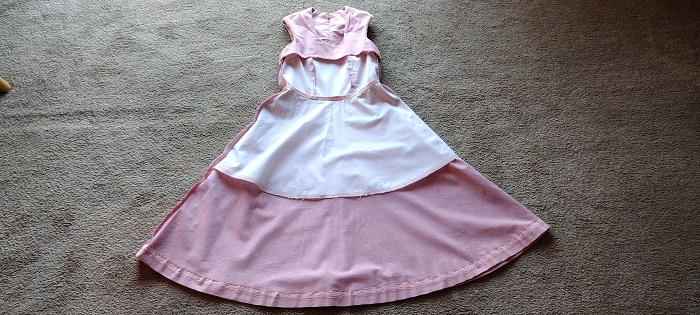
I always wanted a princess seamed dress or overblouse. Now that I have fulfilled the realization of my idea I have to say that it did not fulfill all my expectations. It did turn into a good learning experience about fit, style lines and individual body shapes.
Photos of the Jumper
Background of the pattern
The pattern was based on the Misses Size 8 sloper developed using the Precision Draping technique created by Nellie Weymouth Link. The technique is detailed in a reprint of the 1947 book through Amazon and other booksellers online.
I altered the pattern after fitting the toile on myself and making adjustments.
Expectations vs. Reality
Originally I envisioned the princess seam over my bustline to be very flattering. Once it was finished I did not care for the look on myself.
I have sloping shoulders. This causes the apex of my bustline to be lower than a standard size. The result is that the princess seam curves a bit lower, emphasizing both my bustline and narrow, sloping shoulders. I straightened the curve on the pattern, but that did not make much difference.
I offer this experience as a way for others to learn what makes the most flattering fit for their own body type.
I love the flared skirt of the jumper, the neckline and the armholes. If I were to make this again I would use a vertical dart below the bust or perhaps two French darts in the side seam of the bodice front.
Sewing Techniques
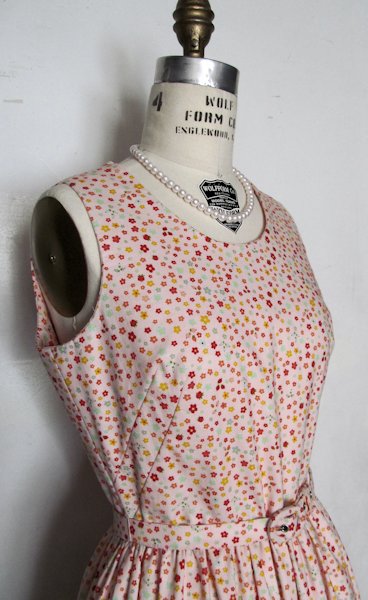
The jumper is made from 100% cotton chambray I ordered from Mood Fabrics. The underlining is cotton batiste.
I underlined the bodice. The skirt was underlined from waist to a few inches below the waistline. I wanted the fabric to have less transparency. The underlining also served as an anchor to the zipper.
Hidden Zipper: A 1960s Couture Technique
I used the instructions for the hidden zipper sewing technique detailed in Couture Sewing by Claire Shaeffer.
The zipper must be sewn to garment pieces that are underlined. This is because the finished seam is anchored to the underlining with catch stitches or fell stitches.
The resulting zipper is a little like an invisible zipper but less rigid.
Seam Finishes
I cut the seams wider than usual because the fabric frayed. Edges were pinked and zig-zagged for durability.
Other Finishes
The all-in-one facing and hemline were finished with Wright’s Flexi-Lace. I used the Flexi-Lace for the waistline stay, too.
In this posting I share some of the fitting and sewing techniques I used to refine my favorite denim sheath skirt. The skirt is made with a bottom weight 100% cotton denim by Kauffman. The fabric was laundered and dried prior to marking, cutting and sewing.
The pattern was developed entirely through draping in cotton muslin.
The skirt had several parts of the construction done by hand. The blouse was purchased online.
Fit is Everything!
To give the skirt more style ease I had to add extra width at waist, hip and hemline. Some sewing books say extra width can be added at the side seam. I found that it is better to open the pattern between the second dart and the side seam. You measure the mid-way point between the dart and the side seam. Draw a vertical line from waist to hem. Then open 1/4 of the total amount of style ease needed. This alteration is the same for front and back of the basic sheath skirt pattern.
In the photo of the back pattern piece for the skirt you can see the place where the cut was made and extra paper added to the pattern between the second dart and the side seam.
Note: The pattern for the skirt was made using Precision Draping by Nellie Weymouth Link. I gained weight since the time the original drape and pattern was made. This necessitated the need for the alteration.
Dressmaker Finishes for a Refined Look
A slot zipper application was used. I followed the hand sewing technique detailed in Couture Sewing by Claire Schaeffer. Instead of using a prick stitch or back stitch, the zipper is sewed into the seam using tiny running stitches. To further secure the zipper in place, the zipper tape is fell stitched only to the side seams, at the edges. The zipper stop is covered by a lightweight piece of lining fabric. I used a small piece of lace hem tape instead.
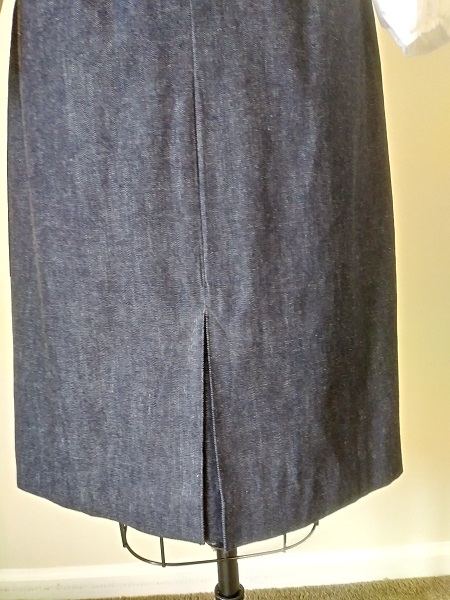
A kick pleat with insert was made in.center back seam. It provides ease of movement as well as a finishing touch. The top of the kick pleat is stitched into place using a triangular shape. A kick pleat is more refined than a high slit at center back of the skirt. That is why this skirt works well for casual dress days at work or an outside meeting with business associates.
All seams were pinked and then edge stitched. Wrights Flexi-Lace tape provided a finish for the hem and kickpleat.
1950s Pat Perkins Day/HousedressMy 2021 Design based on the Pat Perkins dress
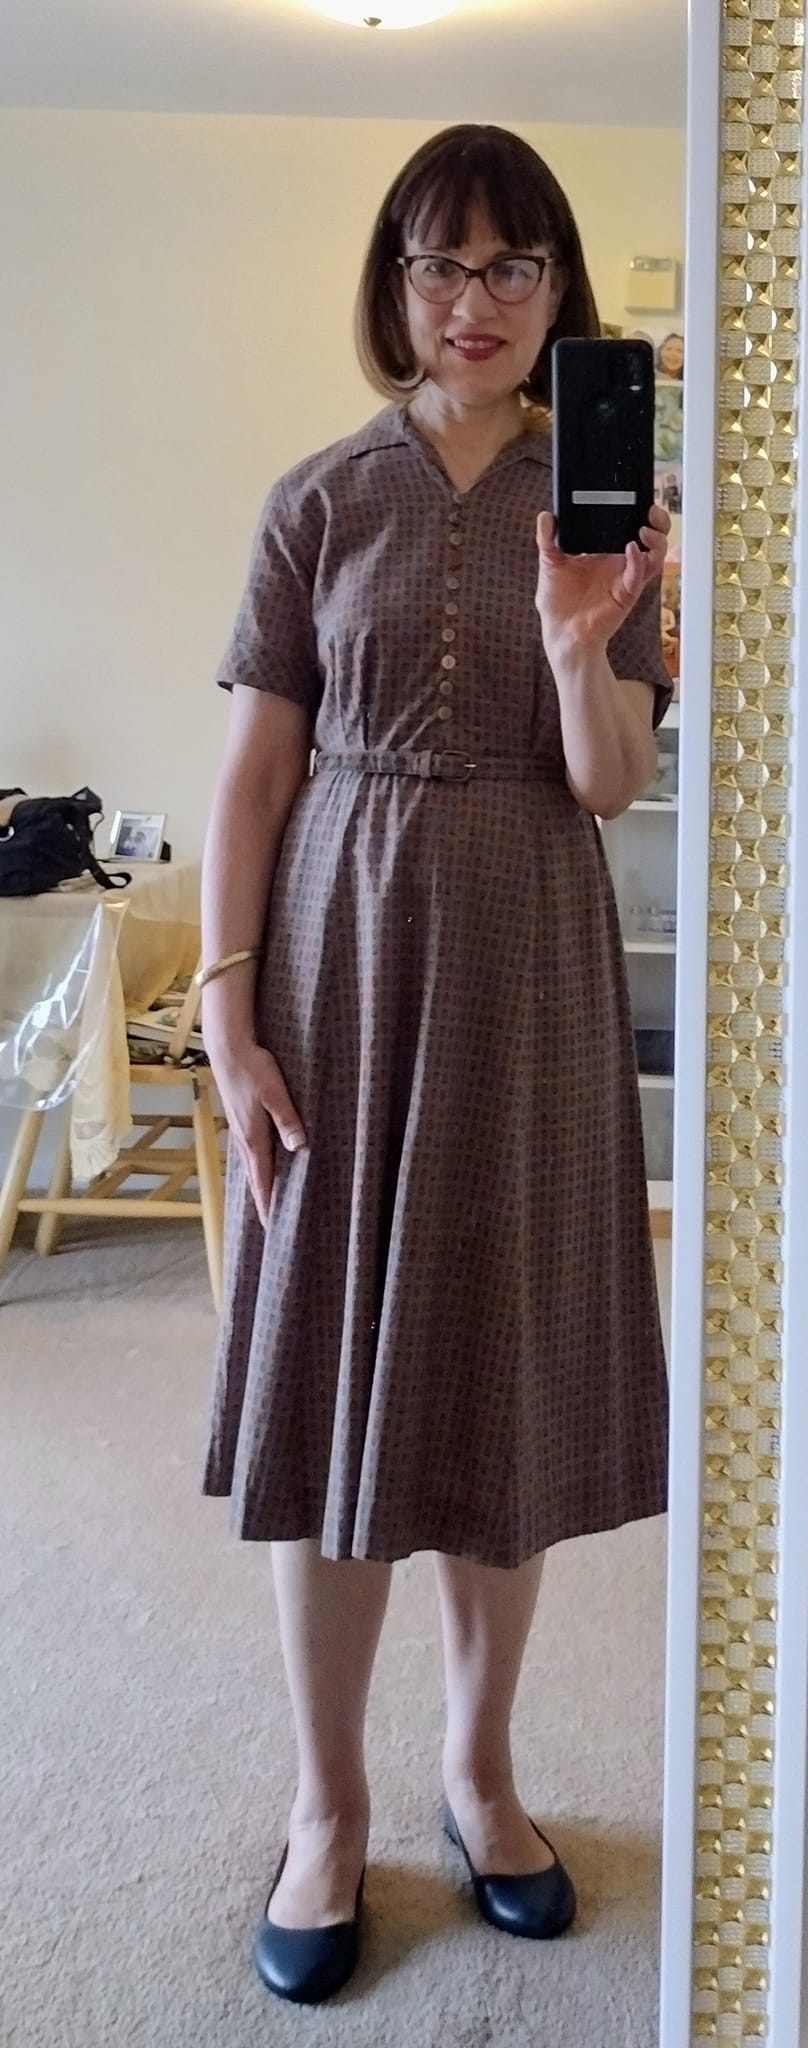
Please note: I forgot to button the second button on the Alice Elizabeth dress when putting it on for the photo. Also my version of the dress was created for a Misses Size 8. I did not alter the pattern or the dress because this is part of my portfolio, not my personal wardrobe.
The Pat Perkins dress is a little short in the waist for me. otherwise the fit is very good. There is a 2″ style ease at the waistlisne which makes putting on the dress very easy. I wore the dress all morning and found the side zipper did not bother me at all. Going forward, I will use a lapped zipper in he side seam for my next 1950s style dress. I think I made too much work for myself going with snaps from waist to knee.
The side seam zipper lies flat. It does not affect the hip line or bodice side seam. I think this is because the fabric is a lightweight cotton. This was an amazing purchase, The dress is in such good condition. I feel so fortunate to have it both to wear and use as a study piece for learning more about vintage garment construction.
Further consideration of my plans for my next project is needed. The sketch of the chambray shirtwaist dress expresses my idea. However, the details I had envisioned must be changed.
I had planned on having in-seam buttonholes. I have been wanting to try this kind of buttonhole for a long time. I want to see how it will work on light to medium weight fabrics. As I thought about my shirtwaist dress I can see that having a seam along center front will cut into the middle gore of the skirt front. This will add extra weight and interfere with the flare. I plan a six gore skirt for the dress.
Possible solutions for new design details
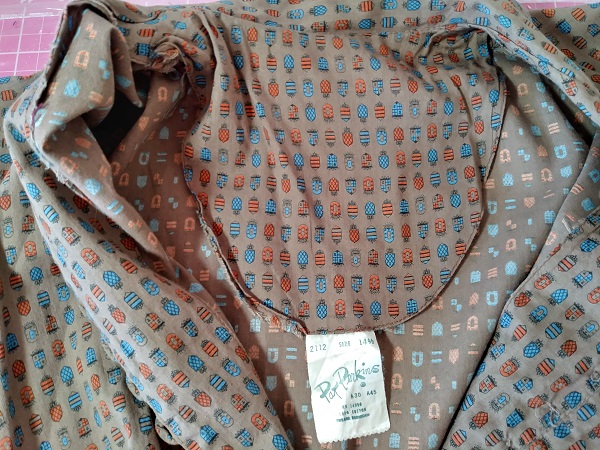
I decided to analyze the construction details of a Pat Perkins everyday dress I bought on Etsy. Pat Perkins was the name of a dress manufacturer in the 1950s. They provided some of the dresses worn by actress Audrey Meadows in a popular sitcom, “The Honeymooners”.
I found the solution to keeping the flares of the skirt undisturbed. I will have to install a lapped zipper into the side seam. I will use the same treatment as used in the Pat Perkins dress. This means I can use in-seam buttonholes for the dress. However, the buttons will only be used on the bodice. Having a size zipper will provide the means for ease in putting the dress on or off.
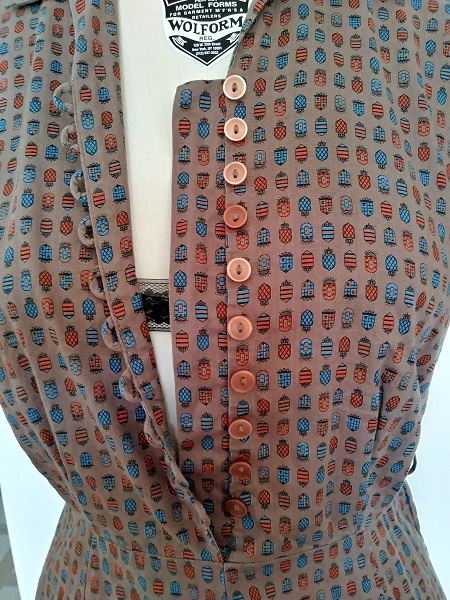
Pat Perkins Everyday Dress circa 1950s
The dress has a fitted bodice with two vertical tucks on each side at the front. The short, unfitted sleeves have a self cuff that turns up from the inside. The collar is similar to a blouse collar and has very little stand. The back bodice has two very small tucks on each side.
The skirt i seven gores: 4 in front and 3 in back. There is a slight flare in each panel. The panel at center front has a seam. At the back there is no seam in the center skirt panel.
To make the dress easy to put on and off, there is about 3″ of style ease at the waist. The fit near the chest and bust has a little less style ease. This will help me adjust my pattern after using the sloper to trace the basic pattern.
The zipper is machine stitched into the left side seam. There is an underlap of fabric that provides body for the zipper and protects the wearer from feeling the zipper teeth. I plan to do the zipper application by hand and use a lightweight nylon zipper. The one in the original dress is metal.
The dress closes with self fabric button loops at center front. An underlap on the left side of the front bodice provides support.
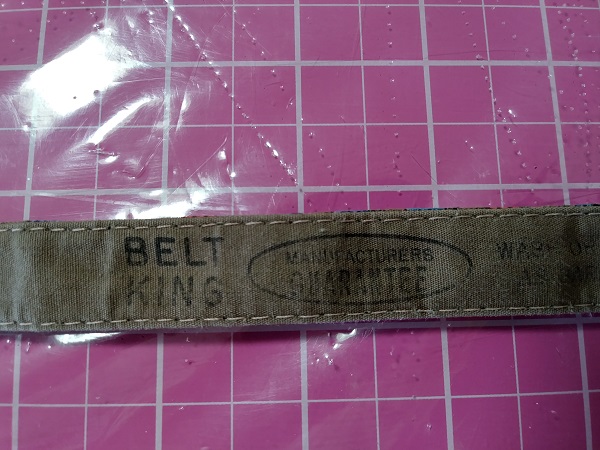
The belt holes are not reinforced with any stitching. No eyelets were used. The buckle is covered with the fashion fabric. Narrow loops at the side seams are the only support to hold the belt in place. The backing has the stamp “Belt King”. I plan to use a belt kit and eyelets. At the side seams I usually use thread loops.
To lend a touch of support to the back of the dress a long facing is used as part of the collar treatment. I do not plan to use this neckline finishing since my dress will have a yoke.
The seams are not finished. No pinking, no edge stitching. The waistline seam is pressed down rather than up. The hem was turned twice and looks to be hand finished.
Hand worked buttonholes are an acquired talent. They take more practice to become good at. There is a benefit to using them. First it is the mark of a custom made garment. It sets the garment apart from mass produced clothing. There is also more control in the stitching and less risk of stretching or fraying the fashion fabric.
Here is how I make my handmade buttonholes.
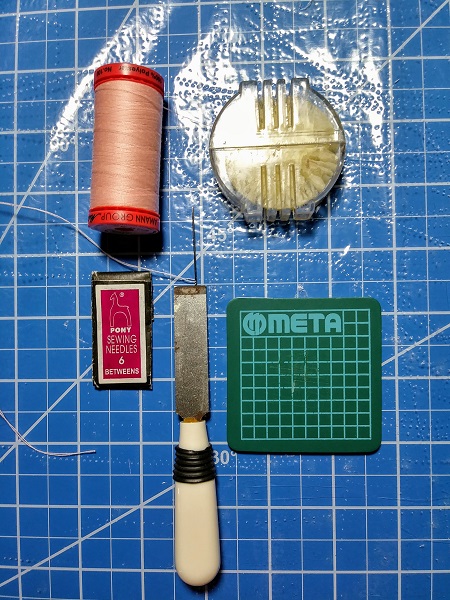
Step 1: Assemble your tools. I use a double strand of poly cotton thread. To prevent tangling, the thread is coated with beeswax. A short sewing needle works best. Experiment to find the size best for you. I use #6 Betweens. To cut the buttonhole cutter set (little mat, blade shown. keyhole punch not shown).
Step 2: Practice first! Use however many layers of fabric as will be in the finished garment. For this practice piece I have two layers of fashion fabric (garment and facing) and interfacing (not shown).
I pressed a line to positioning the cutting line for the button hole. On the finished garment I marked the line using white erasable chalk on the inside of the garment. Then I machine stitched a long line of basting stitches.
The beginning and end of the buttonholes are marked in pencil on the practice piece. On the finished garment they are measured and marked with pins along the line with basting stitches (button and buttonhole placement line). Basting thread is used to mark these points and the pins are removed.
To calculate the length of the finished buttonhole. Measure the width of the button and add it to the height. To this result add 1/8″ for the bar tack at each end. A test buttonhole is the best way to make sure the measurement is correct.
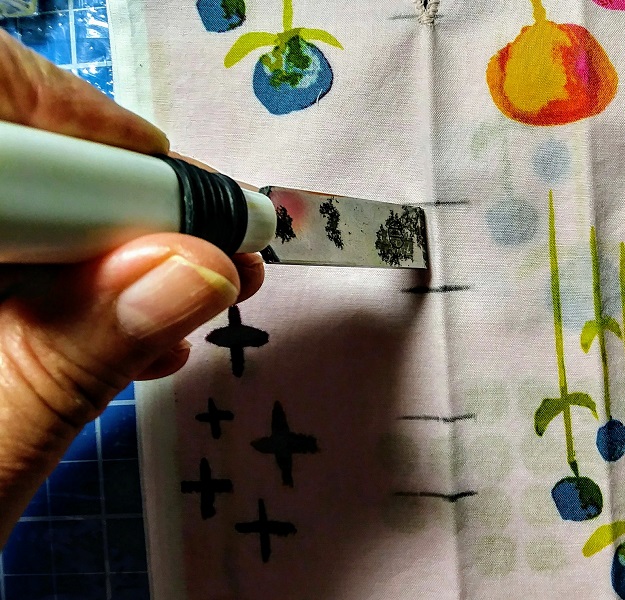
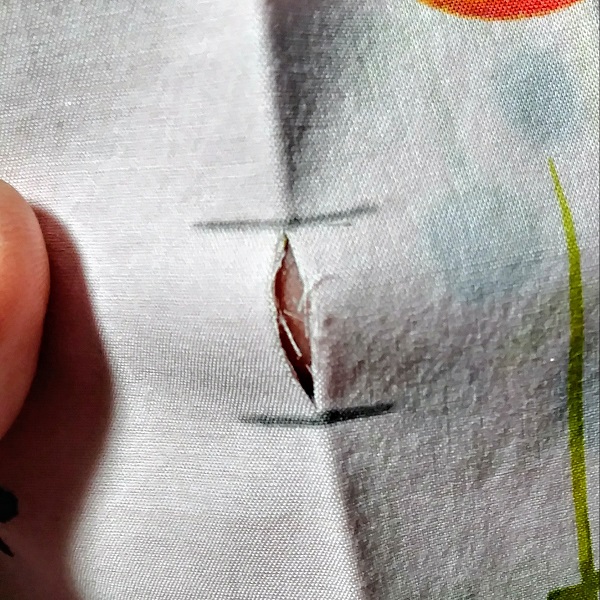
Step 3: The little mat is placed beneath the garment where the buttonhole will be. The garment is placed on top. The blade is positioned along the pressed line (or basting stitched line) and pressed firmly down. A neat opening results. If needed use a small scissor to open the buttonhole a little more.
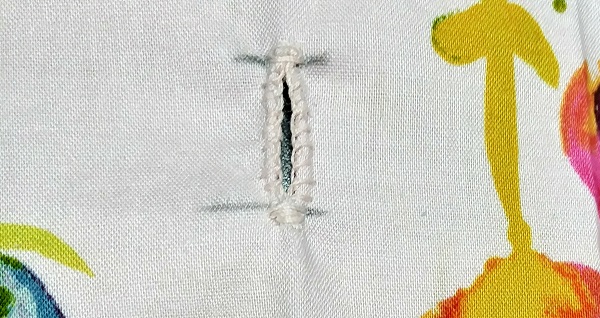
Steps 4 and 5: Using a waxed double strand of thread, first overcast the slit all around. Knot and cut from the wrong side. Wax another double strand of thread. Use a buttonhole stitch to work around the buttonhole. When you come to each end, make the bar tack.
Step 6: Test your buttonhole for length.
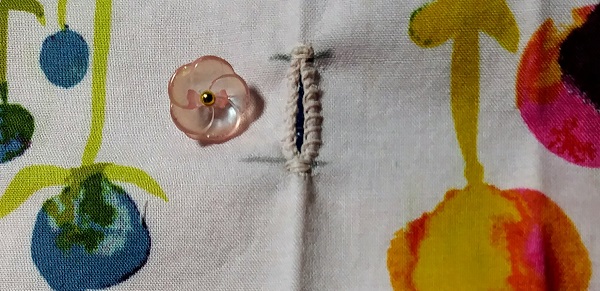
Step 7: Test the workability of your buttonhole. It should go through the buttonhole easily. Sew a button to another piece of fabric and they pass through the buttonhole again. Move the fabric around. The button should stay securely closed. It should not pop out of the buttonhole.
Some people like to steam press the thread after waxing it and before hand stitching their buttonholes. I have had mixed results with this technique. Sometimes the thread is too brittle and breaks. It will all depend on what kind of fashion fabric you use and how thick the layers are.


You must be logged in to post a comment.