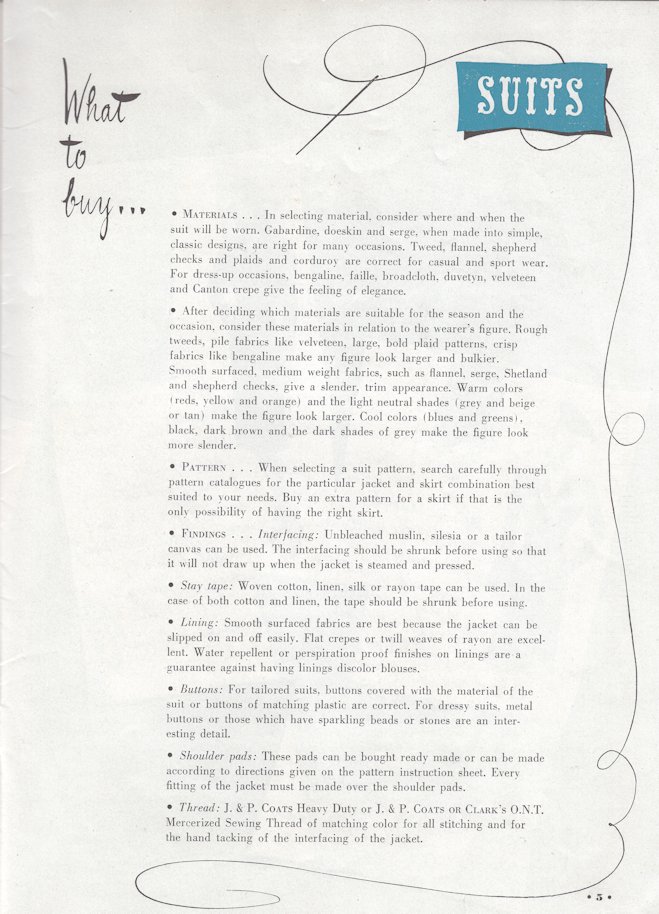
Dressmaking Past & Present is a new feature at Pour Moi. Fashion History provides us with inspirations for our personal style. Understanding and learning about techniques used in the past and the present helps us find a variety of methods for possible use in our own projects.
This week, I put up some scans from a small booklet published by Coats & Clark in the 1940s. Dressmaker’s Suits have some tailoring but not to the extent that a fully tailored suit does. Here are some recommendations from the booklet that can help the dressmaker achieve the look in each illustration.
“Tailoring” by Coats & Clark – Tips for sewing a dressmaker’s suit
A clutch purse never goes out of style. It can be used for a formal occasion. Or, it can be popped into a larger tote bag when going out for the day and come out later for use. Clutch purses are not meant to hold everything. Just what is needed for an afternoon or evening out: keys, wallet, ID card, compact, comb, lipstick and cellphone are enough.
When I lived in Bay Ridge, a neighbhorhood in Brooklyn, I frequented a craft shop that found a treasure trove of old crochet patterns in the basement of the shop. These pattern booklets were put in a large basket for customers to take . I was very fortunate to find ones that I really liked. Most of the booklets were from the 1970s. I went deeper into the basket and found 3 books. One from the 1960s and two from a period spanning 1940s-1950s.
Last Spring I began development of a walking skirt and short dolman sleeve blouse based on two vintage pattern illustrations. I studied the wardrobe basics of 1940s everyday women’s wear. Clothing in the early to mid-1940s had to be functional. Fabrics, threads and notions were not easily available due to rationing. All resources, including textiles, were prioritized for the use by the troops and initiatives to move the American people towards victory in the war. This meant great sacrifice and rationing of many necessities.
Americans received ration coupons for clothing, food, shoes and other items needed for daily life. To get a new blouse, for example, so many ration book coupons had to be used for the purchase. One had to be very careful with how they used their allotment of coupons. When they were gone, there was a wait until the government issued new ration books.
This is why many everday clothes of the WWII period and shortly thereafter had a minimum of details. Everything had to be functional. Because of this simplicity, it was important to buy clothes that fit well and were well made. They had to last for a long time.
Development of the outfit
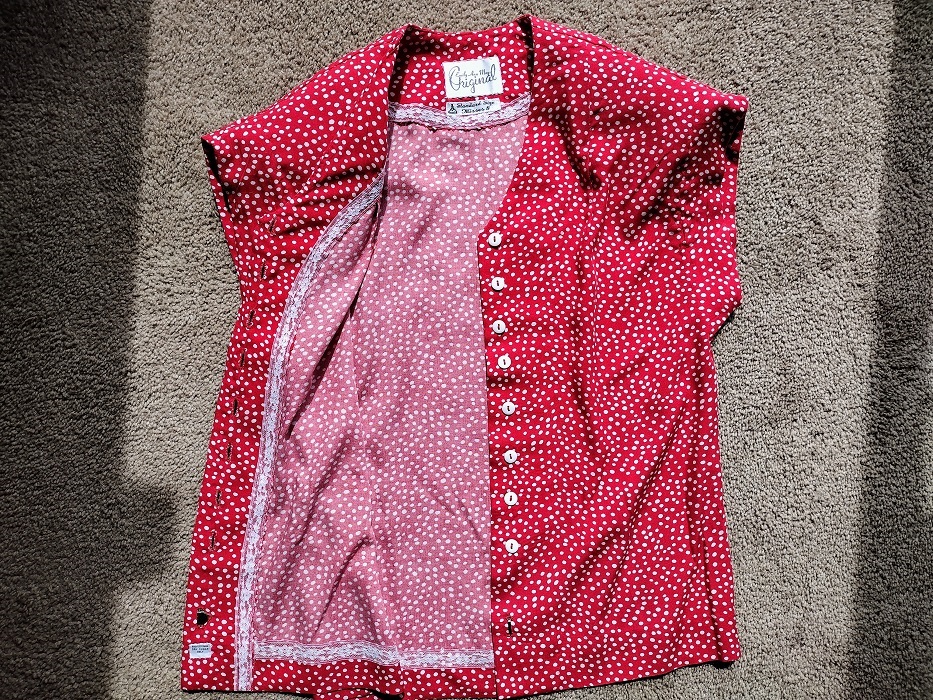
I took inspiration from two 1940s pattern envelope illustrations. The pattern was developed using a Misses Size 8 sloper developed through Precision Draping. Further draping was done on the basic blouse to develop the dolman sleeves.
The blouse features a shoulder dart, short dolman sleeves and a round neckline. As I developed the pattern and tested the toile, I learned that I needed a shoulder pad to support the shape of the sleeve on the shoulder line. Omitting the shoulder pad caused the sleeve to droop and the entire blouse looked tired. My solution was to purchase very thin, regular set-in sleeve shoulder pads and use them for the blouse. I had to experiment with the placement until they looked just right. In the end, the shoulder pad extended about 1/4″ past the shoulder line. The shoulder pads are about 1/4″ thick.
I lowered the neckline of the blouse so I could wear a locket or chocker with the blouse if I wanted to. I selected a very silky, dotted print. To create some visual interest I used 1/2 wide white buttons sewn on with red thread. The contrast worked with the red background and the white dots on the fabric.
I think that 1940 walking skirts are much more figure flattering than pencil skirts. Most 1940s skirts curve over the hip and slightly extend out from there to the hemline. This is not the cookie-cutter A-Line skirt of the 1960s. This is more a slim skirt with a nice built in movement. The skirt moves very nicely when walking. I added kick pleats in front and back to get the most movement out of my skirt.
Fabrics, sewing and finishing details
The front facing of the blouse is in one with the blouse front. A separate facing piece is used for the back. The fabric is very slippery and needed gentle shaping for the neckline and blouse front. I cut the cotton batiste used for the interfacing on the true bias. This worked well with the fluid properties of the fabric. Seams were stitched together, pinked and then stitched again away from the edge. All seams were pressed to the back. Wrights Flexi-Lace was used to finish facing, sleeve hem and blouse hem. The entire facing was slant stitched by hand to the blouse using a fine hand sewing needle and small stitches that were not too tight.
The bias cut batiste interfacing has 1/2″ extra past center front. This creates a soft roll on the front of the blouse. The sleeve edges have a 3/8″ bias cut interfacing that extends past the hemline to create a soft fold when hemmed. The sleeves also are finished with Wrights Flexi-Lace.
The skirtis a lightweight blend that needed body to support the kick pleats. For this reason I choose to underline the skirt. Seams were pinked and straight stitched 1/8″ from the edge. The edges around each kick pleat and the hem are finished with Wrights Flexi-Lace. To add some visual interest I backed the kick pleat insert with the blouse fabric. On the back of the skirt I placed the size and designer labels on the kick pleat. The kick pleat is catched stitched to the underlining at the top.
The skirt has a side lapped zipper application that is hand stitched into place. The waistband uses Banroll to maintain the shape.
The dolman sleeve has a low armhole opening. This blouse is very comfortable but the bra shows just a little if the arm is raised. If this is a problem a camisole or slip can offer some more coverage. Personally this does not matter to me, as I do not think that many people are going to be looking under my arms and into my blouse.
Since the fabric was very slippery, easing the facing into the proper position created problems. I had to place the blouse inside out on the dress form. Then I pinned and basted the facing into place and after that the hem.
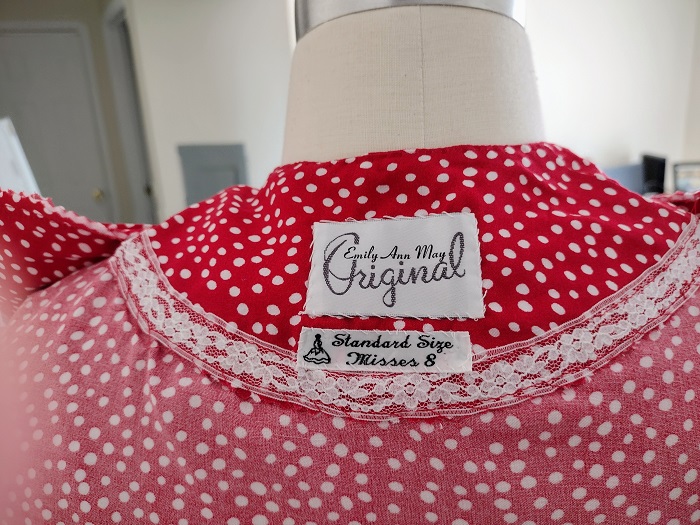
The finishing touch is a custom made label and size label. This always gives me a great sense of accomplishment. I recommend getting your own custom labels for your own creations.
Photos of me wearing the Linda skirt and blouse
Linda was a popular name for girls in the 1940s. I chose this name because it conveys a sense of the everyday which this outfit is meant to do. The emphasis is on fit and a flattering result. I am delighted with this vintage inspired outfit because it can work today and any day in any year.
The finished pattern diagram is available in this posting. It may be copied and sized in your graphics program. I release the pattern into the commons for anyone to use. Always test the pattern and make adjustments where needed.
It is possible to create a retro inspired look interpreted through your own style sensibility. You do not even need to have authentic vintage fashions and accessories to do this. What you do need is a sense of adventure and a keen eye. These can be applied when evaluating the clothes and accessories you already have or shop for. The goal is to get a sense of feeling and look from the vintage fashion. Then express in such a way that it’s a combo of something old and something new!
The Look I took inspiration from
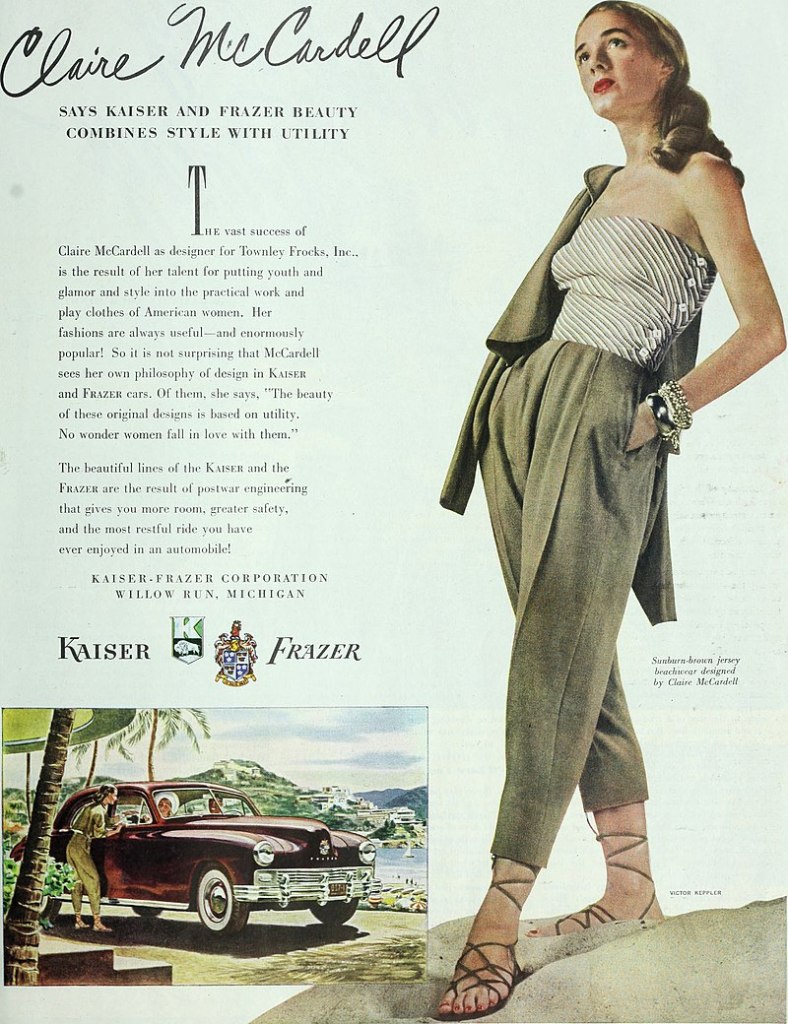
Claire McCardell was an American designer who had her peak popularity during the 1940s and 1950s. She designed comfortable fashions aimed at the American woman and her active lifestyle. Claire worked with knitwear as well as wovens. Her goal was to make elegance something that could be achieved in the simple pieces that make up a capsule wardrobe. She taught her followers how to do this in her book What shall I wear? By having comfortable, well fitting coordinates a woman was already on her way to elegant dressing every day of the week and any time of the day. Colors that worked well together and flattered the woman were important. Individual expression was achieved through beautiful accessories.
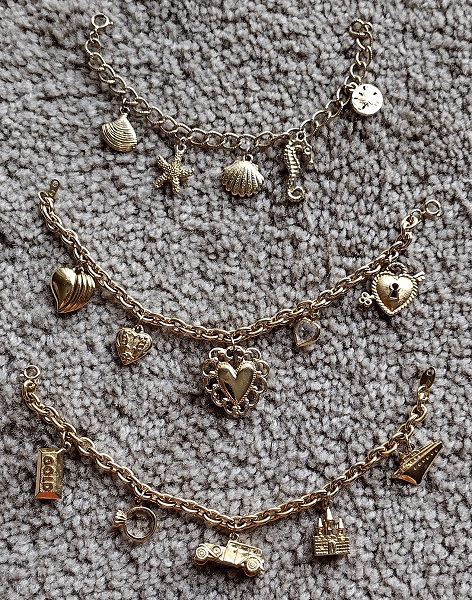
This photo comes from What shall I wear? I love the look of the chunky beaded necklace. And the multiple charm bracelets are enough to convey elegance and individuality.
The second outfit I took inspiration from is a trio of coordinates McCardell designed for beach wear. I especially like the slacks. The deep tucks at the waist and tapering legs of the slacks create a comfortable, easy garment flattering to a wide range of sizes. What I also love is the look of these slacks with the sandals.
With these inspirations in mind I set about recreating the look and making it my own.
How I expressed the look using modern clothing and accessories
I did not want a chunky beaded necklace. In the 1950s beading and sequins were very popular on cardigans and pullover sweaters. When I found this knitwear top it was perfect for starting the look. I also bought one in grey with silver beading.
I looked through the collection of costume jewlery my Mom left me and found the charm bracelets for the outfit.
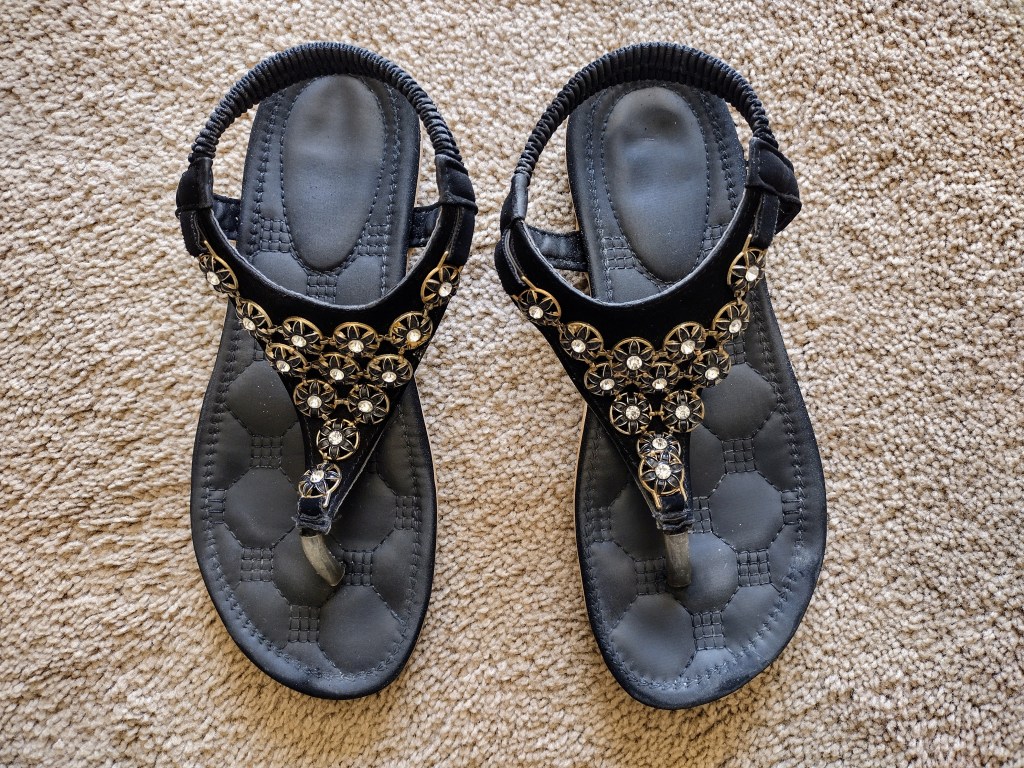
The next step was to find a comfortable pair of slacks that approximated the look of the ones I liked. I also had to find sandals that worked with the slacks.
I ended up at the bargain store where I’d bought the tops. I found two pairs of floral print slacks: one with pink blossoms and one with grey blossoms.
When I saw the sandals I knew I now had the right combination to channel the expression of my vintage inspired vibe.
Photo of the completed look
I am very pleased with the way this look came together. It expresses my own style yet has some of the elements of the original outfit. I hope you take some ideas from this to start your own creative style expression using vintage fashions as a starting point.
Credits
Close-up from What shall I wear? by Claire Mccardell
I am releasing my pattern for the Alice Elizabeth dress into the public domain. You are free to download and size it up or down in a graphics program. You can alter the design. I also give permission to use it privately or commercially.
This is a basic pattern that you can use as the basis of your own rendition of the style.
Please refer to the following posting for further details and as a guide to whether or not you want to make the dress with closures like I used or that are on the original 1950s dress.
Alice Elizabeth dress – Construction details on my interpretation of the Pat Perkins dress
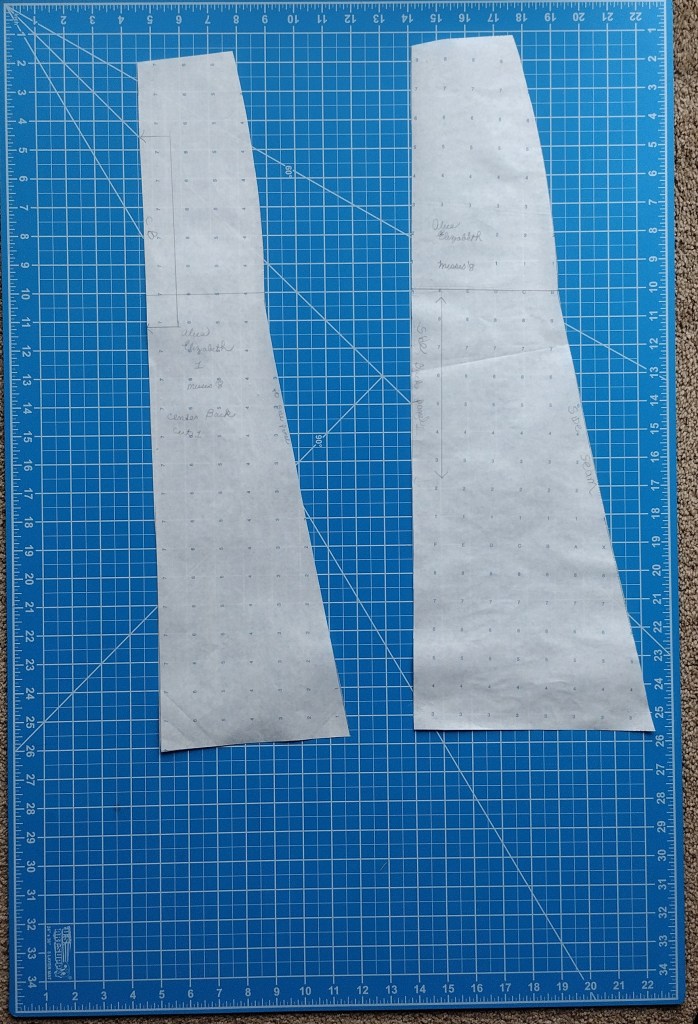
This pattern was created using a combination of draping and flat pattern making based on the 1947 technique, Precision Draping. A Wolf Form in Misses 8 was used. The resulting dress can be labelled a Misses 6/8.
The pattern is showed on a cutting mat using inches. All pattern pieces do not have seam allowances.
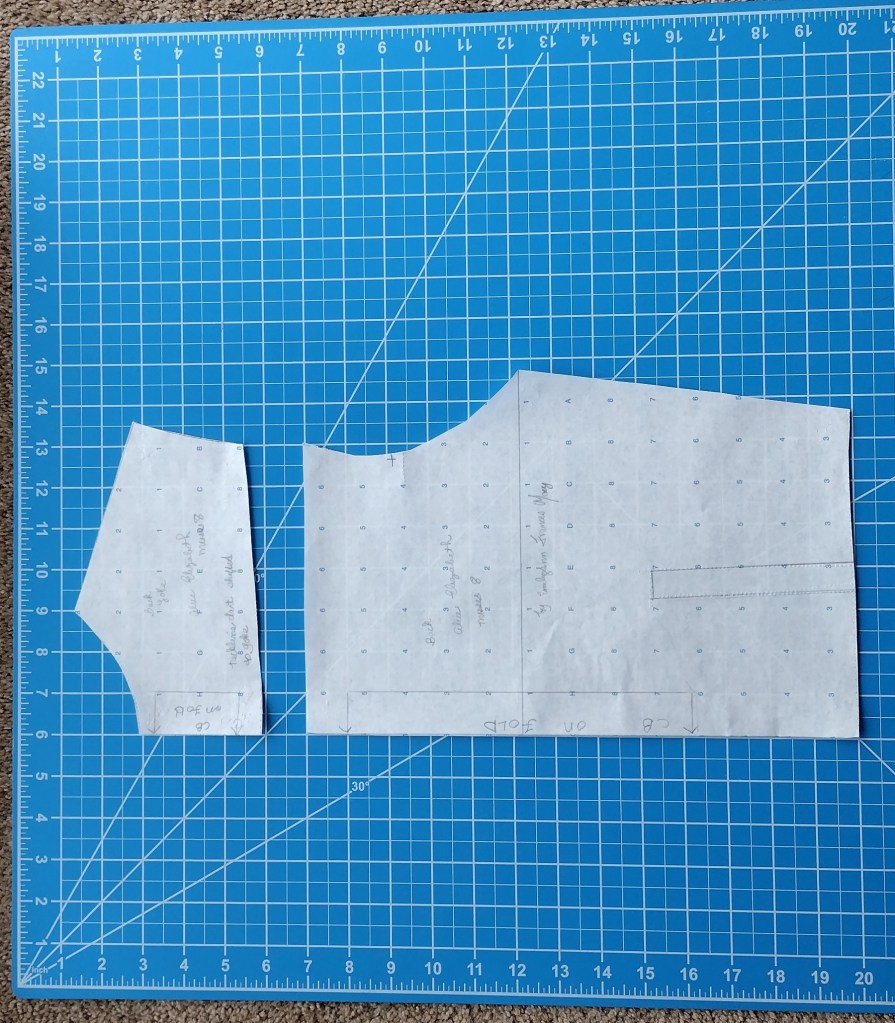
Bodices
Front Bodice
Back Yoke and Bodic
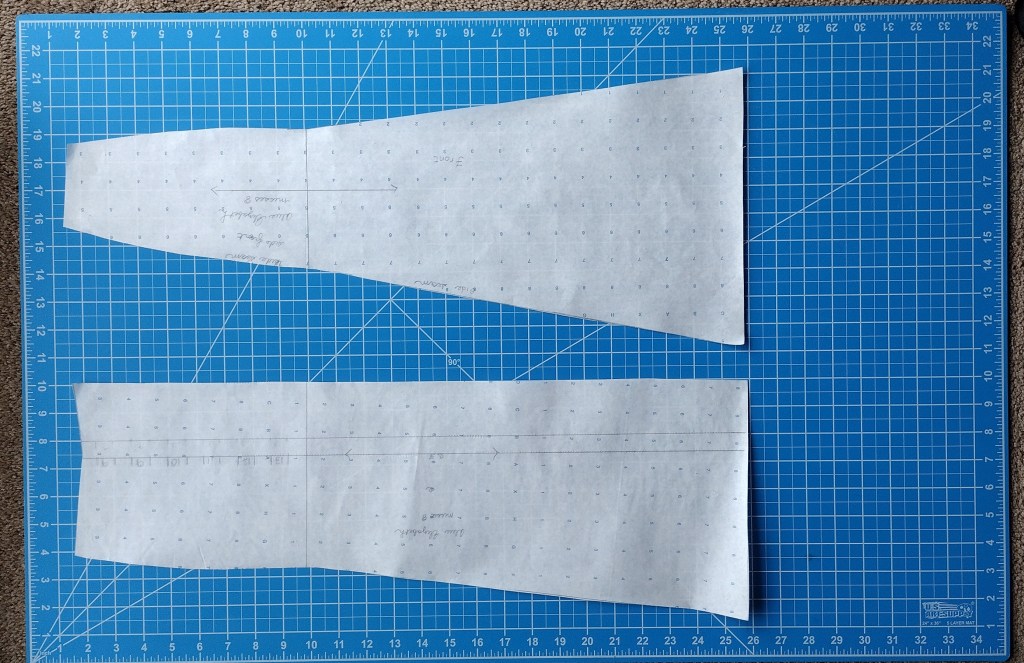
Six-gore Skirt
Frong of six-gore skirt.
Back of six-gore skirt
All-in-one sleeve
All-in-one sleeve
Top collar, under collar, front interfacing
Top collar and bottom collar. Interfacing front bodice and skirt.
Further consideration of my plans for my next project is needed. The sketch of the chambray shirtwaist dress expresses my idea. However, the details I had envisioned must be changed.
I had planned on having in-seam buttonholes. I have been wanting to try this kind of buttonhole for a long time. I want to see how it will work on light to medium weight fabrics. As I thought about my shirtwaist dress I can see that having a seam along center front will cut into the middle gore of the skirt front. This will add extra weight and interfere with the flare. I plan a six gore skirt for the dress.
Possible solutions for new design details
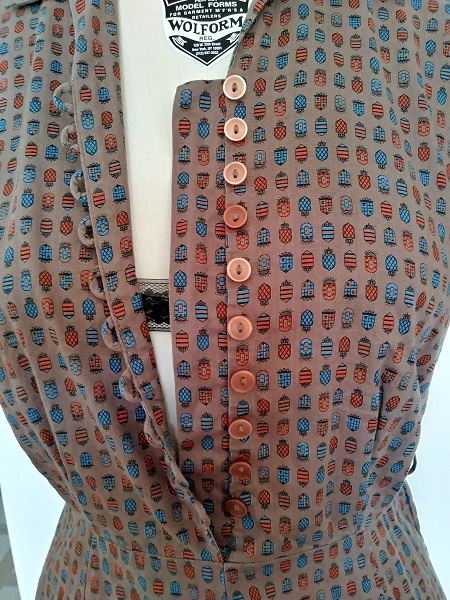
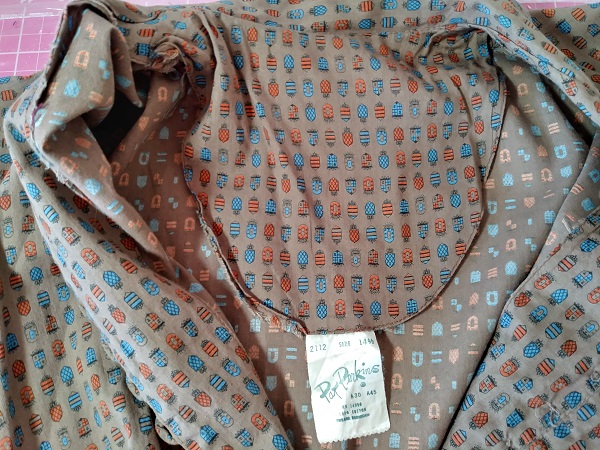
I decided to analyze the construction details of a Pat Perkins everyday dress I bought on Etsy. Pat Perkins was the name of a dress manufacturer in the 1950s. They provided some of the dresses worn by actress Audrey Meadows in a popular sitcom, “The Honeymooners”.
I found the solution to keeping the flares of the skirt undisturbed. I will have to install a lapped zipper into the side seam. I will use the same treatment as used in the Pat Perkins dress. This means I can use in-seam buttonholes for the dress. However, the buttons will only be used on the bodice. Having a size zipper will provide the means for ease in putting the dress on or off.
Pat Perkins Everyday Dress circa 1950s
The dress has a fitted bodice with two vertical tucks on each side at the front. The short, unfitted sleeves have a self cuff that turns up from the inside. The collar is similar to a blouse collar and has very little stand. The back bodice has two very small tucks on each side.
The skirt i seven gores: 4 in front and 3 in back. There is a slight flare in each panel. The panel at center front has a seam. At the back there is no seam in the center skirt panel.
To make the dress easy to put on and off, there is about 3″ of style ease at the waist. The fit near the chest and bust has a little less style ease. This will help me adjust my pattern after using the sloper to trace the basic pattern.
The zipper is machine stitched into the left side seam. There is an underlap of fabric that provides body for the zipper and protects the wearer from feeling the zipper teeth. I plan to do the zipper application by hand and use a lightweight nylon zipper. The one in the original dress is metal.
The dress closes with self fabric button loops at center front. An underlap on the left side of the front bodice provides support.
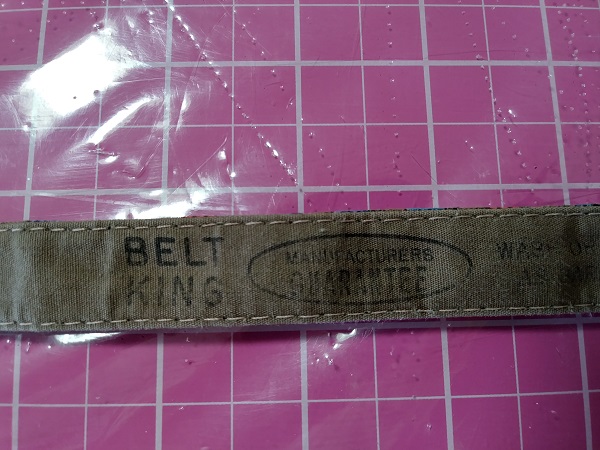
The belt holes are not reinforced with any stitching. No eyelets were used. The buckle is covered with the fashion fabric. Narrow loops at the side seams are the only support to hold the belt in place. The backing has the stamp “Belt King”. I plan to use a belt kit and eyelets. At the side seams I usually use thread loops.
To lend a touch of support to the back of the dress a long facing is used as part of the collar treatment. I do not plan to use this neckline finishing since my dress will have a yoke.
The seams are not finished. No pinking, no edge stitching. The waistline seam is pressed down rather than up. The hem was turned twice and looks to be hand finished.
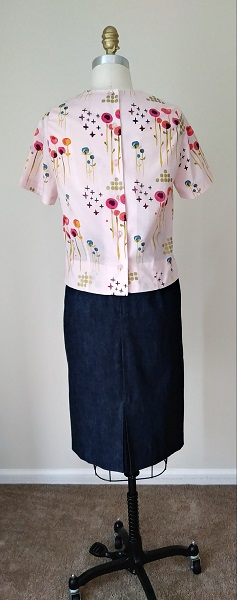
I purchased an early 1960s blouse by the Tropicana company during the furlough from my job due to COVID-19 this past Spring. The blouse provided a fun challenge to me during those days at home. I decided to renew my skills in draping and recreate as much as possible the blouse. As happens, the blouse was not enough. I decided to make a denim skirt to go with the Tropicana blouse and my own version of it.
My recreation was draped on a Standard Misses size 8 form. The resulting pattern was then altered to address my own fitting needs.
The original Tropicana blouse has slits that open from below the waistline.. The skirt and blouse are worn over a white full-slip. The slip provides an extra layer under the lightweight fabric of the blouse. Without a slip or cami, one’s bra will be visible.
The original skirt was altered from a Misses 8 to fit my skirt size which is between a Misses 8 and Misses 10. I have pinned it to better fit the form.
I do not pose for photos in my finished garments. The reason is to keep attention on how I created the look. I want any reader to review my content and consider if these same style elements can be applied to creating a similar style expression for themself.
Comparison: Vintage Original and My Reproduction
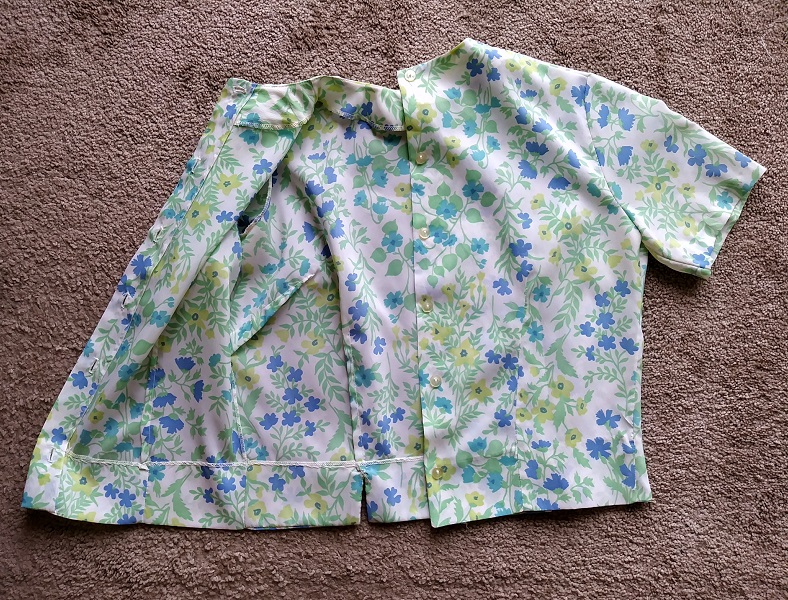
Tropicana blouse. Front view.My reproduction blouse. Front view.Vintage Tropicana blouse. Back view.My reproduction of the blouse. Back view.
An unusual detail of the original blouse are the buttonholes at the back. The first buttonhole is horizontal, the rest are vertical. I duplicated this in my reproduction. The reason the first buttonhole is horizontal may be to ensure this stress point remains closed. The neckline of the original is quite close to the neck. I scooped my version a little more to make the blouse more comfortable. Perhaps the vintage blouse was meant to be worn with a short string of pearls or a necklace on a short chain. I opted for comfort.
Finishing Details
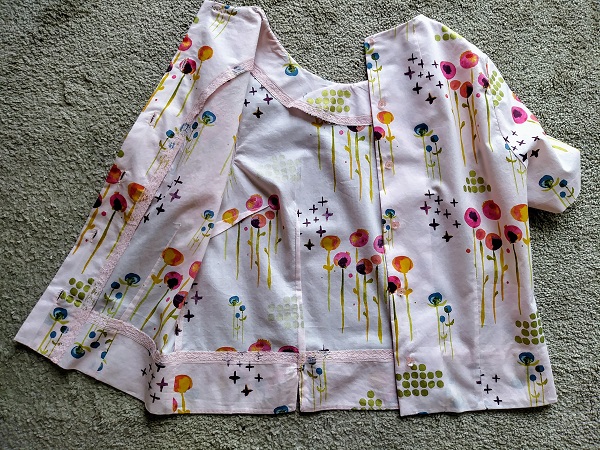
Inside of Tropicana blouse.Inside my reproduction of the blouse.
A narrow merrow-type of stitching finished the edges of the hem, seams and facing. I got fancy with my version of the blouse. I used a pink flexi-lace to finish the hems and facing of the blouse. Seams were straight stitched, then zig-zagged together and pressed towards the back.
Little Details
Tropicana blouse, 3/4 view. My reproduction blouse, 3/4 view.
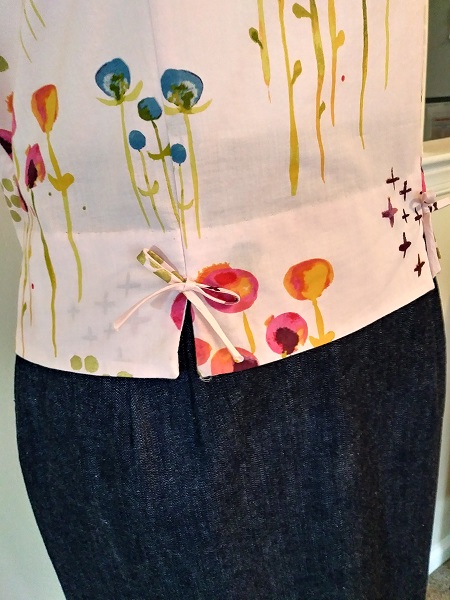
The original and my reproduction have a vertical tuck that ends 1″ below the apex of the bust and about 2″ up from the hem. At the 2″ mark the tuck ends and the slit begins. A bias cut strip of fabric is sewn, turned right side out and hand sewn above the opening of the slit. It is them tied into a bow.
A side bust dart, about 2″ down from the armhole, provides slight shaping in the original. My reproduction goes straight down from that point.
Skirt Details
The skirt is a medium weight denim by Kauffman. I made a kickpleat for the back and draped for a relaxed fit. The denim shreds so seams were finished by straight stitching 1/4 ” in from the edge and then pinking. The hem and edges of the kickpleat were finished with navy blue flexi-lace hem tape. The kickpleat is held in place by small inverted “v” shaped stitching at the beginning of the pleat.
Jewelry and Shoes
Spring into Summer gets humid here in the Tri-State area (NY-NJ-CT) so keeping things simple with jewelry and accessories is important. I chose to work with gold jewelry since there are golden circles that are part of the pattern on the blouse fabric. The tiny heart charm has a diamond chip at the center of an 8 pointed star. The pattern of the blouse does not necessitate a necklace but I’d wear one anyway. The golden bangle was my Moms and my Grandmother wore hoop earrings similar to the ones I chose to complete the look.
Beige sling back shoes help the leg look longer since the eye is drawn upward. The bonus is that these shoes are also one of my choices for the denim chambray dress I intend to make as my next project after completing the basic fitting toile in progress now.


You must be logged in to post a comment.