1930s Inspired Pattern Sloper and Toiles

Introduction

I am happy to share with you my hand drafted slopers that can be used to create styles with a 1930s feeling. The slopers are in a Standard Misses Size 4. The patterns were drafted with 3″ of style ease added to upper arm, chest, bust, and hips. The waist has 1 1/4″ ease added.

I did not use a period drafting system to save time. Instead I used the French Fashion Academy drafting technique which I learned in school. I think the results come close to capturing the pattern shapes in the 1930s drafting and sewing books I used for reference.

I release the slopers into the commons. The photos may be downloaded and used in a graphics program like Adobe to refine, grade, print and use as you please.

Research used: 1930s Pattern Cutting and Sewing Books

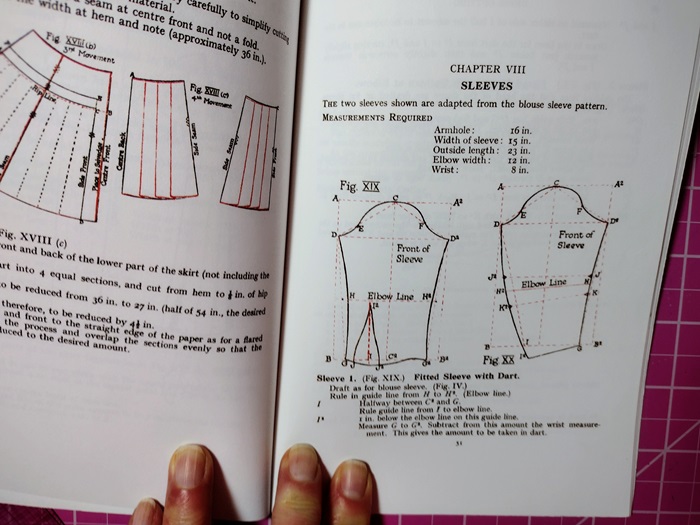
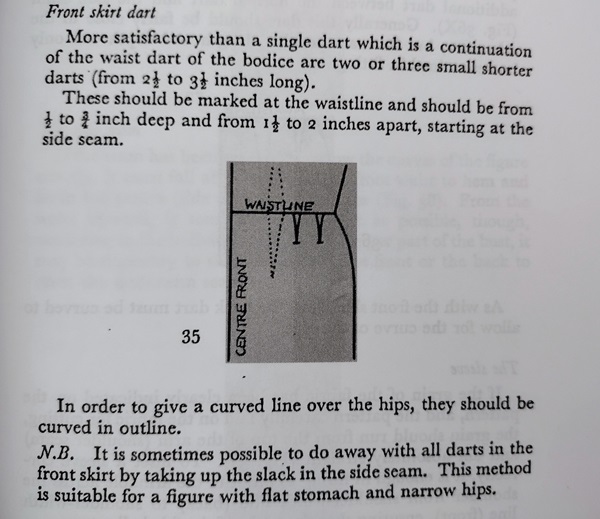
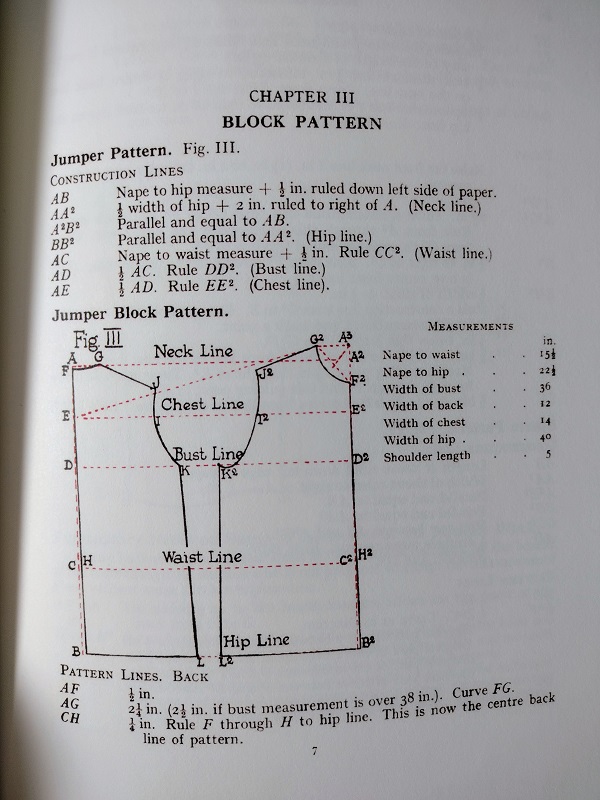
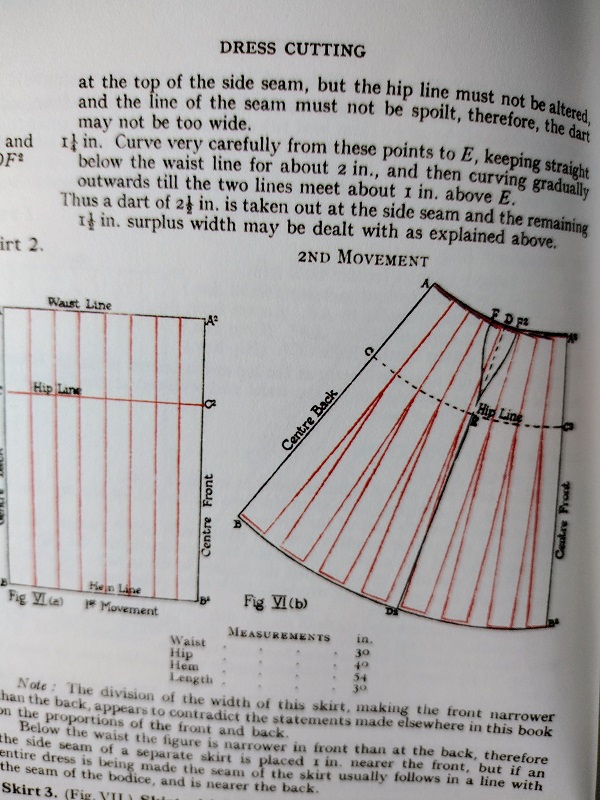
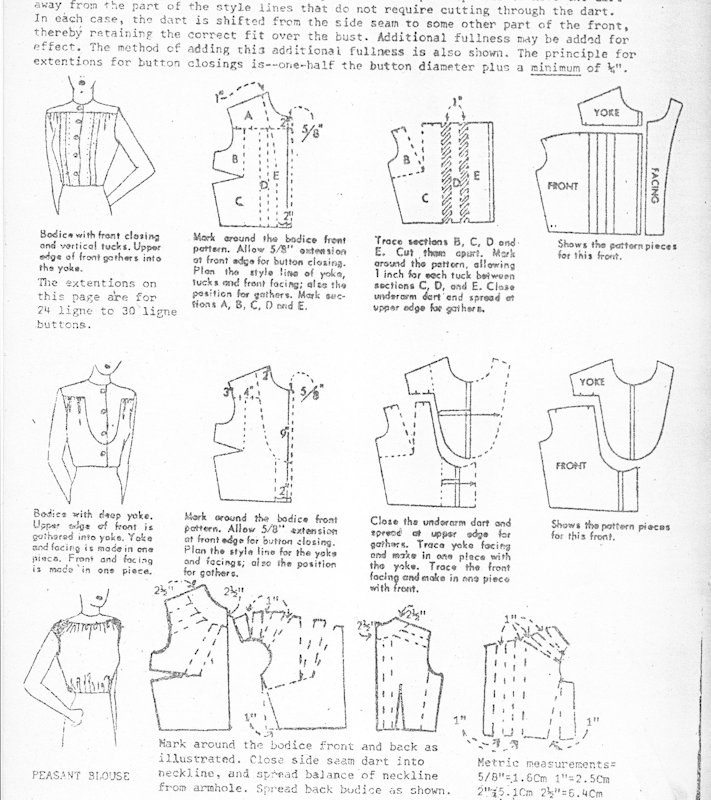
For the pattern shapes I used Dress Cutting by Margaret Ralston. Here are diagrams from the book for the bodice, sleeve and one of the basic skirts.

I referred to illustrations in Weldon’s Encyclopedia of Needlework as an additional step in learning about the shapes of basic patterns during the 1930s. Here are some illustrations from the chapter about fitting:

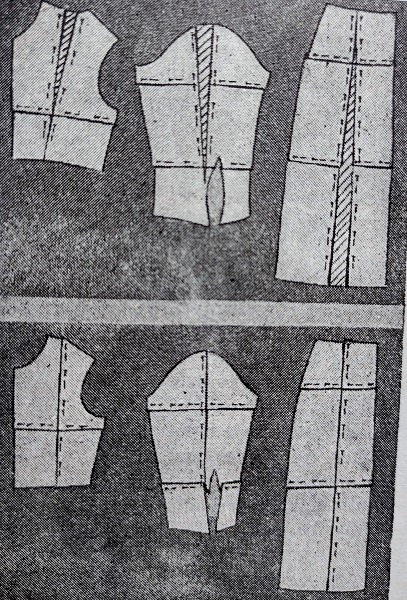
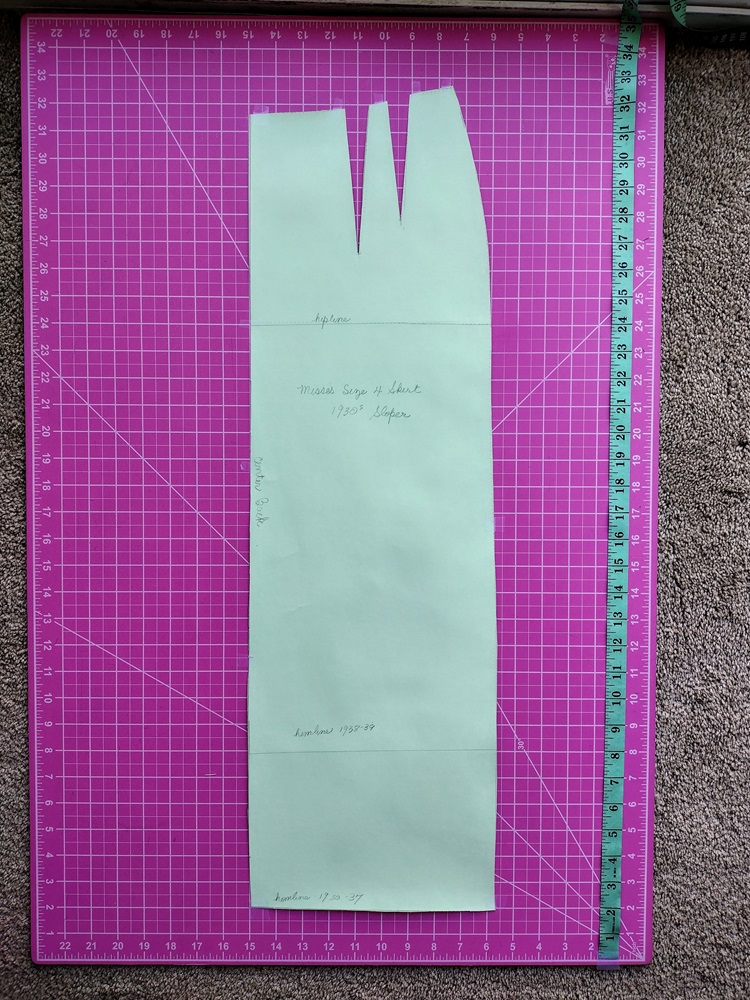
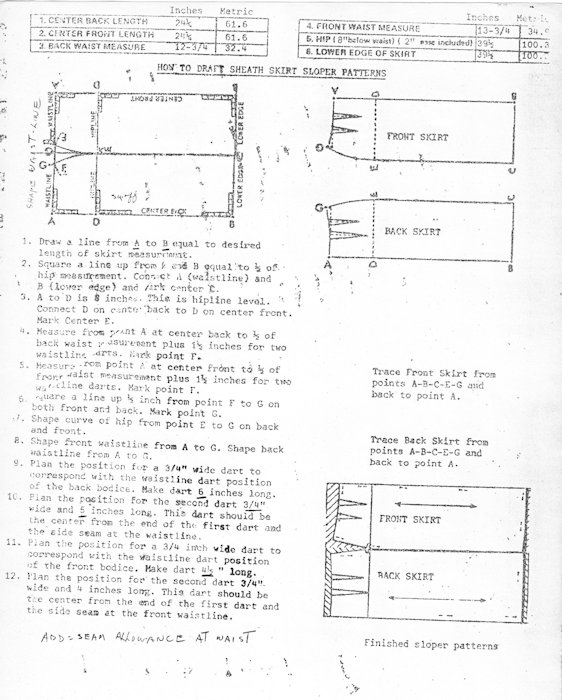
The results I obtained differ from the illustrations. The straight skirt is not as form fitting as a modern pencil skirt. The curve over the hip is softer and the skirt falls straight from the abodomen down. This is why I call it a “slim skirt”. I like the fit as it is not tight and it is not that form fitting in front or back.

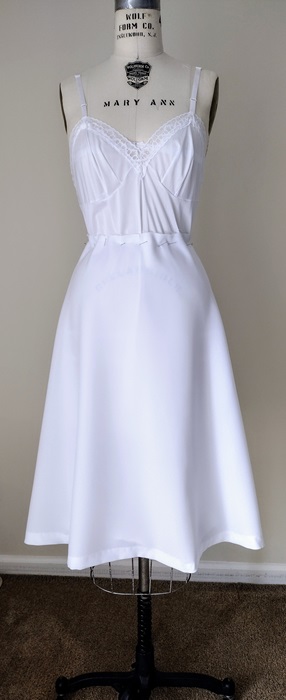
The slightly A-line and flared skirts do not fall as straight as the illustrations in Ralston’s book would have you think. I was surprised and pleased with the degree of flares each had. They are flattering and permit easy movement.

Hemline lengths differ during the 1930s

I bought scans of fashion illustrations from Etsy. These came from various sources and compiled by RetroKatDigital From the scans I saw that skirt lengths went to mid-calf length or lower from 1930 to about 1937. From 1938 to the end of 1939 hemlines went above mid-calf. The silhouette that became iconic during the 1940s was already evolving during 1938 and 1939. The shoulder line was more defined. The waistline was neatly nipped in and skirts had a more A-line shape that was less fluid, at least for everyday wear.

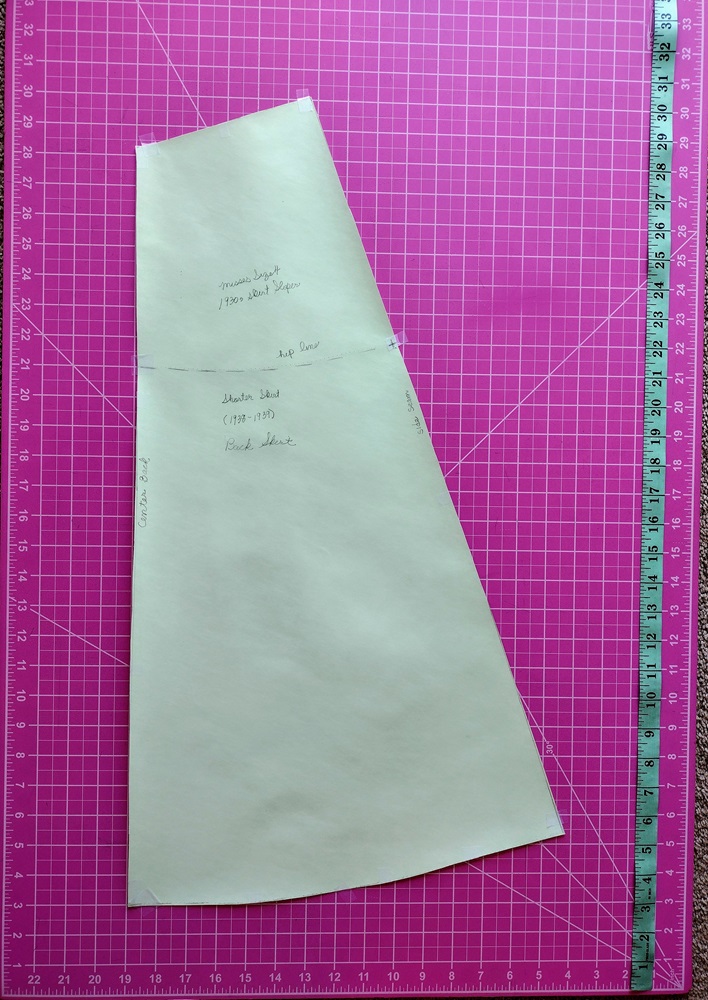
For this reason I marked two different hemlines on the slim skirt sloper. The shorter hemiline is for 1938-1939 inspired styles. The longer hemline is for styles influenced by fashions from 1930-1937.

I made a mid-calf flared skirt for 1930-1937 influenced styles. The sweep at the hemline is greater than that of the shorter flared skirt to be used for 1938-1939 influenced styles. The shorter skirt also has less flares.

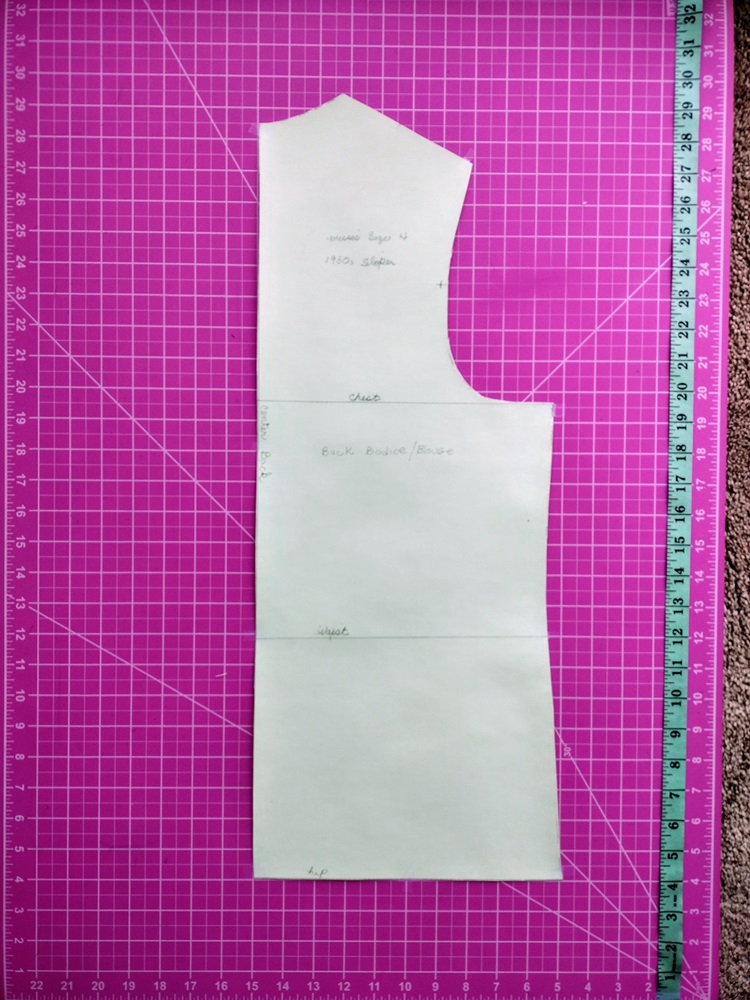
The Bodice-Blouse Sloper and Fitted Vertical Dart Sleeve

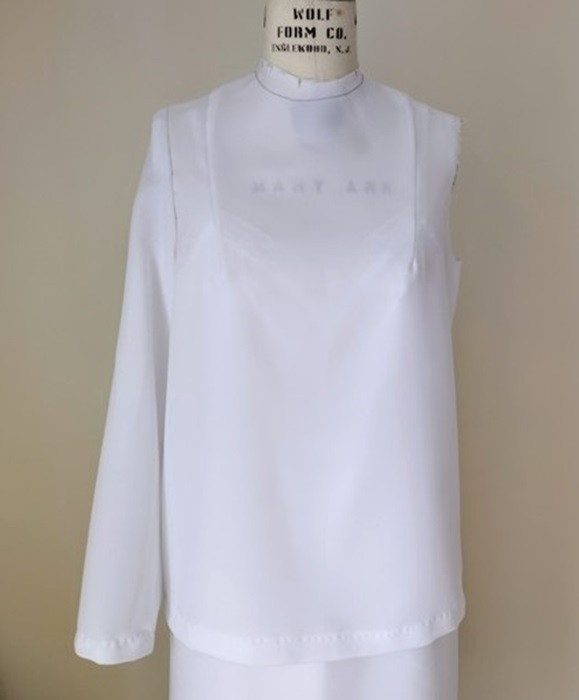
The sloper for the bodice-blouse ends at the hipline (8″ below the waist). The waistline is also marked. This way the sloper can be used for a blouse or the bodice of a dress. I chose an unfitted sloper because this shape agrees with what Ralston shows in her book. When used for a dress, the extra style ease can be gathered into the waist. Another approach is to make a toile, and then drape in tucks or small darts.

The vertical dart in the sleeve can be transformed into gathers that fit into a cuff. The effect is a very modified Bishop Sleeve. The sleeve can also be transformed into a sleeve with a point at the wrist. It can be cut above the elbow to make short sleeves, flared sleeves, bell sleeves and other kinds of sleeves.

Special Notes

–The measurements used for the sloper are the Basic Misses Size 4 plus 3″ ease to chest, bust, hips, and upper arm. The waist has 1 1/4″ ease.

–Always make a muslin to customize the fit or check that it is in line with the size 4 you use.

–Seam allowances of 1/2″ to 5/8″ must be added when cutting.

–The French Fashion pattern making system moves side seams of tops, bottoms and slaeves 1/2″ to the back of where the side seam is on the form or where it would be in mass manufactured clothing. This is done to create a better fit.

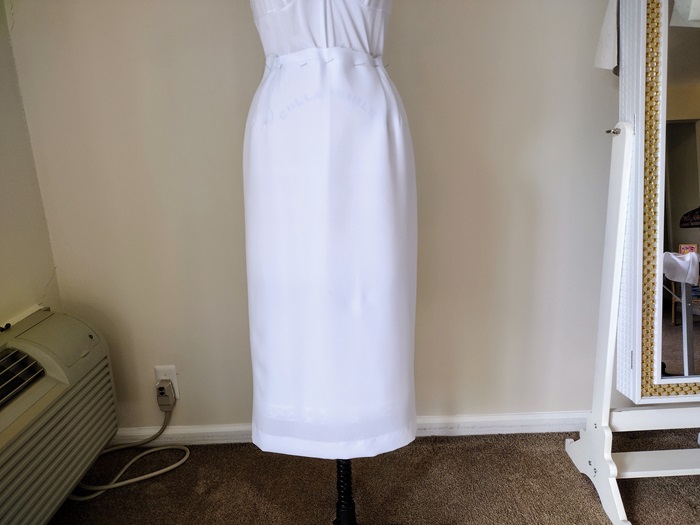
–The toiles are fitted over a one piece slip. This enables me to determine if the final fit has enough ease. It also improves the look of how the garment will drape over the form.

The Sloper: Unfitted Bodice with Fitted Sleeve (vertical dart)

Bodice-Blouse Front

Bodice-Blouse Front

Bodice-Blouse Back

Fitted sleeve with vertical dart

The Sloper: Slim Skirt

Slim skirt front

Slim skirt front

Slim skirt back

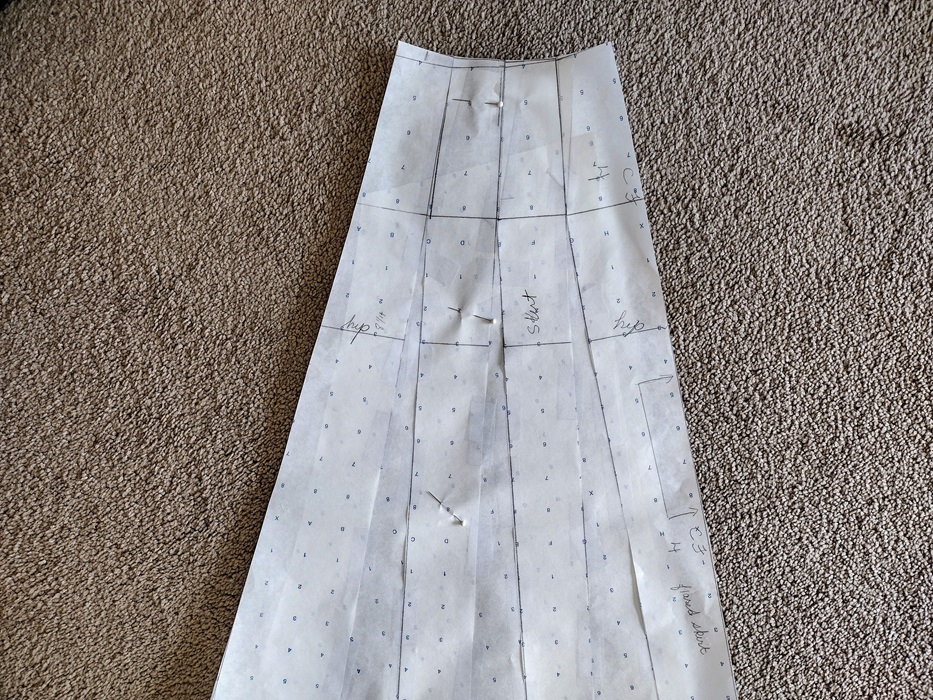
The Sloper: Flared Skirt, longer length

Long flared skirt front

Long flared skirt back

Long flared skirt front

The Sloper: Flared Skirt, shorter length

Short flared skirt front

Short flared skirt back

Short flared skirt front

1930s Slopers Update: Flared Skirt

Introduction

I am making a series of slopers based on basic patterns created in the 1930s by Margaret C. Ralston. Her drafting system and pattern transformations were published in a book entitled Dress Cutting. 

I am using the pattern drafting system that was taught at the French Fashion Academy. I find this system more suited to making retro inspired clothing., rather than using a vintage pattern drafting system. This route saves me time and makes the process more enjoyable. Ralston’s instructions sometimes make no sense to me. For example the sleeve seam is 3/4″ to the front of the bodice, meaning the sleeve seam will not match the side seam of the bodice. In the instructions for transforming a skirt pattern, she writes that sometimes a skirt side seam can be moved towards the back. I am sure this all made sense to her students and target audience at the time. However, I am not sure of how the results will look now and I do not have the time to go into that kind of nitty gritty effort to be authentic. So long as I can create a pattern and garment with a feeling and a little touch from a selected time period I’m quite satisfied. My goal is always to create a little bit of the look of retro combined with ease and movement of modern clothing.

The patterns for the 1930s sloper are drafted using the measurements for a Standard Misses Size 4. My vision is to create the building blocks of 1930s inspired styles that will look flattering on a smaller range of sizes. When completed the slopers will be put up at my blog. They can be best graded down to Misses sizes 0 -2 and upward to Misses sizes 6-8.

Three inches of ease at the hips and 1 1/2 inches of ease at the waist was added to the basic straight skirt drafted as the basis for this flared skirt.

Creating the flared skirt pattern and fitting toile

Cover of Dress Cutting (left) and pattern diagram for basic flared skirt. Notice how the flares begin at the hipline with overlapping of the pattern from waist to hip.

On the straight skirt pattern, the first dart by the side seam was closed halfway to give the skirt more ease and add a slight flare. The remainder of that dart was taken off from hip to waist.

Front of flared skirt pattern.

To create the flares the dart intake closer to center front was divided in half. I then drew two new darts equidisant with each having half of the intake. Then I added another slash line. The darts were closed and the third slash line opened. This reduced how high the flares would form. I repeated the same steps for the back skirt pattern.

Fitting toile of flared skirt.

As you can see from the fitting toile this is a very softly flared skirt. The flares begin below the abdomen and the sides fall straight. It feels true to the spirit of the 1930s when dresses were soft and there was lots of flare and movement created by insets, godets and the way in which the grain was used for a blouse, skirt or dress.

As of the date of this posting the skirt has been pinned to the form or 48 hours. I take this step to let the grain settle prior to marking and then putting up the hem. Sometimes I leave it hanging 72 hours. I highly recommend taking this step. Your finished toile will then reflect the way the flares look when hemmed. You will also know if you lose any length due to the way the grain settles. This skirt when finished and hemmed should have a center front length of 27-29 inches, in keeping with the longer skirt lengths of the 1930s.

In the works for 2024: 1930s inspired pattern sloper

In the works for 2024: a1930s style sloper inspired by Margaret Ralston’s book “Dress Cutting”. I added 3″ style ease and base is size Misses 4 because I want to do somethingvfor smaller sizes as a challenge. This sloper is based on the French Fashion Academy. That is why it looks different. there will be a skirt sloper, too. The intention is that one can make 1930s inspired styles like some of the skirts, blouses and drop waist dresses in this or other 1930s books. Test muslin is next.

For background information on this project please see my posting: Researching and preparing a 1930s inspired pattern sloper

#sloper #1930sinspiredsloper #1930s

Late 1950s Cocktail Dress: style and garment construction analysis

Introduction

I purchased this dress during the Covid-19 Lockdown of Spring 2020. At the time I was teaching myself Precision Draping, a vintage draping technique created by Nellie Weymouth Link. Through that self-learning I was becoming very aware of the effects dart manipulation had on creating vintage looks. I bought this dress as a study piece.

No specific decade was assigned to the dress. After studying the construction I estimate it was made late 1950s-early 1960s. I say that because of the lapped zipper application at center back. Many of the early 1950s dresses I have as study pieces, have lapped zippers in the side seam. Another indicator of time period is the skirt length. At the height of the 1950s skirt lengths were to mid-calf. As the 1960s began hemlines rose to an inch or a few inches right below the knee. This skirt comes to about 1 1/2″ below the knee when I am wearing it. I am 5′ 5″ tall.

The dress is shown here on my 2019 Wolf Misses Size 8 dress form. This dress may have been custom made. The waist is situated an inch above the dress form waistline. The bust apex is also slightly higher than the apex on the form.

I want to share the inside details with you because they offer a wealth of information about how dressmakers and home sewistas constructed their clothing during the late 1950s-early 1960s.

Bodice Front: Bustline Darts and Apex Point

There are 2 darts shaping the bodice front. The darts meet very closely at an apex point slightly above where the apex point is on the dress form. On the form the length from neck to apex point is 10 inches. On the dress the apex is about 1/2-5/8 inch above that. I can only think that the dress was designed based on the bullet bras or balconette bras of the time period. These were highly boned and made to uplift the bust very high, so that it would be visible against a low cut neckline. The neckline on this dress is not so low, so I think the point created by the two darts is intended to draw the eye further upward. It creates interest at the bust and lessens the ability of the eye to see that the wearer is short waisted.

As you can see in this closeup, the two darts converge at the apex point of the bust. There is a horizontal dart beginning at the front side seam. The vertical dart originates at the waistline, and goes up to the apex. From the apex it angles upwards. I think this bodice might have been adjusted for a customized fit. The angled portion above the apex could have been created during a fitting. The only other explanation I have for this unusual vertical dart is that another dart may have existed at the neckline. It was closed and transferred to the vertical dart. The neckline might have required contouring so that it fit better. Both on the dress form and myself the effect of the vertical, angled dart does not look flattering up close. Not even my underwire push-up bra makes the bodice look good! That is how high up the apex is!

Sleeve: Short Mounted Sleeve with Gusset

Short mounted sleeves with a gusset were used for the dress. The point of the gusset begins a little above the waistline. The point and corners of the gusset are very neatly sewn. You can get a better idea of how neat the sewing is by looking at the lining.

This type of sleeve gives a very close fit under the arm. It may have been chosen because the upper part of the sleeve is cut in one with the bodice at front and back. In wearing this dress, I loved the look but not the restriction on my movement. If I raised my arms very high or very often, the entire dress moved up with them. There is not enough room to move very freely or with a great scope of movement.

The darts of front and back skirt are not as long as darts on modern skirts. They are also positioned more to the side seams than close or on the princess lines. The front darts are about 2 1/2″ each, the back darts 4 1/2″ each. The effect is very rounded. Again, this indicates to me that the dress was custom fitted.

For flat patternmaking I use the French Fashion Academy Method by John Klamar. In that system the dart placement for the first dart is center of each skirt panel. This means half distance from Center Back and half distance from Center Front.skirt. The second dart is 1 1/2″ from the center of the first dart. Dart lengths are longer, too. The entire effect is more elongated and, I think, more flattering when the basic skirt is made up.

Closure: Center Back Lapped Zipper

The zipper closure at center back is beautifully finished. The addition of two bows at the waistline and top of the zipper adds yet another unique touch to this dress. The folded band over the waisline is hand sewn into place. It creates the look of a belt. The zipper even has a fabric loop and hook at top.

Finishings: Seam finishes, hems, bra strap holders

The dress is completely lined. The skirt lining hangs freely away from the bodice and is machine hemmed. The rest of the dress was hemmed by hand at skirt hem, sleeves and where the lining is attached to the neckline facing. Seams were pinked. The bra strap holder was made with the lining fabric.

What is the story with the darts?

I wondered why so many darts were used at the bustline, and why the darts at the hipline created a more rounded effect than I am used to seeing, even in vintage clothing.

I recently bought a reprint of a late 1950s sewing book entitled Sew The French Way by Line Jaque. I do not have any information about the author except that the book was originally written in French. In this book Line Jaque provides fitting instructions that are outside the norms of commercial patterns. The emphasis is on using as many darts as needed to achieve a good fit.

There are illustrations showing the kinds of dart placement found on the skirt of my cocktail dress. The lengths recommended in the book are the same as the dart lenghts for the skirt of my dress. I found this very interesting, too, because Line Jaque states it’s not necessary to have skirt darts align with bodice darts. Everything must be placed for the best fit possible.

Here is another illustration from the book showing the bodice of a dress with long mounted sleeves that have a gusset. Note the skirt darts. I hope this analysis has helped further your understanding of vintage garment sewing construction and design details.

Researching and preparing a 1930s inspired pattern sloper

Introduction

I am preparing two slopers this summer. I already created one that I use for 1940s to early 1950s inspired styles. I used that for the Alice Elizabeth dress and the Linda skirt and blouse. I am now in the progress of creating a more structured sloper that I think will work well with the more detailed and fitted styles of the mid-1950s. As a challenge and contrast, I am also researching slopers from the 1930s. The look of the 1930s was very flowing and not fitted the way 1950s clothing was.

My 1940s sloper is available for copying and sizing here. It is a standard Misses 8. The sloper for the 1950s structured fashions is also in a size 8. However, I think the 1930s look is very flattering to smaller sizes so that sloper will be in a standard Misses 4. I do not intend to use drafting systems from the 1930s. Instead, I will drape a basic unfitted bodice and skirt that approximate the look of a set of pattern blocks I located in a small paperback book called Dress Cutting by Margaret C. Ralston. I will draft a fitted sleeve with vertical dart to complete the sloper.

Here are the screen shots showing the basic block Margaret created from her drafting system. I find it a bit confusing to follow. I am also not sure the fit will be comfortable for the modern women. The sleeve looks very fitted and the sleeve seam is 3/4″ to the front of the bodice side seam. While I love vintage styles I do not think it is essential to go so far to recreate or be inspired by the look. The key for me is inspired interpretation.

Pattern Block from Dress Cutting by Margaret Ralston

The bodice front and back appear to be completely unfitted. In some directions for pattern transformations one dart above the bodice is shown. It might also be a tuck. I assume the bodice block had enough width for this dart-tuck to be created.

The skirt is a rectangle equal to half the hip circumference. It is then slashed and overlapped and the top edge so that the waistline measurement results. I plan to drape a basic sheath skirt. Once that fits, I will distribute the dart ease across skirt front and back waistline. Then slightly overlap the sections. That will produce a slightly flared, straight skirt which is the starting point for the skirt styles in this book. For the bodice I will drape an unfitted bodice. It will go straight to the hip and have the waistline marked off as well. There will be one vertical dart above the bust in front and a neckline dart or two in the back. I’m basing the dart positions on the fitting dress or toile shown in the previous posting.

I think developing different bodice and skirt slopers gives one a more extensive collection of shapes to work from. As I research the 1930s, I’m understanding that for the 1960s an unfitted dress sloper works well. So would an A-Line skirt sloper. Those are the two key shapes for dresses and skirts of the 1960s.

Here are the snap shots of the pattern blocks from Dress Cutting. The last snap shot is a dress that can be made using he pattern blocks and transformation instructions in the book.

Cover of Dress Cutting by Margaret Ralston.

Bodice front and back.

Basic skirt front and back.

Basic sleeve.

Fitted sleeves.

One of the styles that can be created using the block and instructions in Dress Cutting by Margaret Ralston.

Style lines from a vintage patternmaking handout

In my previous posting, “What are style lines?” I explained what style lines are. I showed how a few style lines can be used to transform a basic skirt and bodice into a vintage inspired fashion from a 1964 magazine photograph.

Today, I’m sharing classroom handouts from a vintage patternmaking book. The style lines used are easy to understand and clearly illustrated on the basic bodice. Based on my knowledge of patternmaking it looks like the “slash and spread” method was used. This means, the pattern was created by tracing the basic sloper. The style lines were then drawn. After that, the pattern was slashed and spread when tucks or gathers had to be created. Other patterns were simply cut along the style lines, like the one for the princess line bodice.

I estimate that these pattern transformations are from the 1940s.

What are style lines?

Introduction

The basic pattern, a/k/a sloper, is the blueprint of a person’s body. It is a one dimensional representation of the measurements of the body used within a pattern drafting system. Or, the dress form itself is the basic pattern in three dimensional form. It represents the standard size or the size of the person for whom it was custom made.

The process of working the basic pattern into an individual style is called pattern transformation. Style lines are used to map out how the emerging style will look. They are drawn onto the basic pattern. Alternately, style tape is pinned to the dress form to show how the garment pieces will look. This helps the draper know where to mold the fabric and how the garment piece should look.

Analyzing an outfit and seeing the style lines

A knowledge of the different forms sleeves, bodices, skirts, collars, pants and dresses can take helps in analyzing an existing style. Rough sketches help clarify if one is seeing the style lines correctly or misinterpreting a photograph or sketch someone else has made. Of course the best way to analyze a garment is to see it in real time. That is not always, possible, though. When one is inspired by a vintage style sketching and studying photos is one way to help in the recreation or updated expression of that style.

An economical way to practice visualizing and understanding stylelines is to have a library of basic bodices, sleeves, skirts and slacks printed on 8 1/2 x 11 paper. With colored pencil or pen these copies can have style lines drawn over them. Immediately you can see the blueprint for the pattern transformation. Which darts and seams the style lines intersect with also comes to the fore. It is possible to get a better idea what needs to be done for the actual transformation.

Example of a style analysis and practice transformation

This photo comes from a 1964 edition of the Saturday Evening Post. Fashions from Hong Kong were featured. This cocktail outfit consists of a silk sheath shirt and unfitted, sleeveless blouse.

On copies of a basic bodice and basic skirt, fronts and backs, style lines are sketched and notes added to better understand one possible way to recreate, or at least interpret, the original 1964 fashion.

I hope these suggestions help you in your next vintage inspired style recreation or adaptation.

Free 1949 flat patternmaking book available!

Thanks to the Internet Archive, vintage sewing and fashion enthusiasts can download a PDF version of How to design beautiful clothes, by Esther Pivnick. The book was published in 1949.

The patternmaking system used is the same as what was taught at the Traphagen School of Design in New York City. This book offers a complete guide to taking measurements, creating basic patterns and then transforming them.

Even if you do not use the pattern drafting system, there are details and pattern transformations that can be experimented with using your own sloper. It is well worth it to download a PDF version as the original book sells for over $100 when in good condition.

Here are screen shots from the book. I was surprised to see that the skirt is similar to the result I obtained when using the Precision Draping technique from the 1947 book by Nellie Weymouth Link. There is a slight flare to the skirt. It is not the straight, tubular shape of the 1950s basic skirt.

Here are screen shots from How to design beautiful clothes which show the resulting basic front and back bodices; back and front skirt patterns; and a diagram showing the measurements needed.

How to draft a Sheath Skirt Sloper

These pattern drafting instructions were given to me by a student who attended the Traphagen School of Design in the 1980s. It was a private design school in New York City. The instructions are very simple when you take the time to read them through before you start drafting your pattern. Make a muslin to test the fit before using this as the basis pattern for any pencil skirts or other designs based on the basic skirt sloper. The basic sheath skirt (a/k/a pencil skirt, slim skirt, wiggle skirt) has not changed. This pattern can serve as a sloper for vintage or modern skirt designs.

Measurements Needed

Center Back Length (from center back waist to desired length of skirt)
Center Front Length (from center front waist to desired length of skirt)
Back waist measure (from side to side seam at back)
Front Waist Measure (from side to side seam at front)
Hip Measurement – 7 to 9 inches below waist-use widest circumference.  Add 2″ of ease to measurement.
Lower Edge of Skirt (this measurement is determined by the hip circumference plus 2″ ease

Important Note:  Look at the complete diagram.  The rectangle runs from point A back to point A front at waistline.  Point B back runs to point B front.  Point A to B in the back and Point A to B in the front is the skirt length.  I found it easier to start with a large rectangle where A-A and B-B equals the complete hip measurement plus 2 inches of ease.  So draw A-A for the waist.  The draw A to B for center back.  Draw B to B for lower edge.  Then from B in lower edge of front draw a straight line up to A front.

Then proceed to step 2.

1.   Draw a line from A to B equal to desired length of skirt measurement.

2.   Square a line up from A and B equal to 1/2 ofequal to 1/2 of B (lower edge) and mark center C.

3.   A to D is 7 to 9 inches below waistline.  This is the hipline level.  Connect D on center back to D on center front.  Mark Center E. 

4.   Measure from point A at center back to 1/2 of back wait measurement plus 1 1/2 inches for two waistline darts.  Mark point F.

5.   Measure from point A at center front to 1/2 of front waist measurement plus 1 1/2 inches for two waistline darts.  Mark point F.

6..   Square a line up 1/2 inch from point F to G on both front and back.  Mark point G. 

7.   Shape curve of hip from point E to G on back and front.

8.   Shape front waistline from A to G.  Shape back waistline from A to G.

9.   Plan the position for a 3/4″ wide dart to correspond with the waistline dart position of the back bodice*.  Make dart 6 inches long.

10.   Plan the position for the second dart 3/4″ wide and 5 inches long.  This dart should be the center from the end of the first dart and the side seam at the waistline.

11.   Plan the position for a 3/4 inch wide dart to correspnd with the waistline dart position of the front bodice*.  Make dart 4 1/2″ long.

12.  Plan the position for the second dart 3/4 wide and 4 inches lont.  This dart should be the center from the end of the first dart and the side seam at the front waistline.

13.   Cut out sloper.  This sloper must have 1/2″ seam allowances added at waistline, side seams and center back.  Add hem allowance at bottom of skirt.  The hem for the basic skirt is usually 2″

New Dress “Alice”: Progress Photos 2-6-21

Introduction

In this posting I share progress photos of a new dress developed through a combo of flat patternmaking and draping. The photos featured are of the half-toile to test the fit.

Combination Technique: Draping and flat patternmaking

95% of this toile was made using a flat pattern. I used the Misses Size 8 sloper to create the fitted bodice, semi-fitted skirt and basic unfitted sleeve.

3/4 view of half-toile.

The flat pattern for the bodice front had the horizontal side dart closed and vertical dart opened. The construction of the bodice shoulder, back yoke, back tuck and side seams were completed. After steam pressing the bodice was pinned to the form. The excess dart intake below the bust was draped into two vertical tucks each 3 1/8″ high and about 1 1/2″ wide. I like the softer look of the tucks over the dressmaker dart under the bust.

Front view of half-toile..

I am very pleased so far with the 6 gore skirt. It was created by closing the darts of the basic semi-fitted skirt. The skirt front and back were cut along the lines of the dart and below the dart. Each piece then had extra width added at the hemline along front and back princess lines and side seams. I find the fit of this kind of gored skirt even more flattering than that of the 6 or 8 gore skirt created through flat patternmaking.

The collar was simple, easy flat patternmaking as was the sleeve. The next posting will be published once the fitting toile is complete.

Giving a Name to the Dress

As I work on a new project and gather the notions and fabric, I develop an image of who the dress will be for. I choose a name to create a sense of space between my self and what is coming to expression. This permits me to think whether or not improvements are needed. When I am too close personally and emotionally to a project become too attached. That is not good because it prevents perception of where the fit or creative result is lacking. This dress is called Alice. I will add a middle name once I feel more of the character of the dress emerging.