These pattern drafting instructions were given to me by a student who attended the Traphagen School of Design in the 1980s. It was a private design school in New York City. The instructions are very simple when you take the time to read them through before you start drafting your pattern. Make a muslin to test the fit before using this as the basis pattern for any pencil skirts or other designs based on the basic skirt sloper. The basic sheath skirt (a/k/a pencil skirt, slim skirt, wiggle skirt) has not changed. This pattern can serve as a sloper for vintage or modern skirt designs.
Measurements Needed
Center Back Length (from center back waist to desired length of skirt)
Center Front Length (from center front waist to desired length of skirt)
Back waist measure (from side to side seam at back)
Front Waist Measure (from side to side seam at front)
Hip Measurement – 7 to 9 inches below waist-use widest circumference. Add 2″ of ease to measurement.
Lower Edge of Skirt (this measurement is determined by the hip circumference plus 2″ ease
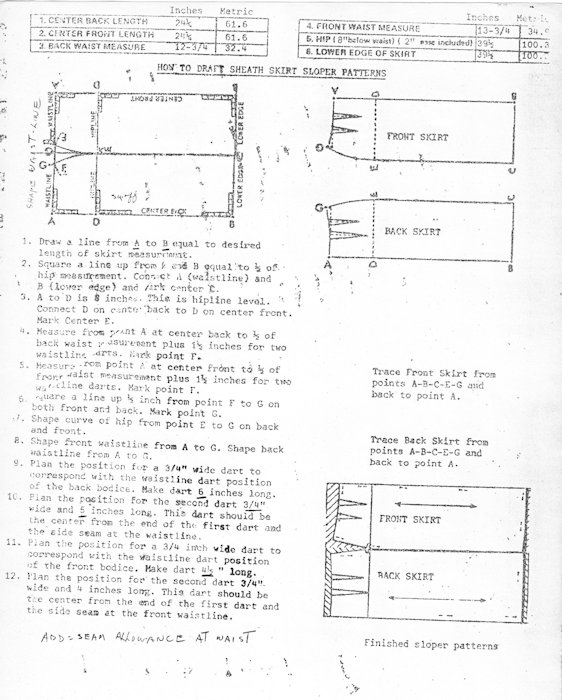
Important Note: Look at the complete diagram. The rectangle runs from point A back to point A front at waistline. Point B back runs to point B front. Point A to B in the back and Point A to B in the front is the skirt length. I found it easier to start with a large rectangle where A-A and B-B equals the complete hip measurement plus 2 inches of ease. So draw A-A for the waist. The draw A to B for center back. Draw B to B for lower edge. Then from B in lower edge of front draw a straight line up to A front.
Then proceed to step 2.

1. Draw a line from A to B equal to desired length of skirt measurement.
2. Square a line up from A and B equal to 1/2 ofequal to 1/2 of B (lower edge) and mark center C.
3. A to D is 7 to 9 inches below waistline. This is the hipline level. Connect D on center back to D on center front. Mark Center E.
4. Measure from point A at center back to 1/2 of back wait measurement plus 1 1/2 inches for two waistline darts. Mark point F.
5. Measure from point A at center front to 1/2 of front waist measurement plus 1 1/2 inches for two waistline darts. Mark point F.
6.. Square a line up 1/2 inch from point F to G on both front and back. Mark point G.
7. Shape curve of hip from point E to G on back and front.
8. Shape front waistline from A to G. Shape back waistline from A to G.
9. Plan the position for a 3/4″ wide dart to correspond with the waistline dart position of the back bodice*. Make dart 6 inches long.
10. Plan the position for the second dart 3/4″ wide and 5 inches long. This dart should be the center from the end of the first dart and the side seam at the waistline.
11. Plan the position for a 3/4 inch wide dart to correspnd with the waistline dart position of the front bodice*. Make dart 4 1/2″ long.

12. Plan the position for the second dart 3/4 wide and 4 inches lont. This dart should be the center from the end of the first dart and the side seam at the front waistline.
13. Cut out sloper. This sloper must have 1/2″ seam allowances added at waistline, side seams and center back. Add hem allowance at bottom of skirt. The hem for the basic skirt is usually 2″


You must be logged in to post a comment.