Researching and preparing a 1930s inspired pattern sloper

Introduction

I am preparing two slopers this summer. I already created one that I use for 1940s to early 1950s inspired styles. I used that for the Alice Elizabeth dress and the Linda skirt and blouse. I am now in the progress of creating a more structured sloper that I think will work well with the more detailed and fitted styles of the mid-1950s. As a challenge and contrast, I am also researching slopers from the 1930s. The look of the 1930s was very flowing and not fitted the way 1950s clothing was.

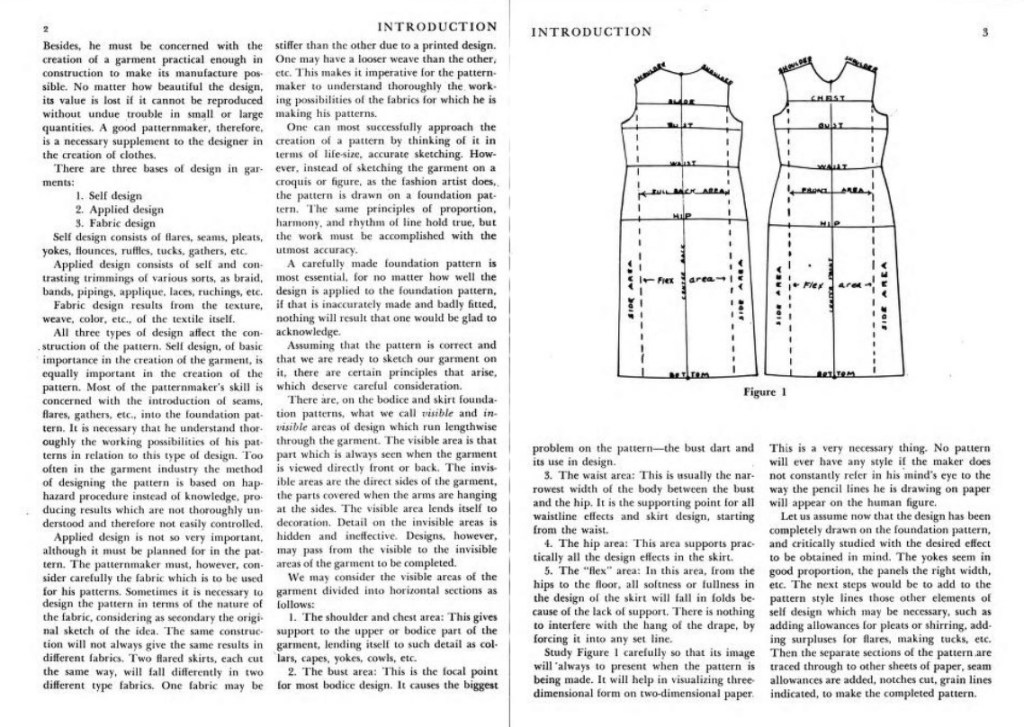
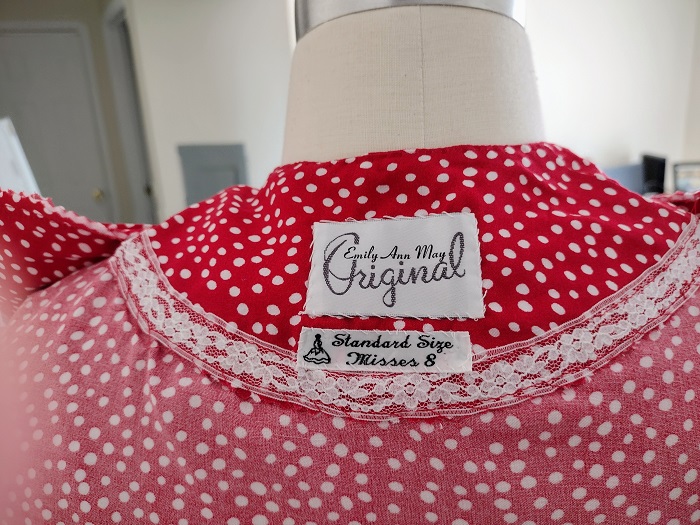
My 1940s sloper is available for copying and sizing here. It is a standard Misses 8. The sloper for the 1950s structured fashions is also in a size 8. However, I think the 1930s look is very flattering to smaller sizes so that sloper will be in a standard Misses 4. I do not intend to use drafting systems from the 1930s. Instead, I will drape a basic unfitted bodice and skirt that approximate the look of a set of pattern blocks I located in a small paperback book called Dress Cutting by Margaret C. Ralston. I will draft a fitted sleeve with vertical dart to complete the sloper.

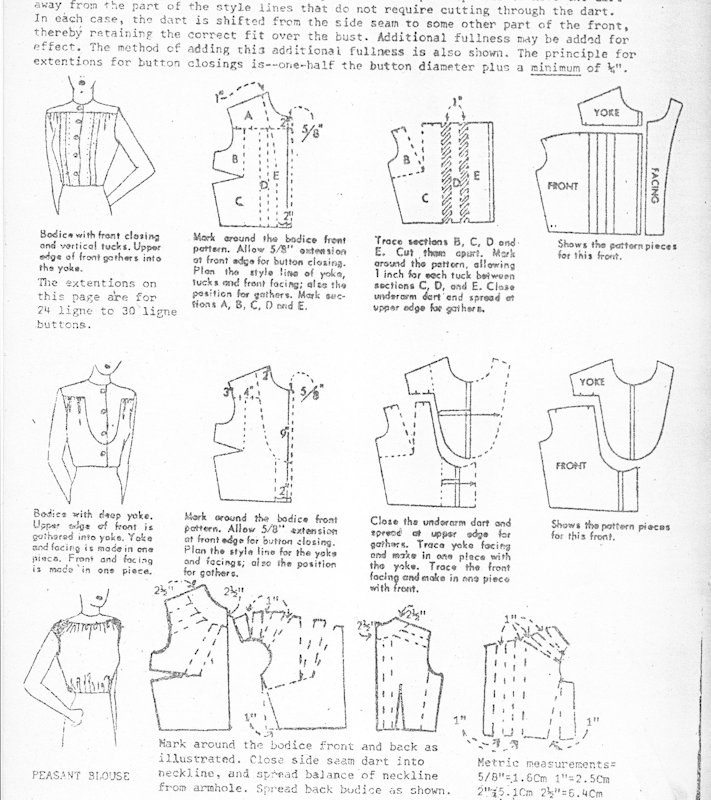
Here are the screen shots showing the basic block Margaret created from her drafting system. I find it a bit confusing to follow. I am also not sure the fit will be comfortable for the modern women. The sleeve looks very fitted and the sleeve seam is 3/4″ to the front of the bodice side seam. While I love vintage styles I do not think it is essential to go so far to recreate or be inspired by the look. The key for me is inspired interpretation.

Pattern Block from Dress Cutting by Margaret Ralston

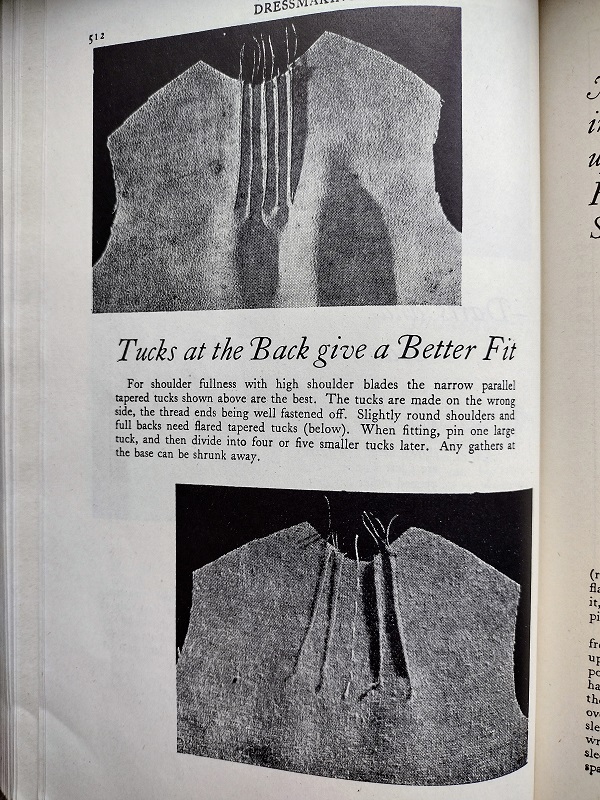
The bodice front and back appear to be completely unfitted. In some directions for pattern transformations one dart above the bodice is shown. It might also be a tuck. I assume the bodice block had enough width for this dart-tuck to be created.

The skirt is a rectangle equal to half the hip circumference. It is then slashed and overlapped and the top edge so that the waistline measurement results. I plan to drape a basic sheath skirt. Once that fits, I will distribute the dart ease across skirt front and back waistline. Then slightly overlap the sections. That will produce a slightly flared, straight skirt which is the starting point for the skirt styles in this book. For the bodice I will drape an unfitted bodice. It will go straight to the hip and have the waistline marked off as well. There will be one vertical dart above the bust in front and a neckline dart or two in the back. I’m basing the dart positions on the fitting dress or toile shown in the previous posting.

I think developing different bodice and skirt slopers gives one a more extensive collection of shapes to work from. As I research the 1930s, I’m understanding that for the 1960s an unfitted dress sloper works well. So would an A-Line skirt sloper. Those are the two key shapes for dresses and skirts of the 1960s.

Here are the snap shots of the pattern blocks from Dress Cutting. The last snap shot is a dress that can be made using he pattern blocks and transformation instructions in the book.

Cover of Dress Cutting by Margaret Ralston.

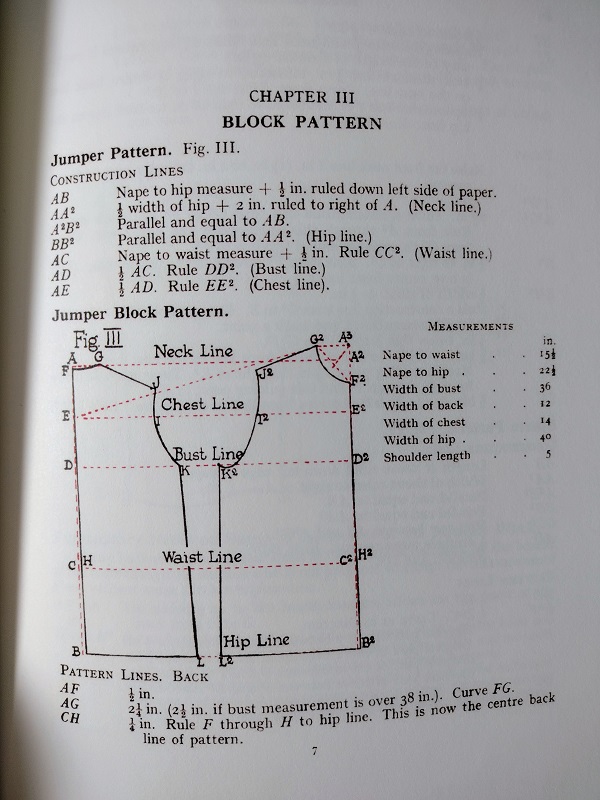
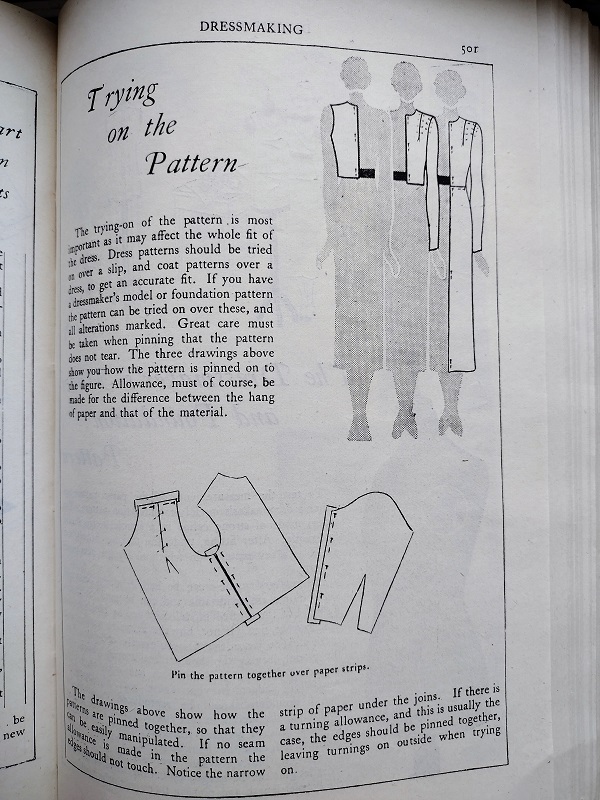
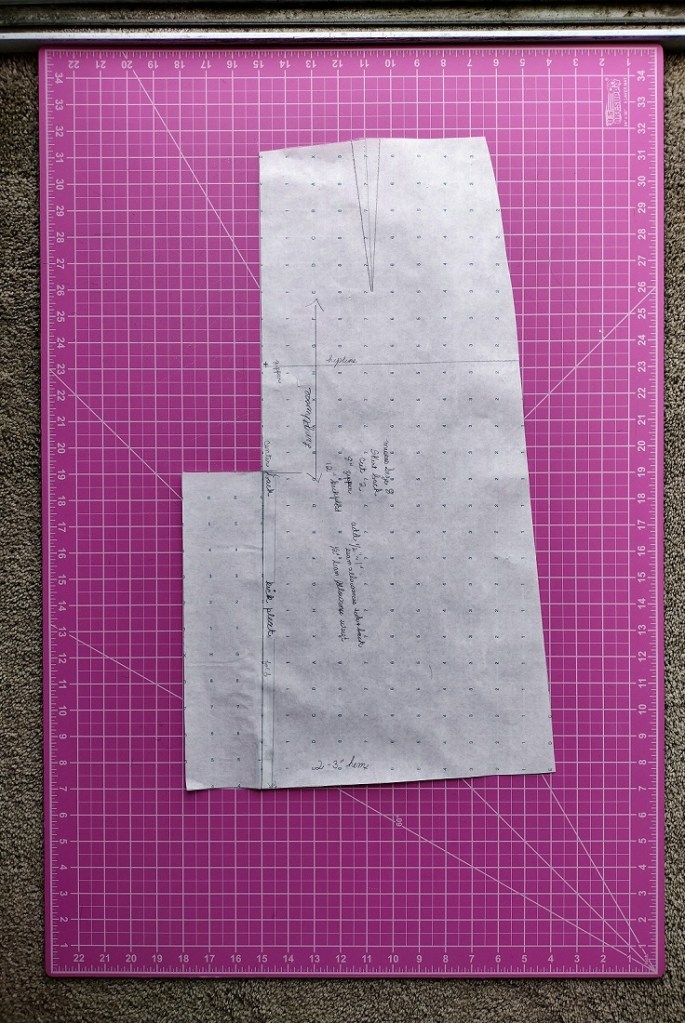
Bodice front and back.

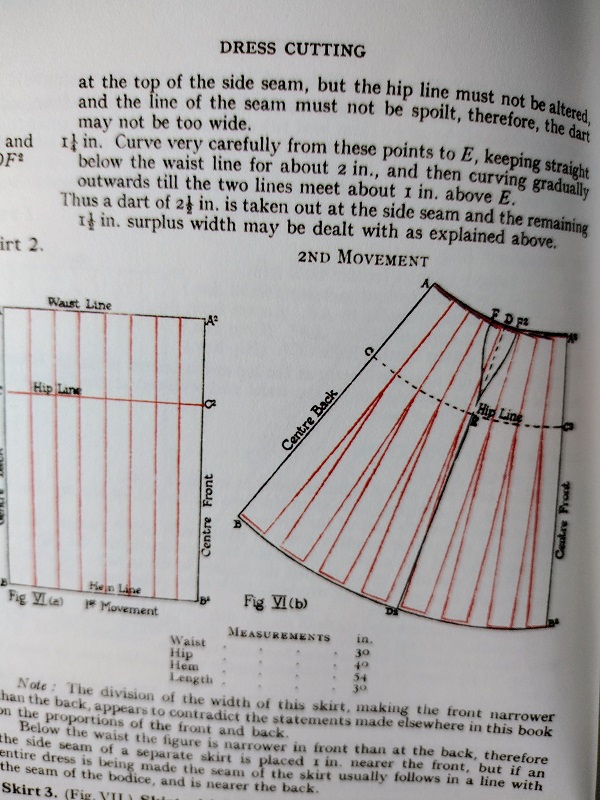
Basic skirt front and back.
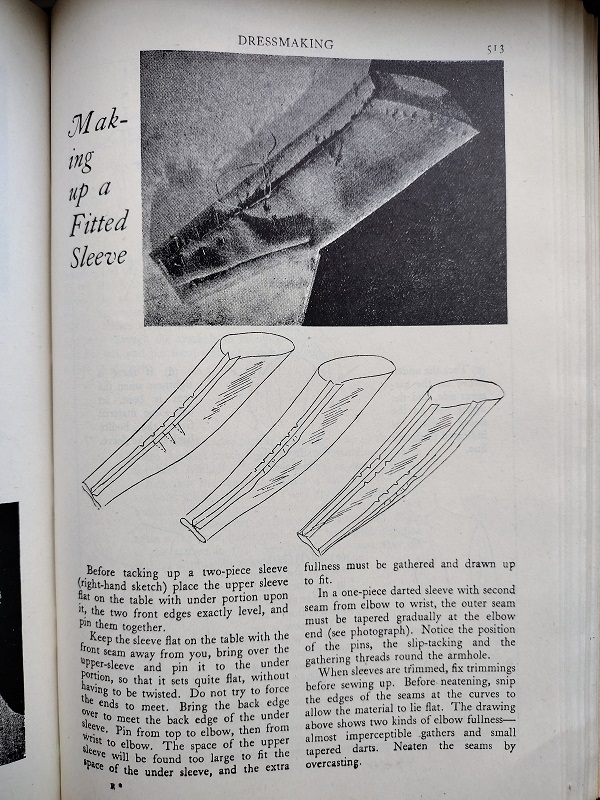
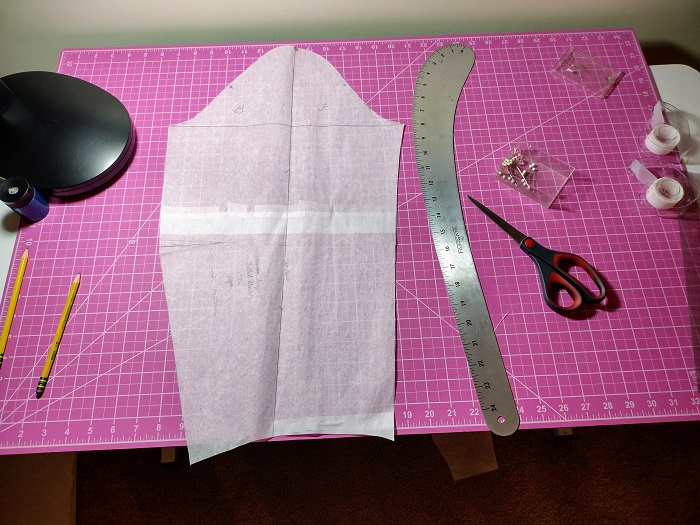
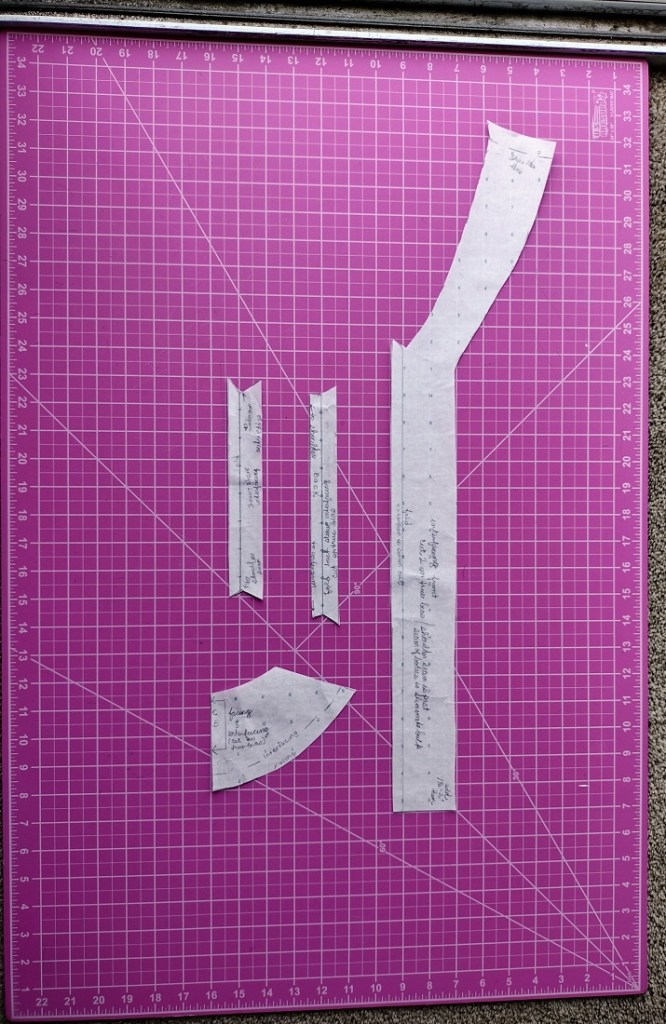
Basic sleeve.

Fitted sleeves.

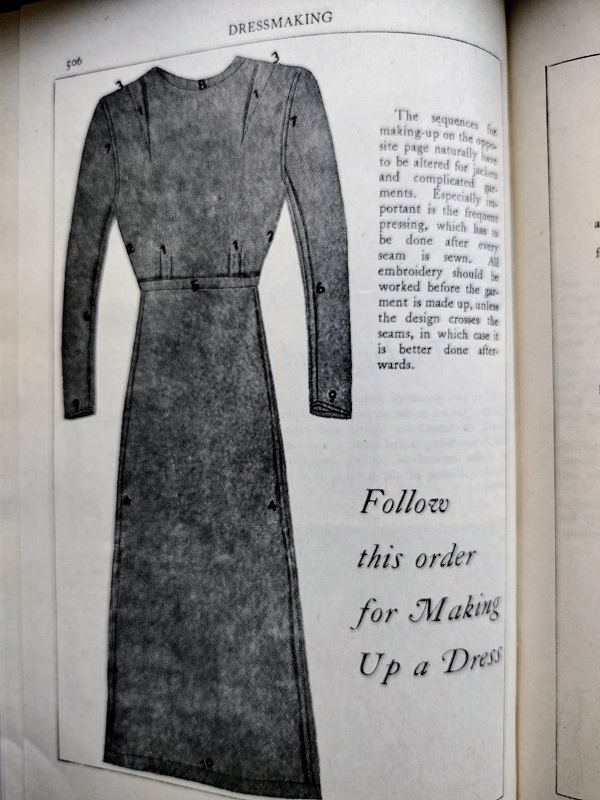
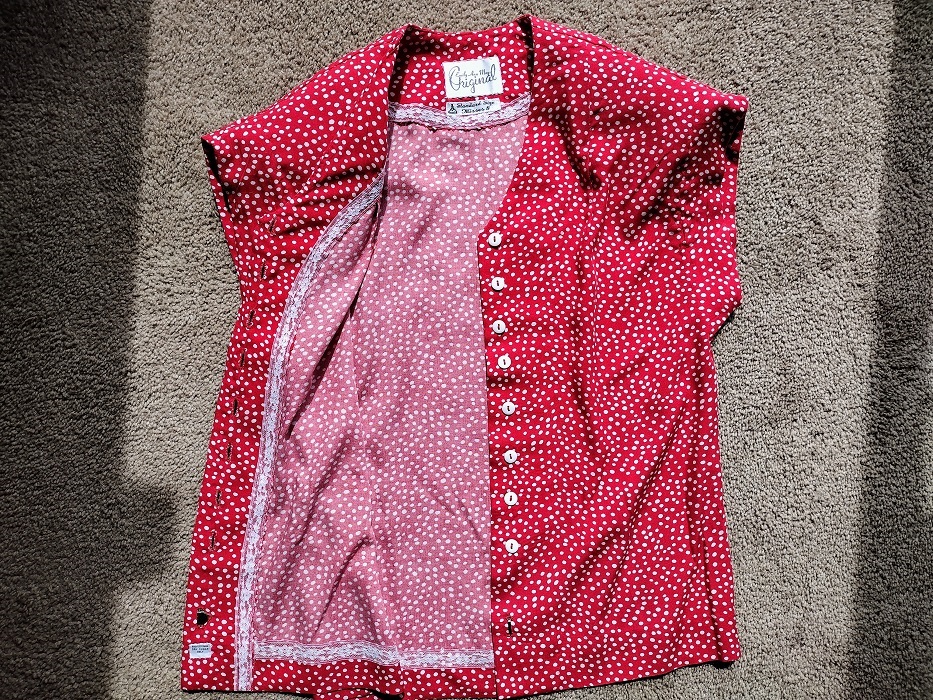
One of the styles that can be created using the block and instructions in Dress Cutting by Margaret Ralston.

The Dressmaker’s Model and Fitting Pattern in the 1930s, Part 1

Introduction

This posting initiates a series on my adventure into creating a 1930s type sloper in a modern day Misses size 4. I think modern sewistas and patternmakers can get a similar look without the expense of a vintage pattern purchase. Nor will there be the many fitting challenges that come with using a vintage pattern. My goal is to simplify a process of creation, not complicate it or make it overly time consuming. I think if enough research is done, it will be possible to come close to the shapes of a basic sloper for the 1930s.

Draping Technique I will use

I am going to use the 1940s draping system called Precision Draping which was developed by Nellie Weymouth Link. The book has been reprinted and is available at booksellers online new or used. While this is not a 1930s draping technique, it is a vintage one. It is easy to learn and provides a good foundation for exploration into the styles of other decades.

Beginning point

As always, research and reading provide insights and ideas. I begin this journey by making available for you a section of Weldons Encyclopedia of Needlework from my very small collection of vintage sewing books. It was published by The Waverley Book Col, Ltd. of Farringdon Street, London, E.C. 4, but no date of publication exists in the book! I estimate that the edition I have was published in the 1930s. As you can see in the illustrations that follow, the silhouette is close to 1930s fashions with longer hemlines and flowing skirts. The fashion figure is also slender and soft. The boxier fashions with emphasis on the shoulder line of the 1940s is not present in the chapter I post here.

We will continue this exploration into the elements of a 1930 sloper and the key takeaways for creating a sloper that can approximate the look in the next posting. For now I hope you enjoy this look into what a sloper and dress form from the 1930s looked like. What is shown here may or may not be typical but it has elements that appear in another flat pattern drafting system from the 1930s that appear in another book I have and will use in this series.

“The Dressmaker’s Model and Fitting Pattern” from Weldon’s Encyclopedia of Needlework

Style lines from a vintage patternmaking handout

In my previous posting, “What are style lines?” I explained what style lines are. I showed how a few style lines can be used to transform a basic skirt and bodice into a vintage inspired fashion from a 1964 magazine photograph.

Today, I’m sharing classroom handouts from a vintage patternmaking book. The style lines used are easy to understand and clearly illustrated on the basic bodice. Based on my knowledge of patternmaking it looks like the “slash and spread” method was used. This means, the pattern was created by tracing the basic sloper. The style lines were then drawn. After that, the pattern was slashed and spread when tucks or gathers had to be created. Other patterns were simply cut along the style lines, like the one for the princess line bodice.

I estimate that these pattern transformations are from the 1940s.

What are style lines?

Introduction

The basic pattern, a/k/a sloper, is the blueprint of a person’s body. It is a one dimensional representation of the measurements of the body used within a pattern drafting system. Or, the dress form itself is the basic pattern in three dimensional form. It represents the standard size or the size of the person for whom it was custom made.

The process of working the basic pattern into an individual style is called pattern transformation. Style lines are used to map out how the emerging style will look. They are drawn onto the basic pattern. Alternately, style tape is pinned to the dress form to show how the garment pieces will look. This helps the draper know where to mold the fabric and how the garment piece should look.

Analyzing an outfit and seeing the style lines

A knowledge of the different forms sleeves, bodices, skirts, collars, pants and dresses can take helps in analyzing an existing style. Rough sketches help clarify if one is seeing the style lines correctly or misinterpreting a photograph or sketch someone else has made. Of course the best way to analyze a garment is to see it in real time. That is not always, possible, though. When one is inspired by a vintage style sketching and studying photos is one way to help in the recreation or updated expression of that style.

An economical way to practice visualizing and understanding stylelines is to have a library of basic bodices, sleeves, skirts and slacks printed on 8 1/2 x 11 paper. With colored pencil or pen these copies can have style lines drawn over them. Immediately you can see the blueprint for the pattern transformation. Which darts and seams the style lines intersect with also comes to the fore. It is possible to get a better idea what needs to be done for the actual transformation.

Example of a style analysis and practice transformation

This photo comes from a 1964 edition of the Saturday Evening Post. Fashions from Hong Kong were featured. This cocktail outfit consists of a silk sheath shirt and unfitted, sleeveless blouse.

On copies of a basic bodice and basic skirt, fronts and backs, style lines are sketched and notes added to better understand one possible way to recreate, or at least interpret, the original 1964 fashion.

I hope these suggestions help you in your next vintage inspired style recreation or adaptation.

Work in Progress: New Misses 8 Sloper

Introduction

I have begun draping a new Misses Size 8 Sloper that is slightly different than the sloper previously completed and now available for your use to size in a graphics program. The earlier sloper has worked well but I want to create another one to check the differences in fit.

This project got its start with the pencil skirt pattern. The skirt currently available is slightly flared and more suitable to 1940s styles. For many 1950s styles a slim pencil skirt is needed. So that is what I draped. I then went on to drape a fitted bodice with darts above and below the bust. I also draped a fitted sleeve with elbow dart.

The curve on the pencil skirt breaks at the abdomen instead of the hipline. I want to see if this results in a better fit for the skirt. A fit that is attractive but not too tight. I’m hoping that the skirt will have more comfort and room to move. Not everyone has a smaller abodomen-larger hip measurement. It can also be the other way around! I look forward to seeing if this small difference results in a more flattering fit.

I drape in tissue paper using the Precision Draping technique created by author Nellie Weymouth Link. The tehcnique can be learned through her book of the same name. I will post photos of the progress and look forward to sharing the finished sloper when completed.

Photos of the pattern in progress

Original tissue paper drape is copied again to tissue paper. I call this the second pattern and it will be used to cut a full toile.

Tissue paper drape after marking. Next step is to press the paper. Then trace to a clean sheet of tracing paper.

A tracing of the drape was made to clean tracing paper. The fitted sleeve pattern needs a light pressing. Next step: cut the sleeve on fabric and add to the bodice.

This pattern is the result of testing the fit using the second tissue pattern paper. The results were good so the tissue was copied to dotted pattern paper.

Dressmaking Past & Present: Tailoring a dressmaker’s suit-Tips from Coats & Clark in the 1940s

Introduction

Dressmaking Past & Present is a new feature at Pour Moi. Fashion History provides us with inspirations for our personal style. Understanding and learning about techniques used in the past and the present helps us find a variety of methods for possible use in our own projects.

This week, I put up some scans from a small booklet published by Coats & Clark in the 1940s. Dressmaker’s Suits have some tailoring but not to the extent that a fully tailored suit does. Here are some recommendations from the booklet that can help the dressmaker achieve the look in each illustration.

“Tailoring” by Coats & Clark – Tips for sewing a dressmaker’s suit

Classic Accessories: Clutch Purse, 1940s Crochet Pattern

Introduction

A clutch purse never goes out of style. It can be used for a formal occasion. Or, it can be popped into a larger tote bag when going out for the day and come out later for use. Clutch purses are not meant to hold everything. Just what is needed for an afternoon or evening out: keys, wallet, ID card, compact, comb, lipstick and cellphone are enough.

When I lived in Bay Ridge, a neighbhorhood in Brooklyn, I frequented a craft shop that found a treasure trove of old crochet patterns in the basement of the shop. These pattern booklets were put in a large basket for customers to take . I was very fortunate to find ones that I really liked. Most of the booklets were from the 1970s. I went deeper into the basket and found 3 books. One from the 1960s and two from a period spanning 1940s-1950s.

1940s Crochet Clutch Purse Pattern

Free 1949 flat patternmaking book available!

Thanks to the Internet Archive, vintage sewing and fashion enthusiasts can download a PDF version of How to design beautiful clothes, by Esther Pivnick. The book was published in 1949.

The patternmaking system used is the same as what was taught at the Traphagen School of Design in New York City. This book offers a complete guide to taking measurements, creating basic patterns and then transforming them.

Even if you do not use the pattern drafting system, there are details and pattern transformations that can be experimented with using your own sloper. It is well worth it to download a PDF version as the original book sells for over $100 when in good condition.

Here are screen shots from the book. I was surprised to see that the skirt is similar to the result I obtained when using the Precision Draping technique from the 1947 book by Nellie Weymouth Link. There is a slight flare to the skirt. It is not the straight, tubular shape of the 1950s basic skirt.

Here are screen shots from How to design beautiful clothes which show the resulting basic front and back bodices; back and front skirt patterns; and a diagram showing the measurements needed.

Pattern Diagram: 1940s inspired skirt and blouse

Introduction

Front, back and 3/4 view of the Linda 1940s inspired skirt and blouse.

First sketch, photo of me in the finished outfit.

This pattern is released into the commons for you to copy and size in your graphics program. It is based on 1940s vintage pattern envelope illustrations.

Construction highlights are provided in this posting.

The style was developed through a sloper created with Precision Draping. The pattern is Misses Size 8.

See notes on the pattern pieces for details.

Pattern diagrams for the 1940s inspired Linda walking skirt and short dolman sleeved blouse

NOTE: No seam or hem allowances have been added to the patterns. See notes on skirt pattern for development of waistband.

Blouse front pattern.

Blouse back pattern.

Pattern pieces for facings of blouse.

Pattern for back skirt with kick pleat extension.

Pattern for front skirt with kick pleat extension.

Kick pleat underlay pattern piece.

The Linda Walking Skirt and Short Dolman Sleeve Blouse, 1940s style

Introduction

Last Spring I began development of a walking skirt and short dolman sleeve blouse based on two vintage pattern illustrations. I studied the wardrobe basics of 1940s everyday women’s wear. Clothing in the early to mid-1940s had to be functional. Fabrics, threads and notions were not easily available due to rationing. All resources, including textiles, were prioritized for the use by the troops and initiatives to move the American people towards victory in the war. This meant great sacrifice and rationing of many necessities.

Americans received ration coupons for clothing, food, shoes and other items needed for daily life. To get a new blouse, for example, so many ration book coupons had to be used for the purchase. One had to be very careful with how they used their allotment of coupons. When they were gone, there was a wait until the government issued new ration books.

This is why many everday clothes of the WWII period and shortly thereafter had a minimum of details. Everything had to be functional. Because of this simplicity, it was important to buy clothes that fit well and were well made. They had to last for a long time.

Development of the outfit

I took inspiration from two 1940s pattern envelope illustrations. The pattern was developed using a Misses Size 8 sloper developed through Precision Draping. Further draping was done on the basic blouse to develop the dolman sleeves.

The blouse features a shoulder dart, short dolman sleeves and a round neckline. As I developed the pattern and tested the toile, I learned that I needed a shoulder pad to support the shape of the sleeve on the shoulder line. Omitting the shoulder pad caused the sleeve to droop and the entire blouse looked tired. My solution was to purchase very thin, regular set-in sleeve shoulder pads and use them for the blouse. I had to experiment with the placement until they looked just right. In the end, the shoulder pad extended about 1/4″ past the shoulder line. The shoulder pads are about 1/4″ thick.

I lowered the neckline of the blouse so I could wear a locket or chocker with the blouse if I wanted to. I selected a very silky, dotted print. To create some visual interest I used 1/2 wide white buttons sewn on with red thread. The contrast worked with the red background and the white dots on the fabric.

I think that 1940 walking skirts are much more figure flattering than pencil skirts. Most 1940s skirts curve over the hip and slightly extend out from there to the hemline. This is not the cookie-cutter A-Line skirt of the 1960s. This is more a slim skirt with a nice built in movement. The skirt moves very nicely when walking. I added kick pleats in front and back to get the most movement out of my skirt.

Fabrics, sewing and finishing details

The front facing of the blouse is in one with the blouse front. A separate facing piece is used for the back. The fabric is very slippery and needed gentle shaping for the neckline and blouse front. I cut the cotton batiste used for the interfacing on the true bias. This worked well with the fluid properties of the fabric. Seams were stitched together, pinked and then stitched again away from the edge. All seams were pressed to the back. Wrights Flexi-Lace was used to finish facing, sleeve hem and blouse hem. The entire facing was slant stitched by hand to the blouse using a fine hand sewing needle and small stitches that were not too tight.

The bias cut batiste interfacing has 1/2″ extra past center front. This creates a soft roll on the front of the blouse. The sleeve edges have a 3/8″ bias cut interfacing that extends past the hemline to create a soft fold when hemmed. The sleeves also are finished with Wrights Flexi-Lace.

The skirtis a lightweight blend that needed body to support the kick pleats. For this reason I choose to underline the skirt. Seams were pinked and straight stitched 1/8″ from the edge. The edges around each kick pleat and the hem are finished with Wrights Flexi-Lace. To add some visual interest I backed the kick pleat insert with the blouse fabric. On the back of the skirt I placed the size and designer labels on the kick pleat. The kick pleat is catched stitched to the underlining at the top.

The skirt has a side lapped zipper application that is hand stitched into place. The waistband uses Banroll to maintain the shape.

The dolman sleeve has a low armhole opening. This blouse is very comfortable but the bra shows just a little if the arm is raised. If this is a problem a camisole or slip can offer some more coverage. Personally this does not matter to me, as I do not think that many people are going to be looking under my arms and into my blouse.

Since the fabric was very slippery, easing the facing into the proper position created problems. I had to place the blouse inside out on the dress form. Then I pinned and basted the facing into place and after that the hem.

The finishing touch is a custom made label and size label. This always gives me a great sense of accomplishment. I recommend getting your own custom labels for your own creations.

Photos of me wearing the Linda skirt and blouse

Linda was a popular name for girls in the 1940s. I chose this name because it conveys a sense of the everyday which this outfit is meant to do. The emphasis is on fit and a flattering result. I am delighted with this vintage inspired outfit because it can work today and any day in any year.

The finished pattern diagram is available in this posting. It may be copied and sized in your graphics program. I release the pattern into the commons for anyone to use. Always test the pattern and make adjustments where needed.