Meet Katie—my ever-patient mannequin and today’s muse. I’ve styled in a look for her that’s quietly elegant, budget-friendly, and built entirely from my own closet. No splurges, no fast fashion—just timeless pieces collected over time, chosen with care and worn with confidence.
Katie wears:
A cream pencil skirt in a classic cut—versatile, flattering, and ready to star in future posts.
A linen-blend blouse with cream, gold, and tan stripes that echo her neutral palette.
Beige sandals and a gold fabric hairband for understated polish.
Four beaded bracelets in soft cantaloupe, white, beige, tan, and gold—just enough sparkle to say “I’m here.”
The magic? These pieces weren’t bought as a set. They came from different seasons, different shops, and different moods. But they work—because I stayed true to my style sense: flattering lines, neutral shades, and colors that make me feel like me.
This is your reminder: –You don’t need a new wardrobe. You need your style sense. –Shop your closet. Trust your eye. Build slowly. Choose what flatters and feels good. Chic isn’t about cost—it’s about coherence, confidence, and care.
You’re already stylish. Let’s keep building on that.
Disclosure and Credits: This posting was researched and drafted by me. It was rewritten and condensed by Copilot for easier readability. All photos taken by me using the camera in my LG Android phone. Photos edited in the phone and in MS Paint.–EmilyAnn Frances May
You don’t need a closet full of coordinated outfits to look chic in summer. With just a few basic skirts and tops, you can create stylish, breathable looks that feel effortless. The key is simplicity—soft colors and gentle prints help you project calm and ease, even in heat and humidity.
This is the first post in my Style Sense series. Each look is built from two slim skirts and a mix of solid and printed tops. None of the pieces were bought as a set—they were collected over time. When you stay true to your style and color preferences, your wardrobe naturally works together. You can always shop your closet to create something fresh.
Summer Chic: Vanilla Crème
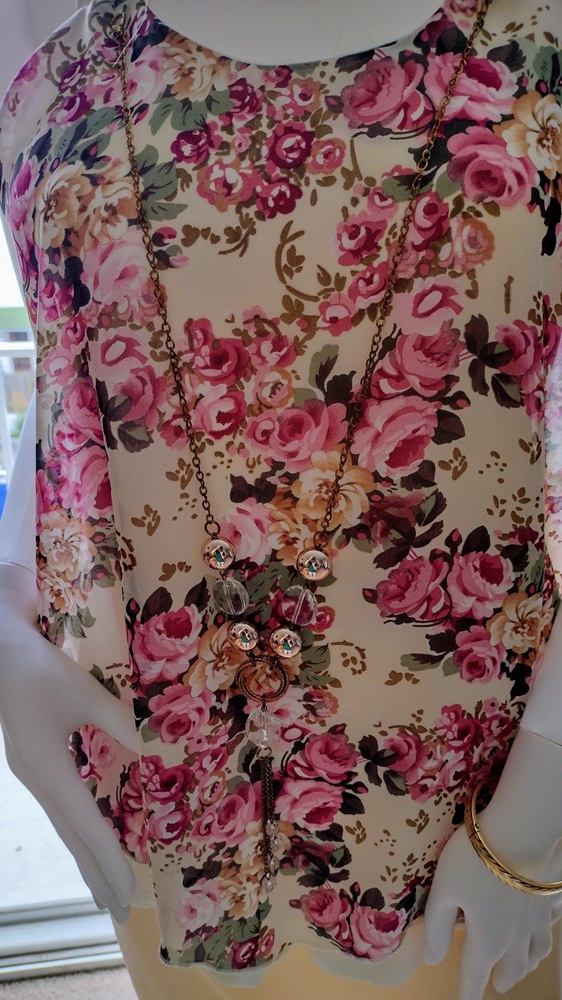
A vanilla-colored pencil skirt is a summer essential. It pairs beautifully with halter tops, tanks, and breezy overblouses. Its soft neutrality complements both prints and solids, making it a versatile base for countless outfits.
In this look, the top is the focal point. To keep the eye drawn upward, I added a simple gold bangle and chose beige sandals that contrast subtly with the skirt. The soft floral tones—roses and leaves—add a feminine touch without overwhelming the palette.
Necklaces can feel heavy or sticky in humid weather. This top features a clever solution: the necklace is detachable and secured with clear plastic loops sewn beneath each shoulder. Each side of the necklace has a clasp that hooks into the loops. It’s a thoughtful detail that can be adapted to your own summer sewing projects.
Style Notes
– Choose a mid-calf or ballerina-length pencil skirt in a neutral shade like vanilla – Look for a stretch skirt with no zippers or wide waistbands—comfort matters in the heat – If the skirt is sheer, wear a lightweight slip in white or off-white – Select a top in a color or print that complements the skirt – Sandals should be close to the skirt’s shade, or slightly lighter/darker – Let the top be the focal point – Keep jewelry minimal—bangles or earrings work well without adding bulk
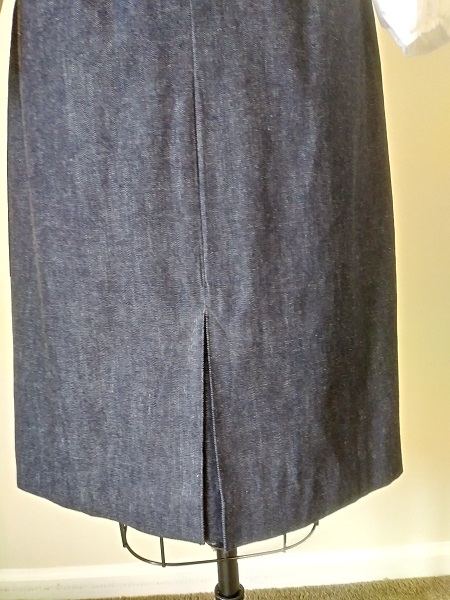
In this posting I share some of the fitting and sewing techniques I used to refine my favorite denim sheath skirt. The skirt is made with a bottom weight 100% cotton denim by Kauffman. The fabric was laundered and dried prior to marking, cutting and sewing.
The pattern was developed entirely through draping in cotton muslin.
The skirt had several parts of the construction done by hand. The blouse was purchased online.
Fit is Everything!
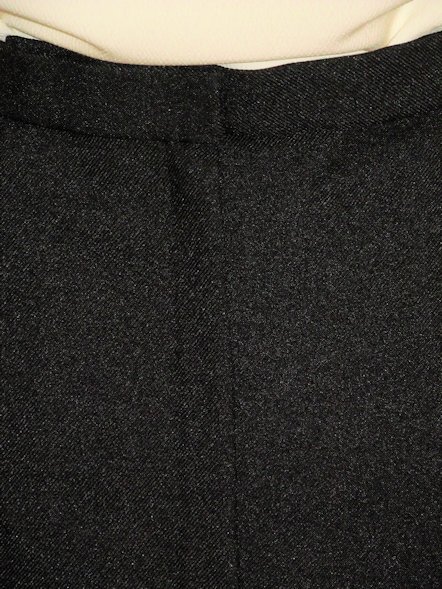
To give the skirt more style ease I had to add extra width at waist, hip and hemline. Some sewing books say extra width can be added at the side seam. I found that it is better to open the pattern between the second dart and the side seam. You measure the mid-way point between the dart and the side seam. Draw a vertical line from waist to hem. Then open 1/4 of the total amount of style ease needed. This alteration is the same for front and back of the basic sheath skirt pattern.
In the photo of the back pattern piece for the skirt you can see the place where the cut was made and extra paper added to the pattern between the second dart and the side seam.
Note: The pattern for the skirt was made using Precision Draping by Nellie Weymouth Link. I gained weight since the time the original drape and pattern was made. This necessitated the need for the alteration.
Dressmaker Finishes for a Refined Look
A slot zipper application was used. I followed the hand sewing technique detailed in Couture Sewing by Claire Schaeffer. Instead of using a prick stitch or back stitch, the zipper is sewed into the seam using tiny running stitches. To further secure the zipper in place, the zipper tape is fell stitched only to the side seams, at the edges. The zipper stop is covered by a lightweight piece of lining fabric. I used a small piece of lace hem tape instead.
A kick pleat with insert was made in.center back seam. It provides ease of movement as well as a finishing touch. The top of the kick pleat is stitched into place using a triangular shape. A kick pleat is more refined than a high slit at center back of the skirt. That is why this skirt works well for casual dress days at work or an outside meeting with business associates.
All seams were pinked and then edge stitched. Wrights Flexi-Lace tape provided a finish for the hem and kickpleat.
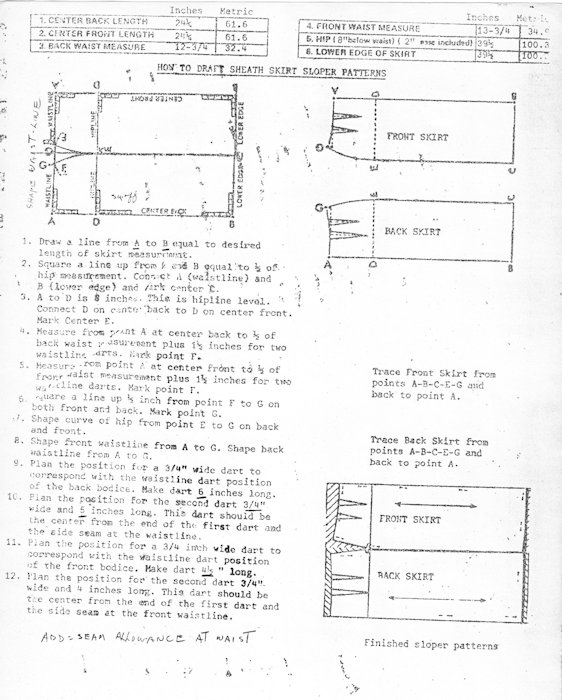
These pattern drafting instructions were given to me by a student who attended the Traphagen School of Design in the 1980s. It was a private design school in New York City. The instructions are very simple when you take the time to read them through before you start drafting your pattern. Make a muslin to test the fit before using this as the basis pattern for any pencil skirts or other designs based on the basic skirt sloper. The basic sheath skirt (a/k/a pencil skirt, slim skirt, wiggle skirt) has not changed. This pattern can serve as a sloper for vintage or modern skirt designs.
Measurements Needed
Center Back Length (from center back waist to desired length of skirt) Center Front Length (from center front waist to desired length of skirt) Back waist measure (from side to side seam at back) Front Waist Measure (from side to side seam at front) Hip Measurement – 7 to 9 inches below waist-use widest circumference. Add 2″ of ease to measurement. Lower Edge of Skirt (this measurement is determined by the hip circumference plus 2″ ease
Important Note: Look at the complete diagram. The rectangle runs from point A back to point A front at waistline. Point B back runs to point B front. Point A to B in the back and Point A to B in the front is the skirt length. I found it easier to start with a large rectangle where A-A and B-B equals the complete hip measurement plus 2 inches of ease. So draw A-A for the waist. The draw A to B for center back. Draw B to B for lower edge. Then from B in lower edge of front draw a straight line up to A front.
Then proceed to step 2.
1. Draw a line from A to B equal to desired length of skirt measurement.
2. Square a line up from A and B equal to 1/2 ofequal to 1/2 of B (lower edge) and mark center C.
3. A to D is 7 to 9 inches below waistline. This is the hipline level. Connect D on center back to D on center front. Mark Center E.
4. Measure from point A at center back to 1/2 of back wait measurement plus 1 1/2 inches for two waistline darts. Mark point F.
5. Measure from point A at center front to 1/2 of front waist measurement plus 1 1/2 inches for two waistline darts. Mark point F.
6.. Square a line up 1/2 inch from point F to G on both front and back. Mark point G.
7. Shape curve of hip from point E to G on back and front.
8. Shape front waistline from A to G. Shape back waistline from A to G.
9. Plan the position for a 3/4″ wide dart to correspond with the waistline dart position of the back bodice*. Make dart 6 inches long.
10. Plan the position for the second dart 3/4″ wide and 5 inches long. This dart should be the center from the end of the first dart and the side seam at the waistline.
11. Plan the position for a 3/4 inch wide dart to correspnd with the waistline dart position of the front bodice*. Make dart 4 1/2″ long.
12. Plan the position for the second dart 3/4 wide and 4 inches lont. This dart should be the center from the end of the first dart and the side seam at the front waistline.
13. Cut out sloper. This sloper must have 1/2″ seam allowances added at waistline, side seams and center back. Add hem allowance at bottom of skirt. The hem for the basic skirt is usually 2″
Further consideration of my plans for my next project is needed. The sketch of the chambray shirtwaist dress expresses my idea. However, the details I had envisioned must be changed.
I had planned on having in-seam buttonholes. I have been wanting to try this kind of buttonhole for a long time. I want to see how it will work on light to medium weight fabrics. As I thought about my shirtwaist dress I can see that having a seam along center front will cut into the middle gore of the skirt front. This will add extra weight and interfere with the flare. I plan a six gore skirt for the dress.
Possible solutions for new design details
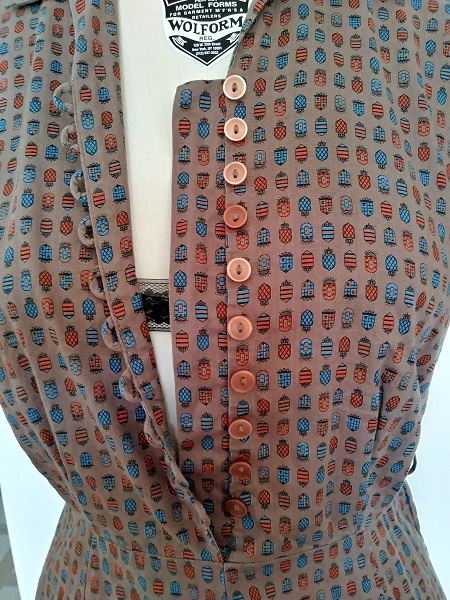
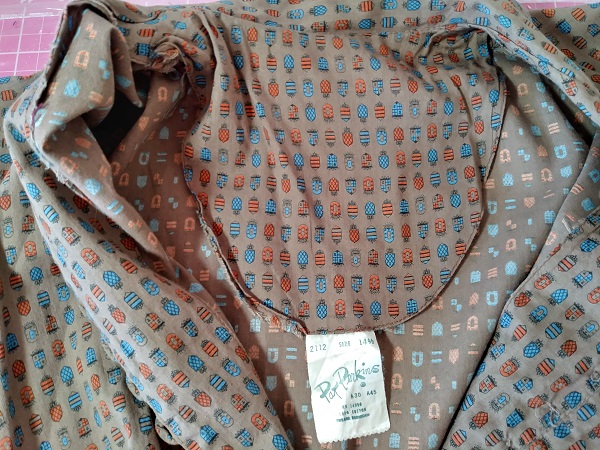
I decided to analyze the construction details of a Pat Perkins everyday dress I bought on Etsy. Pat Perkins was the name of a dress manufacturer in the 1950s. They provided some of the dresses worn by actress Audrey Meadows in a popular sitcom, “The Honeymooners”.
I found the solution to keeping the flares of the skirt undisturbed. I will have to install a lapped zipper into the side seam. I will use the same treatment as used in the Pat Perkins dress. This means I can use in-seam buttonholes for the dress. However, the buttons will only be used on the bodice. Having a size zipper will provide the means for ease in putting the dress on or off.
Pat Perkins Everyday Dress circa 1950s
The dress has a fitted bodice with two vertical tucks on each side at the front. The short, unfitted sleeves have a self cuff that turns up from the inside. The collar is similar to a blouse collar and has very little stand. The back bodice has two very small tucks on each side.
The skirt i seven gores: 4 in front and 3 in back. There is a slight flare in each panel. The panel at center front has a seam. At the back there is no seam in the center skirt panel.
To make the dress easy to put on and off, there is about 3″ of style ease at the waist. The fit near the chest and bust has a little less style ease. This will help me adjust my pattern after using the sloper to trace the basic pattern.
The zipper is machine stitched into the left side seam. There is an underlap of fabric that provides body for the zipper and protects the wearer from feeling the zipper teeth. I plan to do the zipper application by hand and use a lightweight nylon zipper. The one in the original dress is metal.
The dress closes with self fabric button loops at center front. An underlap on the left side of the front bodice provides support.
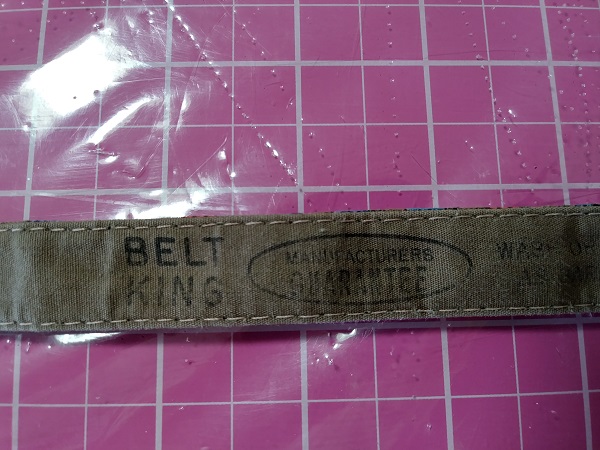
The belt holes are not reinforced with any stitching. No eyelets were used. The buckle is covered with the fashion fabric. Narrow loops at the side seams are the only support to hold the belt in place. The backing has the stamp “Belt King”. I plan to use a belt kit and eyelets. At the side seams I usually use thread loops.
To lend a touch of support to the back of the dress a long facing is used as part of the collar treatment. I do not plan to use this neckline finishing since my dress will have a yoke.
The seams are not finished. No pinking, no edge stitching. The waistline seam is pressed down rather than up. The hem was turned twice and looks to be hand finished.
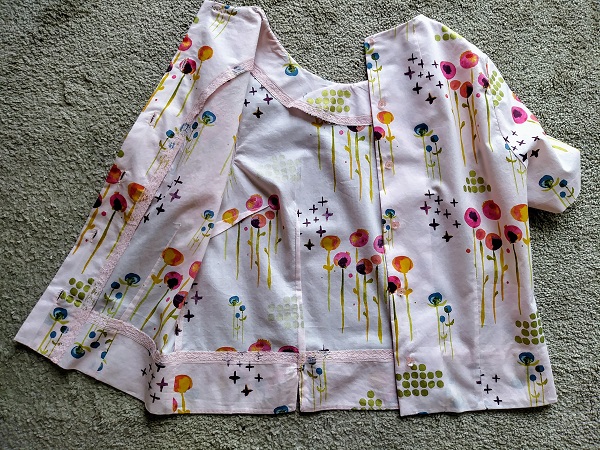
I purchased an early 1960s blouse by the Tropicana company during the furlough from my job due to COVID-19 this past Spring. The blouse provided a fun challenge to me during those days at home. I decided to renew my skills in draping and recreate as much as possible the blouse. As happens, the blouse was not enough. I decided to make a denim skirt to go with the Tropicana blouse and my own version of it.
My recreation was draped on a Standard Misses size 8 form. The resulting pattern was then altered to address my own fitting needs.
The original Tropicana blouse has slits that open from below the waistline.. The skirt and blouse are worn over a white full-slip. The slip provides an extra layer under the lightweight fabric of the blouse. Without a slip or cami, one’s bra will be visible.
The original skirt was altered from a Misses 8 to fit my skirt size which is between a Misses 8 and Misses 10. I have pinned it to better fit the form.
I do not pose for photos in my finished garments. The reason is to keep attention on how I created the look. I want any reader to review my content and consider if these same style elements can be applied to creating a similar style expression for themself.
Comparison: Vintage Original and My Reproduction
Tropicana blouse. Front view.My reproduction blouse. Front view.Vintage Tropicana blouse. Back view.My reproduction of the blouse. Back view.
An unusual detail of the original blouse are the buttonholes at the back. The first buttonhole is horizontal, the rest are vertical. I duplicated this in my reproduction. The reason the first buttonhole is horizontal may be to ensure this stress point remains closed. The neckline of the original is quite close to the neck. I scooped my version a little more to make the blouse more comfortable. Perhaps the vintage blouse was meant to be worn with a short string of pearls or a necklace on a short chain. I opted for comfort.
Finishing Details
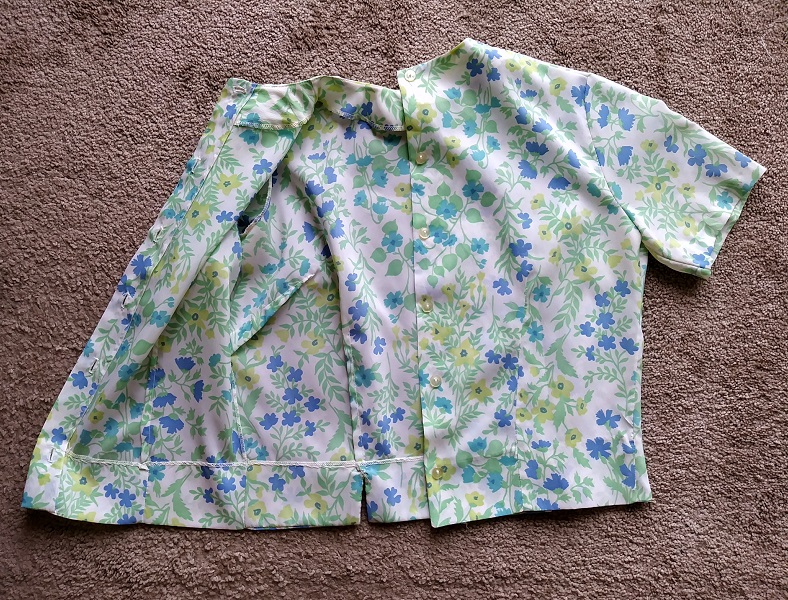
Inside of Tropicana blouse.Inside my reproduction of the blouse.
A narrow merrow-type of stitching finished the edges of the hem, seams and facing. I got fancy with my version of the blouse. I used a pink flexi-lace to finish the hems and facing of the blouse. Seams were straight stitched, then zig-zagged together and pressed towards the back.
Little Details
Tropicana blouse, 3/4 view. My reproduction blouse, 3/4 view.
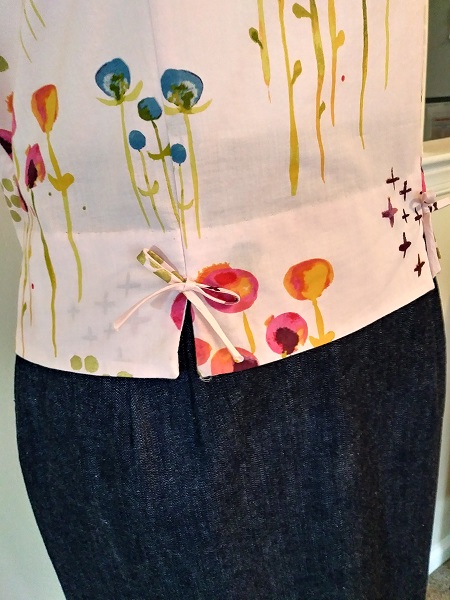
The original and my reproduction have a vertical tuck that ends 1″ below the apex of the bust and about 2″ up from the hem. At the 2″ mark the tuck ends and the slit begins. A bias cut strip of fabric is sewn, turned right side out and hand sewn above the opening of the slit. It is them tied into a bow.
A side bust dart, about 2″ down from the armhole, provides slight shaping in the original. My reproduction goes straight down from that point.
Skirt Details
The skirt is a medium weight denim by Kauffman. I made a kickpleat for the back and draped for a relaxed fit. The denim shreds so seams were finished by straight stitching 1/4 ” in from the edge and then pinking. The hem and edges of the kickpleat were finished with navy blue flexi-lace hem tape. The kickpleat is held in place by small inverted “v” shaped stitching at the beginning of the pleat.
Jewelry and Shoes
Spring into Summer gets humid here in the Tri-State area (NY-NJ-CT) so keeping things simple with jewelry and accessories is important. I chose to work with gold jewelry since there are golden circles that are part of the pattern on the blouse fabric. The tiny heart charm has a diamond chip at the center of an 8 pointed star. The pattern of the blouse does not necessitate a necklace but I’d wear one anyway. The golden bangle was my Moms and my Grandmother wore hoop earrings similar to the ones I chose to complete the look.
Beige sling back shoes help the leg look longer since the eye is drawn upward. The bonus is that these shoes are also one of my choices for the denim chambray dress I intend to make as my next project after completing the basic fitting toile in progress now.
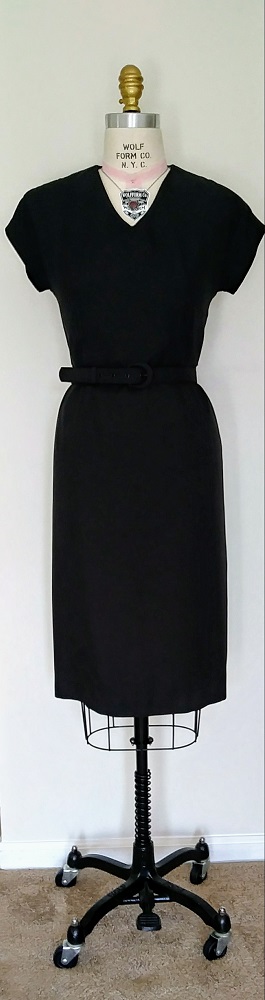
The Little Black Dress is a must when you need a reliable classic to use for many occasions. I made mine using a fitted bodice with short dolman sleeves. Fit was achieved through vertical darts under the bust and on each side of the back. 1/4″ dolman sleeve shoulder pads were trimmed around the edges to accomodate the neckline finish. Shoulder pads were then covered in black lining fabric.
The rayon fabric was lightweight. To provide body and make it opaque, I underlined the complete garment.
The sheath skirt is shaped with just one dart on each side of the front and each side of the back. I kept the fit easy so that it is not too tight. This is important since I wear the dress for family events.
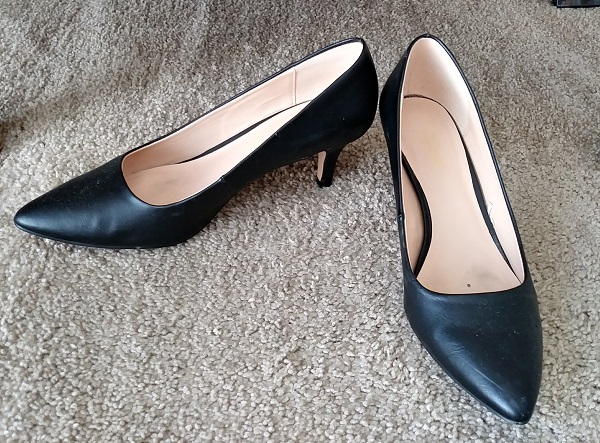
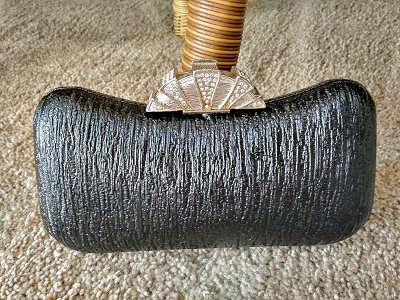
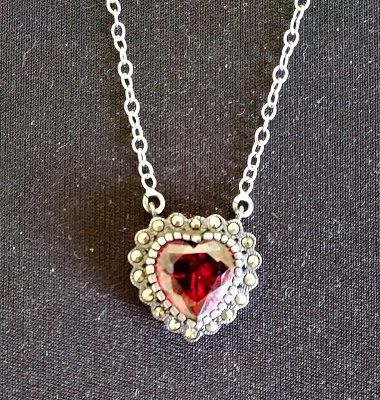
To keep the look understated I often accessorize with black, low heeled pumps and a clutch purse with faux marcasite clasp. A heart shaped red crystal surrounded by marcasite necklace completes the look.
To keep the focus on the accessories I had a fabric covered belt made by Bee Lignes. Please visit their site for your customized belt and covered button needs. The workmanship is top quality. Since the belt is handmade to your specifications you may have to wait a few weeks for delivery.
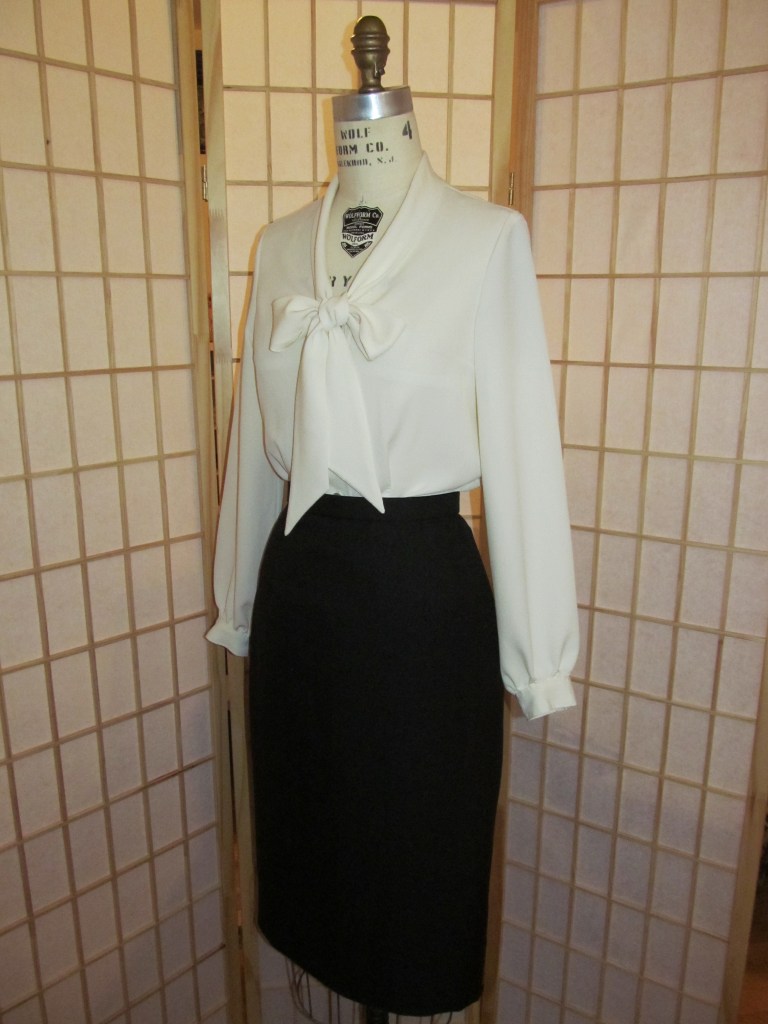
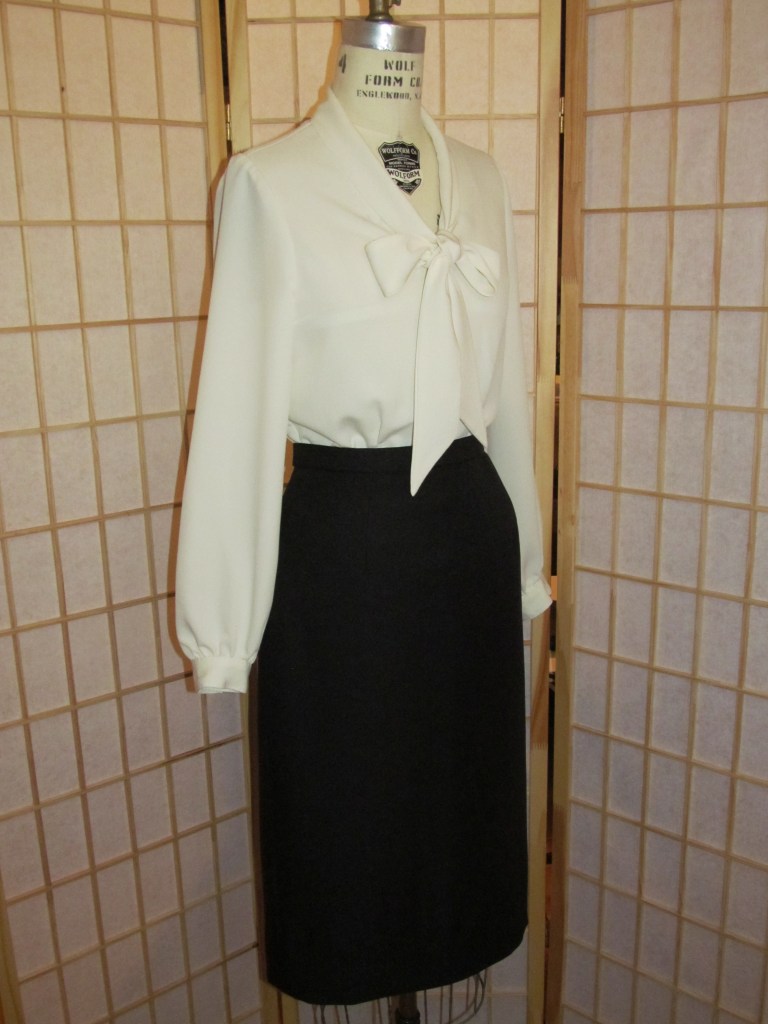
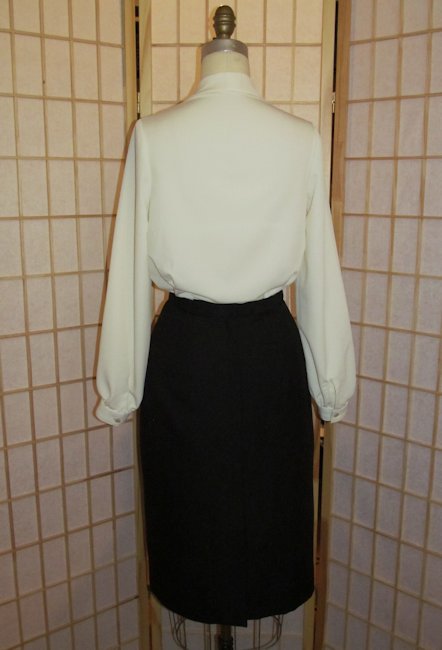
A perfect outfit for work or a meeting with a client. The pebble crepe blouse has a pussycat bow made from a bias strip of fabric which finishes the neckline.
The pencil skirt achieves a good fit through two darts on each side of the front and back. A kick pleat allows greater walking movement without exposing the legs. The zipper is hidden inside of the back seam.
Since the bow is the focal point at center front the best accessories are either earrings or a headband or pretty comb. I chose these stud earrings with amber colored crystals that complement the cream colored crepe of the blouse.
Pour Moi means for me in French. I chose this name for my new blog because it focuses on the evolution of my personal style…what is flattering, pleasing and best for me. I hope you will join me in this journey and learn some new things to help the development of your own dressmaking skills and personal style.
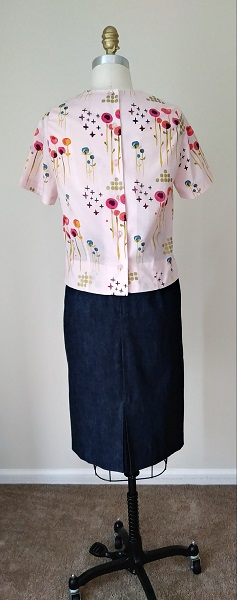
My personal choice of style is understated and simple. I want to make a positive impression but not overwhelm others. Here is an example of one of my favorite styles made in 2014. It consists of a gathered skirt, sleeveless bodice with double French darts and a fabric covered belt. The bodice was draped and the skirt drafted. A string of pink pearls completes the outfit. It looks as good in 2020 as it did in 2014.


You must be logged in to post a comment.