Free 1949 flat patternmaking book available!

Thanks to the Internet Archive, vintage sewing and fashion enthusiasts can download a PDF version of How to design beautiful clothes, by Esther Pivnick. The book was published in 1949.

The patternmaking system used is the same as what was taught at the Traphagen School of Design in New York City. This book offers a complete guide to taking measurements, creating basic patterns and then transforming them.

Even if you do not use the pattern drafting system, there are details and pattern transformations that can be experimented with using your own sloper. It is well worth it to download a PDF version as the original book sells for over $100 when in good condition.

Here are screen shots from the book. I was surprised to see that the skirt is similar to the result I obtained when using the Precision Draping technique from the 1947 book by Nellie Weymouth Link. There is a slight flare to the skirt. It is not the straight, tubular shape of the 1950s basic skirt.

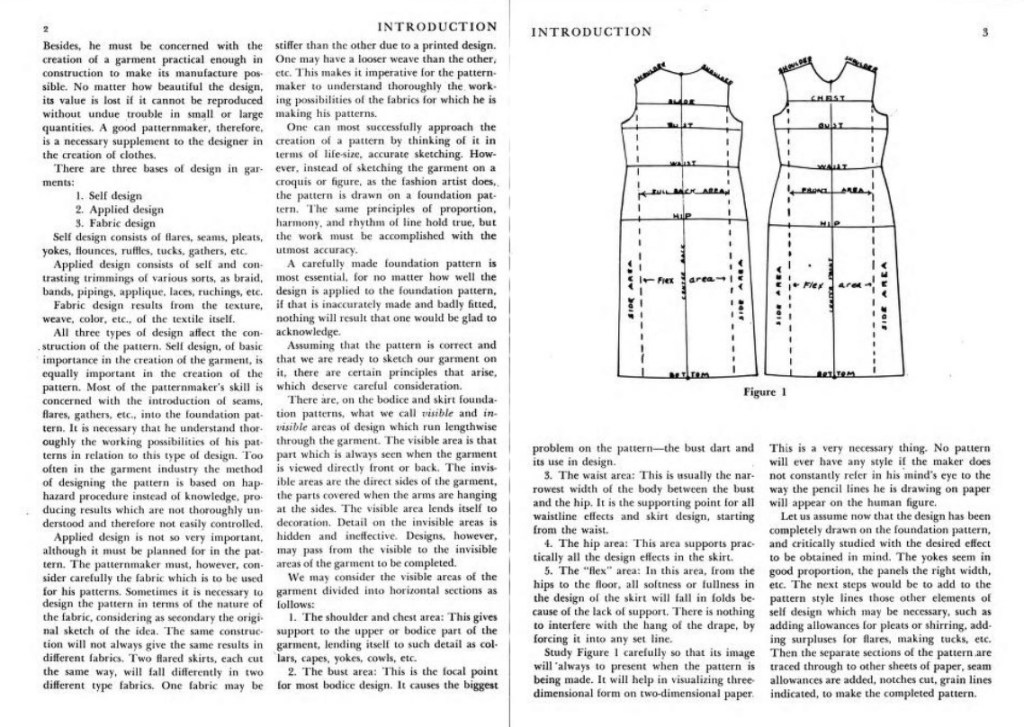
Here are screen shots from How to design beautiful clothes which show the resulting basic front and back bodices; back and front skirt patterns; and a diagram showing the measurements needed.

How to Take Measurements

When taking measurements, hold the tape measure with one hand inside, against the body. This will allow a slight amount of ease. The fitting sloper is very close to the body in order to achieve the best assessment of the fit. It also shows if the measurements are accurate or need adjusting. Style ease is added to key measurements once a pattern for a particular style is created. The basic fitting sloper is the mother of all creations. From the basic all your creations will be derived. Some patterns like a half circle or gored skirt do not require so many measurements. These styles are a good start for a pattern drafting.

Photo 1
  • CHEST CIRCUMFERENCE: photo 1A
    Place the tape around the back, under the arm and above the bust.
  • BUST CIRCUMFERENCE: photo 1B
    Around the fullest part of the bust.
  • RIB CAGE CIRCUMFERENCE: photo 1C
    About 3-4″ below the bust.
  • WAIST CIRCUMFERENCE: photo 1D
    Around the waist.
  • ABDOMEN CIRCUMFERENCE: photo 1E
    Around the fullest part of the abdomen, approximately 4: below the waist.
  • WAIST TO ABDOMEN: photo 1F
    From the waist to the circumference of the abdomen, usually 4″ to 5″.
  • HIP CIRCUMFERENCE: photo 1G
    Please note a correction: 1G should be same level as 1H. I made a mistake in labelling the photo.
    Around the fullest part of the hip. Note: I have found it varies with figure type. It can be 7 to 9″ below the waistline.
  • WAIST TO HIP: photo 1H
    Measure the distance from waist to hip.
Photo 2
  • SHOULDER WIDTH: photo 2A-D
    From the side of the neck to the tip of the shoulder.
  • NECK TO BUST LENGTH: photo 2A-B
    On the side of the neck from a point where the shoulder begins, to the bust point.
  • FRONT BODICE LENGTH: photo 2A-C
    From the same point as used in the previous measurement, continue with the tape over the bust, adjusting it to the figure down to the waist.
Photo 3
  • NECKLINE: photo 3A-B
    From the first vertebra following the shape of the neck to the place the seam shoulder begins and then to center front.
Photo 4
  • CROSS CHEST WIDTH: photo 4A-B
    From the point where the arm begins to the same point on the other arm in the front.
  • BUST SEPARATION: photo 4C-D
    Take the distance between the two breast points.
Photo 5
  • BACK BODICE LENGTH: photo 5A-F
    From the first vertebra down, along the back, to the waistline.
  • CROSS BACK WIDTH: photo 5G-H
    In the back, from the point where the arm begins, to the same point on the other arm.
Photo 6
  • FRONT BODICE LENGTH: 6A-C is the side view of measurement given in 2A-C.
  • FRONT SHOULDER TO WAIST: 6D-E
    From the front edge of the shoulder pull the tape tightly down to the waistline.
  • BACK SHOULDER TO WAIST: 6D-F
    From the back edge of the shoulder pull the tape tightly down to the waistline.
Photo 7
  • Please note that in real life the measurements in this section must be taken with the arm bent so that the hand rests on the hip. This way of measuring the arm provides room for movement.
  • ARM LENGTH: photo 7C-d-E
    From the tip of the shoulder to the wrist.
  • UPPER ARM WIDTH: photo 7A
    Take measurement at widest point of arm. Also called Biceps Level.
  • ELBOW WIDTH: photo 7B
    Around the elbow with arm bent.
  • WRIST WIDTH: photo 7E
    Around the wrist.
Photo 8
  • FRONT SKIRT LENGTH: photo 8A-B
    Length from waist to floor at Center Front when wearing the kinds of shoes the outfit will be worn with.
Photo 9
  • SIDE SKIRT LENGTH: photo 9C-D
    Length from waist to floor at point where side seam of skirt will be when wearing the kinds of shoes the outfit will be worn with.
Photo 10
  • BACKSKIRT LENGTH: photo 10E-F
    Length from waist to floor at Center Back when wearing the kinds of shoes the outfit will be worn with.