This project got its start with the pencil skirt pattern. The skirt currently available is slightly flared and more suitable to 1940s styles. For many 1950s styles a slim pencil skirt is needed. So that is what I draped. I then went on to drape a fitted bodice with darts above and below the bust. I also draped a fitted sleeve with elbow dart.
The curve on the pencil skirt breaks at the abdomen instead of the hipline. I want to see if this results in a better fit for the skirt. A fit that is attractive but not too tight. I’m hoping that the skirt will have more comfort and room to move. Not everyone has a smaller abodomen-larger hip measurement. It can also be the other way around! I look forward to seeing if this small difference results in a more flattering fit.
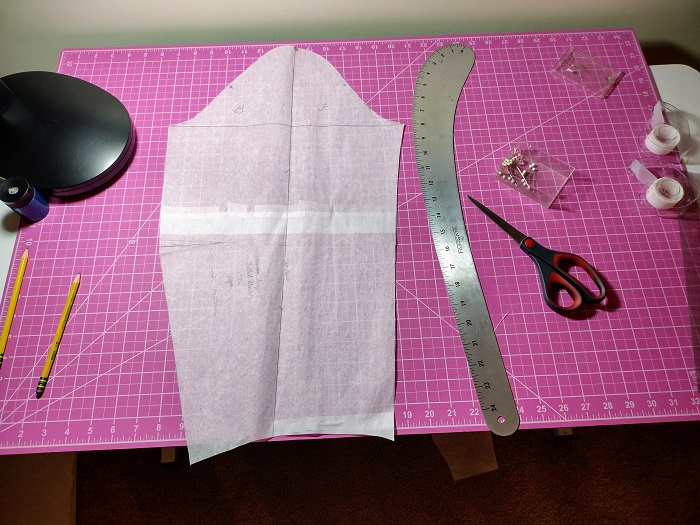
I drape in tissue paper using the Precision Draping technique created by author Nellie Weymouth Link. The tehcnique can be learned through her book of the same name. I will post photos of the progress and look forward to sharing the finished sloper when completed.
Photos of the pattern in progress
Original tissue paper drape is copied again to tissue paper. I call this the second pattern and it will be used to cut a full toile.
Tissue paper drape after marking. Next step is to press the paper. Then trace to a clean sheet of tracing paper.
A tracing of the drape was made to clean tracing paper. The fitted sleeve pattern needs a light pressing. Next step: cut the sleeve on fabric and add to the bodice.
This pattern is the result of testing the fit using the second tissue pattern paper. The results were good so the tissue was copied to dotted pattern paper.
Last Spring I began development of a walking skirt and short dolman sleeve blouse based on two vintage pattern illustrations. I studied the wardrobe basics of 1940s everyday women’s wear. Clothing in the early to mid-1940s had to be functional. Fabrics, threads and notions were not easily available due to rationing. All resources, including textiles, were prioritized for the use by the troops and initiatives to move the American people towards victory in the war. This meant great sacrifice and rationing of many necessities.
Americans received ration coupons for clothing, food, shoes and other items needed for daily life. To get a new blouse, for example, so many ration book coupons had to be used for the purchase. One had to be very careful with how they used their allotment of coupons. When they were gone, there was a wait until the government issued new ration books.
This is why many everday clothes of the WWII period and shortly thereafter had a minimum of details. Everything had to be functional. Because of this simplicity, it was important to buy clothes that fit well and were well made. They had to last for a long time.
Development of the outfit
I took inspiration from two 1940s pattern envelope illustrations. The pattern was developed using a Misses Size 8 sloper developed through Precision Draping. Further draping was done on the basic blouse to develop the dolman sleeves.
The blouse features a shoulder dart, short dolman sleeves and a round neckline. As I developed the pattern and tested the toile, I learned that I needed a shoulder pad to support the shape of the sleeve on the shoulder line. Omitting the shoulder pad caused the sleeve to droop and the entire blouse looked tired. My solution was to purchase very thin, regular set-in sleeve shoulder pads and use them for the blouse. I had to experiment with the placement until they looked just right. In the end, the shoulder pad extended about 1/4″ past the shoulder line. The shoulder pads are about 1/4″ thick.
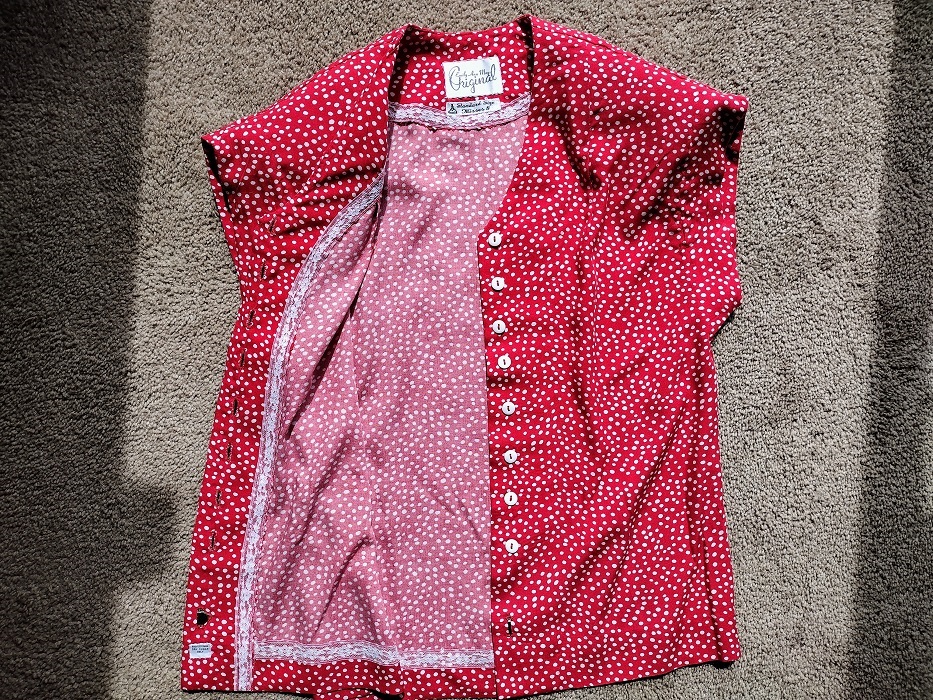
I lowered the neckline of the blouse so I could wear a locket or chocker with the blouse if I wanted to. I selected a very silky, dotted print. To create some visual interest I used 1/2 wide white buttons sewn on with red thread. The contrast worked with the red background and the white dots on the fabric.
I think that 1940 walking skirts are much more figure flattering than pencil skirts. Most 1940s skirts curve over the hip and slightly extend out from there to the hemline. This is not the cookie-cutter A-Line skirt of the 1960s. This is more a slim skirt with a nice built in movement. The skirt moves very nicely when walking. I added kick pleats in front and back to get the most movement out of my skirt.
Fabrics, sewing and finishing details
The front facing of the blouse is in one with the blouse front. A separate facing piece is used for the back. The fabric is very slippery and needed gentle shaping for the neckline and blouse front. I cut the cotton batiste used for the interfacing on the true bias. This worked well with the fluid properties of the fabric. Seams were stitched together, pinked and then stitched again away from the edge. All seams were pressed to the back. Wrights Flexi-Lace was used to finish facing, sleeve hem and blouse hem. The entire facing was slant stitched by hand to the blouse using a fine hand sewing needle and small stitches that were not too tight.
The bias cut batiste interfacing has 1/2″ extra past center front. This creates a soft roll on the front of the blouse. The sleeve edges have a 3/8″ bias cut interfacing that extends past the hemline to create a soft fold when hemmed. The sleeves also are finished with Wrights Flexi-Lace.
The skirtis a lightweight blend that needed body to support the kick pleats. For this reason I choose to underline the skirt. Seams were pinked and straight stitched 1/8″ from the edge. The edges around each kick pleat and the hem are finished with Wrights Flexi-Lace. To add some visual interest I backed the kick pleat insert with the blouse fabric. On the back of the skirt I placed the size and designer labels on the kick pleat. The kick pleat is catched stitched to the underlining at the top.
The skirt has a side lapped zipper application that is hand stitched into place. The waistband uses Banroll to maintain the shape.
The dolman sleeve has a low armhole opening. This blouse is very comfortable but the bra shows just a little if the arm is raised. If this is a problem a camisole or slip can offer some more coverage. Personally this does not matter to me, as I do not think that many people are going to be looking under my arms and into my blouse.
Since the fabric was very slippery, easing the facing into the proper position created problems. I had to place the blouse inside out on the dress form. Then I pinned and basted the facing into place and after that the hem.
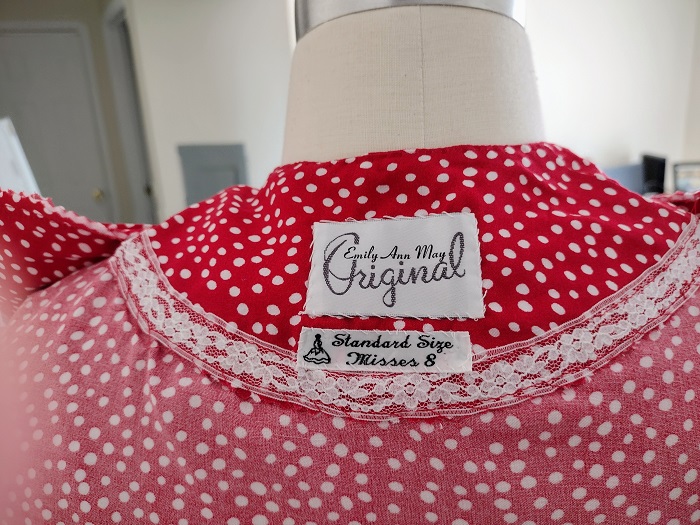
The finishing touch is a custom made label and size label. This always gives me a great sense of accomplishment. I recommend getting your own custom labels for your own creations.
Photos of me wearing the Linda skirt and blouse
Linda was a popular name for girls in the 1940s. I chose this name because it conveys a sense of the everyday which this outfit is meant to do. The emphasis is on fit and a flattering result. I am delighted with this vintage inspired outfit because it can work today and any day in any year.
The finished pattern diagram is available in this posting. It may be copied and sized in your graphics program. I release the pattern into the commons for anyone to use. Always test the pattern and make adjustments where needed.
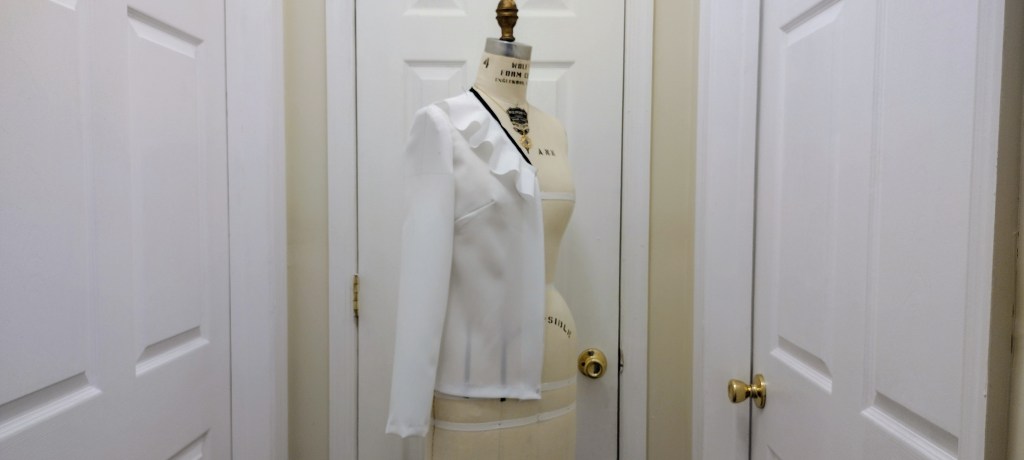
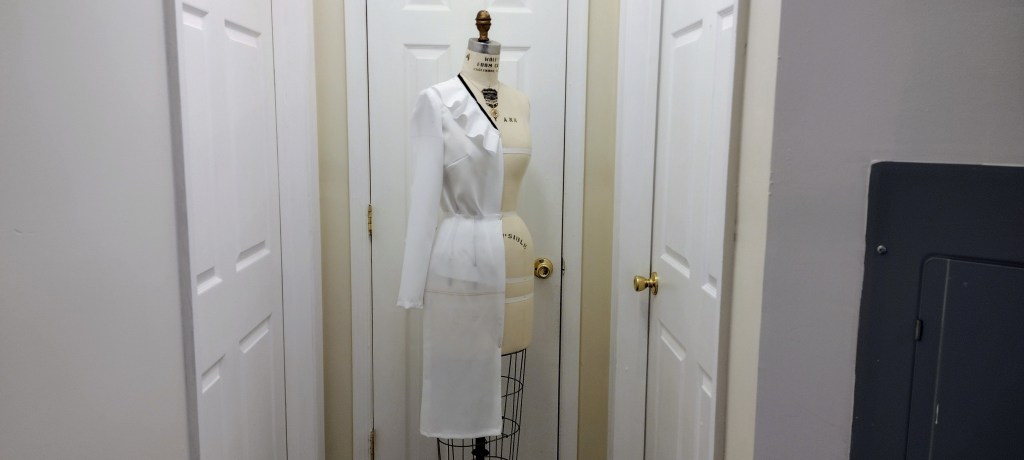
More practice in Precision Draping. Half-toile of pattern made from tissue paper drape. First fitting. Sleeve made through flat patternmaking. Ruffled collar made off of the drape through flat patternmaking. Facing and buttonhole extension to be added. To be paired with a pencil skirt drafted from a pattern created with instructions from the 60s.
Style influences are from the clothes my Mom and the neighborhood women wore when I was growing up in Dyker Heights, Brooklyn.
New work in progress…I am taking up the challenge to drape in tissue paper. During WWII there was rationing of consumer goods including fabrics like cotton and silk. To conserve resources for the war effort, fashion schools and books about patternmaking taught students how to drape in tissue paper instead of muslin. The technique was used by author Nellie Weymouth Links in her 1947 book “Precision Draping”. I taught myself the method during Lockdown 2020 except at the time I used muslin. I think it is time I learned how to do it in tissue paper. If I am successful, I will save a lot of money! The new project is a blouse with a blouse yoke. The kind of blouse yoke I will make is for the lower part of the blouse. It is described in Claire Schaeffer’s “Couture Sewing Techniques”. The pattern is derived from a skirt pattern. The yoke holds the upper part of the blouse neatly in place and fits smoothly under the skirt. I will post a screen shot of the sketch and half toile when completed..
Photos of work in progress
First pattern of bodice and blouse yoke draped in tissue paper.
“Preccision Draping” by Nellie Weymouth Link
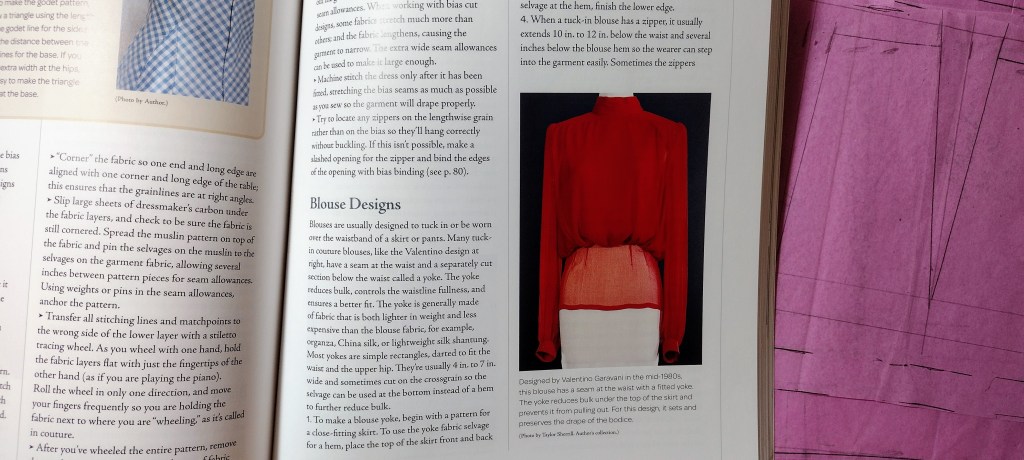
Photo of blouse with blouse yoke. From “Couture Sewing Techniques” by Claire Schaeffer.


You must be logged in to post a comment.