One way to develop your creative visualization and draping skills is to play with fabric! That is what I did during a break from my housework this morning.
To enter into the spirit of fantasy draping, buy large lightweight scarves and a yard or two of lightweight, soft fabric. These can be a poly charmeuse, poly crepe back satin, a light weight cotton chambray or batiste–or if you can afford it–a 1-2 yard length of a silk blend or a few very large silk scarves.
I have not tried heavier weight fabrics as I am not feeling very inspired by denim or tweeds at the moment.
Hold the fabric in different positions over the dress form. Try to have a conversation with the fabric to learn what it wants to do. You may discover that the cross grain looks better than the lengthwise grain, or a bias cut really takes your vision to a new high point.
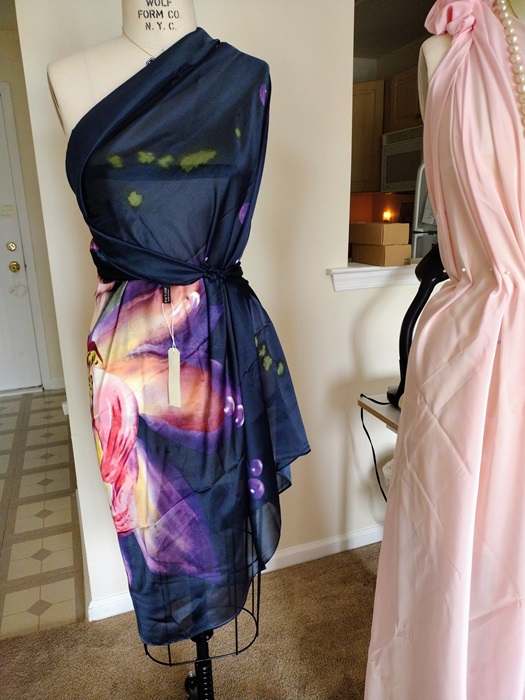
Here are the results of letting my imagination take wing for a few minutes. These are not meant to become a finished evening gown or cocktail dress. Rather, this exercise is meant to help me develop a feel for handling the fabrics and learning what they want to tell me.
I recommend this activity as a way to heighten your abilities and expand your understanding. I describe this as fantasy draping because I can get as outrageous as I want and not worry about final results. This is all a way to see how far the fabric will let me go and how it will look.
I am ready to begin draping a sleeve pattern for my 1950s style sloper in Misses Size 8, and a 1930s style sloper in Misses Size 4.
My Decision to use a different Draping Technique
The instructions in Precision Draping by Nellie Weymouth Link are for creating a fitted sleeve with elbow dart. I prefer making the basic unfitted sleeve without elbow dart since that is the starting point for other sleeves. The basic unfitted sleeve, meaning one without elbow dart, is used as a sloper. From the resulting basic sleeve further pattern development will create a sleeve with elbow dart for my 1950s style sloper. For the 1930s style sloper the sleeve will have a long vertical dart from wrist to elbow.
By having the basic sleeve without elbow dart as my sloper I will save time in developing other variations of sleeves. I have found the easiest and clearest YouTube video after a week of reviewing about 10 videos. Susan Elias’ video shows a precise, detailed and simple combination method for creating your sleeve. The lower part is drafted right on the muslin using just a few measurements. Susan shows how to take the measurements and do the calculations. She also shares tips for making measuring easier and for pinning the lower half of the pattern.
Draping takes place for the sleeve cap. Susan shows this on a toile she has pin fitted and marked up. By seeing her perform the entire process from beginning to end you will get a good idea of what will happen when you start draping your own sleeve. I highly recommend this video for the technique, the clarity and the orderly presentation. I’m off now to start my own first attempt!
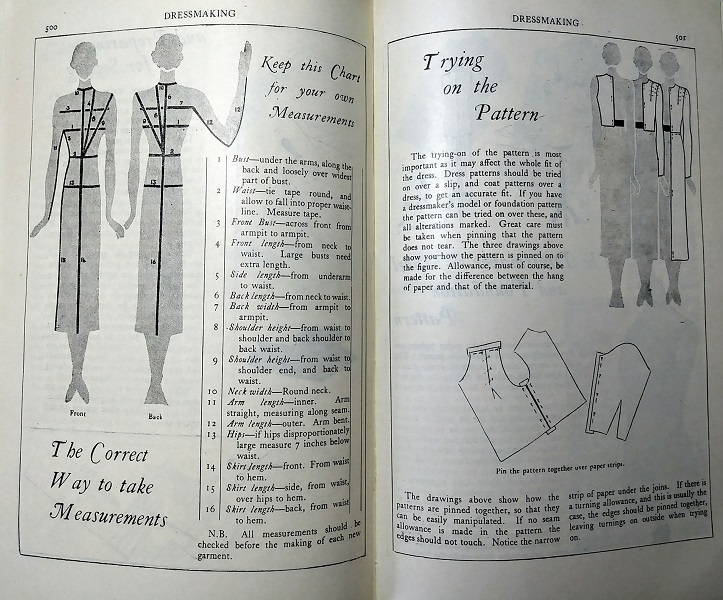
Pin fitting as illustrated in the 1931 Butterick book, “Paris Frocks at Home”. Published in New York.
I use the modern draping system created by Hilda Jaffe and Nurie Relis in their book “Draping for Fashion Design”. It is one of the better books on the subject for me. I am always satisfied with the fit that results from their technique. I also add in some vintage fitting and sewing techniques to my design and sewing repetoire when they enhance efficiency. Pin fitting is one of these techniques.
Pin fitting is not presented in the modern sewing and design books in my Dressmaker’s Library. It is, however, commonly featured in the vintage sewing and pattern drafting books that are also in my library at home.
Pin fitting from “Weldons Encyclopedia of Needlework”, published in London. No date given.
While it is not a substitute for sewing and fitting a completed muslin toile, it is a quick and efficient way to test the accuracy of darts, seam placements and other pattern details. I find the pin fitting process a great way to spot check the development of a completed drape and subsequent transfer to a first paper pattern.
The Initial Drape
The photos used in this section are those of the basic fitting toile after the dots and Xs of each draped piece have been connected using pencils and rulers.
Update 10-4-20: Please see my posting Draping: Placement and Length of Darts concerning corrections made to the darts shown in the photos of the first toile you see here.
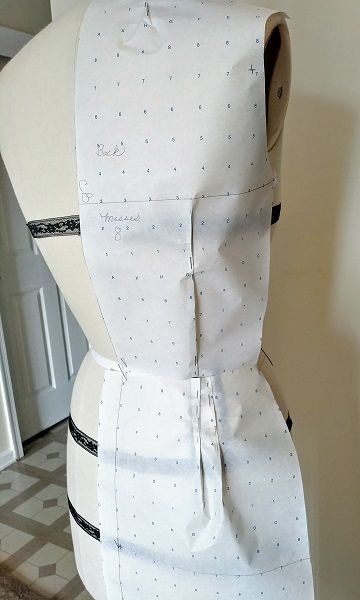
Initial drape of the basic fitted front and back bodice.
A half toile of the basic muslin fitting toile is draped on the dress form. Markings are made lightly in pencil. Once all pieces have been pinned and marked the drape is removed and pressed. Draping is not always precise in the way flat patternmaking is. Th vertical dart on the front bodice needed straightening and redrawing.
The basic fitted sleeve is first drafted as a flat pattern to save time as draping a sleeve is only for those with advanced skills and experience. The resulting sleeve is cut in muslin and the dart or darts are draped in place on an arm fitted to the dress form.
The dots and X’s used to mark the drape are then connected using French Curve, L-Square and straight rulers. An Armhole/Hip Curve ruler is also used. Pattern pieces are measured to ensure back and front side seams are the same length. Armhole curves and hip curves are also checked for a smooth flowing line in each piece.
Basic fitting toile skirt, front and back. Hips lines and hemlines are matched to check placement.
Each piece of the muslin drape is now pinned to the pattern paper. A special tracing wheel is used to transfer the markings to pattern paper. The tracing wheel is very sharp and leaves a discernible outline after the muslin is removed. Rulers and pencils are used again to connect and make the markings more easy to see.
Pin Fitting the First Pattern
The photos used here are those of the paper pattern created by transferring the muslin pattern to pattern paper.
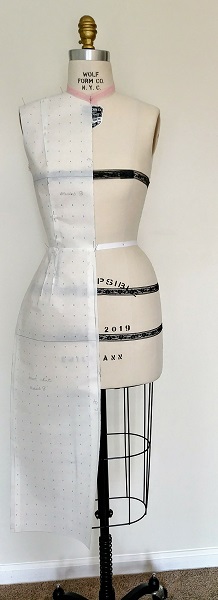
Initial pin fitting of the basic fitting toile front bodice and skirt. The dart lines and seams are checked.
This is the point where I use pin fitting to do a quick spot check for darts and side seams. Each pattern piece is pinned along the darts and then pinned to the form. I check to make sure the darts line up and end where they are supposed to.
Pin fitting of the basic fitting toile bodice back and skirt back.
Sometimes even a quick check through pin fitting will show that there is a need to add a fraction of an inch (or slightly more) to side seams. At other times, an adjustment to the dart apex line might be needed. This happens because sometimes during draping the muslin may have been pinned a little too tightly. At other times it may have had too much ease added. In which case the paper pattern may go beyond the side seam or place it is supposed to be.
It is good to check the pin fitted pattern from a distance to make sure the chest, bust, and hip lines are even.
I make the needed adjustments to the first paper pattern. Then each piece is measured again at side seams, bust dart, back darts and other check points.
The pin fitting of the paper pattern at this stage has saved me the time that would have been spent making corrections to the first muslin had the needed minor adjustments been overlooked.
The pattern is now ready to be cut as a full muslin and tested for fitting on the form.


You must be logged in to post a comment.