The Fashion Croquis: Muse and Model, source of inspiration!

Introduction

The fashion croquis is meant to represent a stylized version of the dressmaker’s or designer’s muse. The form does not have to be realistic. The purpose is to use a representation that enables the imagination to become inspired. The croquis is a means upon which to bring an idea to life in it’s very first stages.

Sources of Inspiration

The appearance given to the croquis is meant to be dramatic. It should tell the story of the creator’s vision and the aesthetic upon which the designs are based. In the initial stages proportions, colors and poses can all be exaggerated. The key word is inspiration.

Realism of the figure and the proportions of the garment details are worked out later, once the draping or patternmaking begins.

My personal choice is the 10 or 12 heads croquis that represents a tall, willowy and slender woman. My inspiration is rooted in the artwork of Erte. As well, I take inspiration from the illustrations in the stylebooks of Marfy Studio. My reasons for choosing this style of croquis is that I find great enjoyment in the sketching as well as the sources from which I derive that inspiration.

IMy sketches always have a cartoon-like quality to them. Again, it is to give the finished sketch a sense of light-heartedness. When it comes to sketching a design it is up to the individual to choose the kind of croquis they use. Nobody can dictate which one is right or wrong. Go with what best expresses your creative vision and move forward from there.

My 3/4 Croquis which you may copy, distribute and use

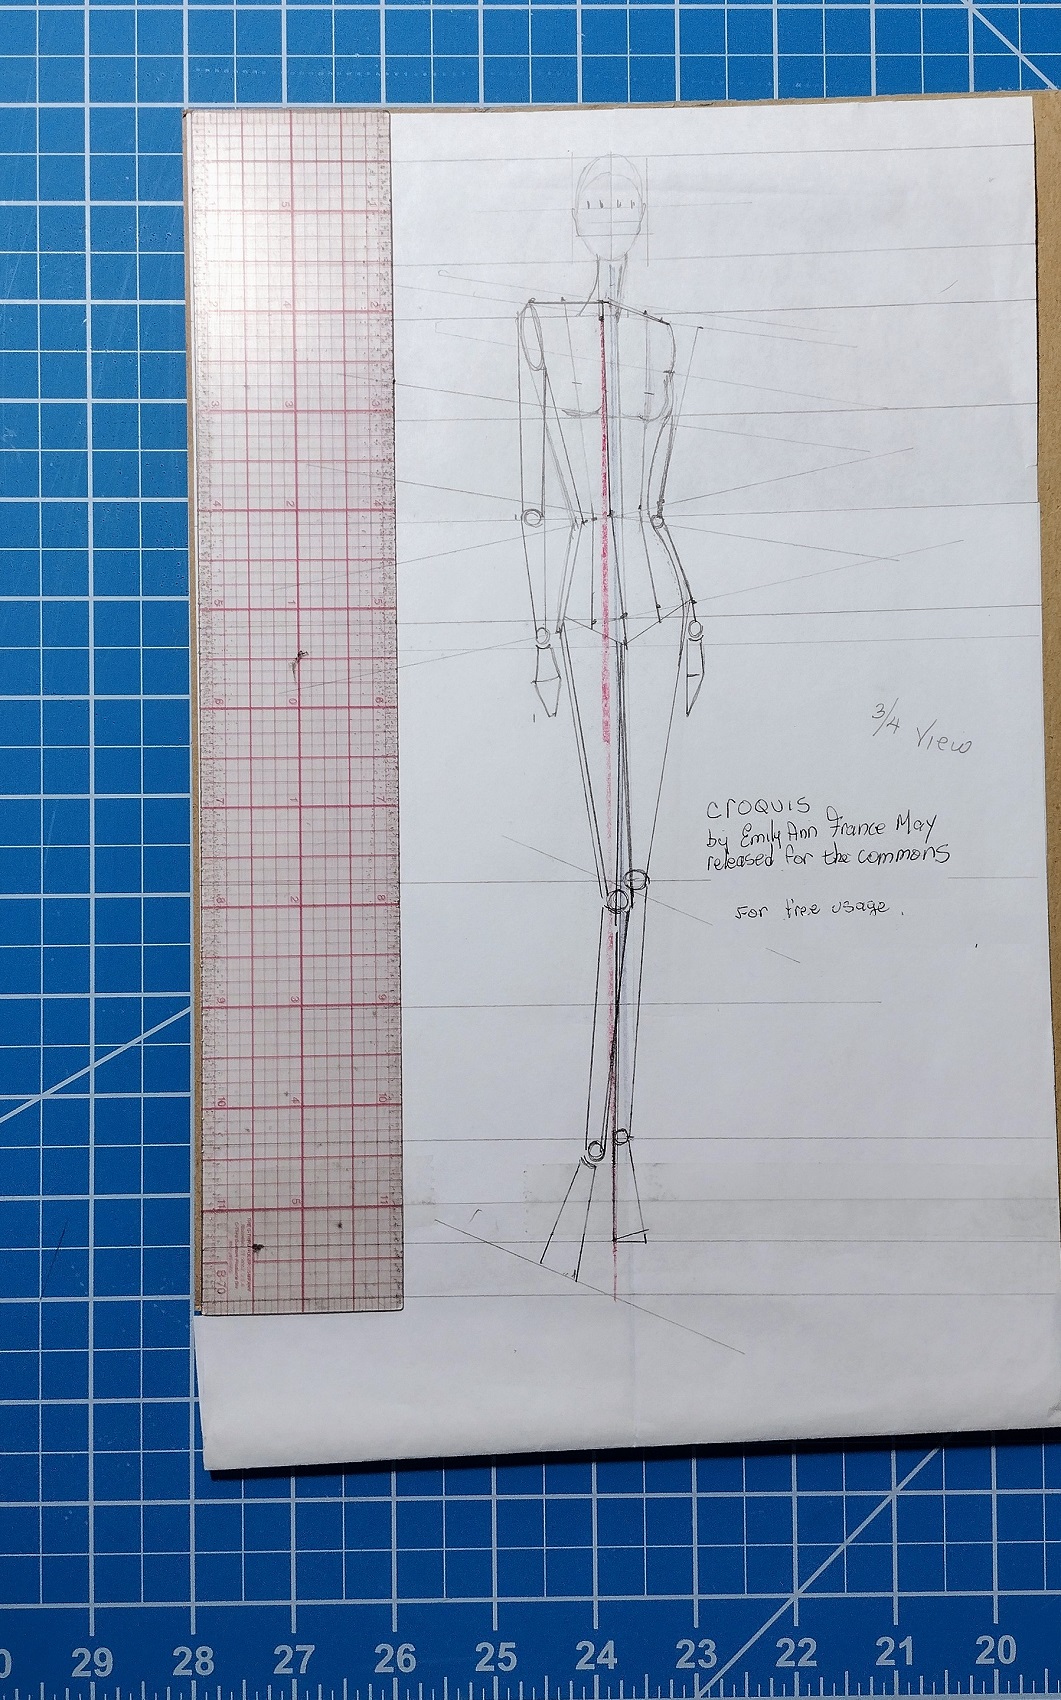
My sketches using the 3/4 croquis

The above sketch was made using the 3/4 10-heads croquis. Notice how it is filled out. The croquis because it represents the bone structure of the figure will always be slimmer than the final sketch. I like my sketches to look old, as if they came from a vintage sketch book, comic book or series of drafts from long ago. To get that look I use colored pencils and color from the wrong side of the sketch. I also use crayon on the wrong side and then smudge with a Q-tip.

Preliminary Sketch for New Project-Chambray Shirtwaist Dress

Introduction

I always start a project with a sketch. It acts as a roadmap. Once a fitting toile is made, the style may take on further changes. It depends on the resulting drape and other details I may want to add. Right now, I am considering this shirtwaist dress with additional details. The most practical are pockets set into the side seam. A shirtwaist dress is a working garment so I see the pockets as important. They can hold my keys, some money or receipts when I have to go to the lobby for a delivery or am at the laundry. Yet I want this dress to have a feminine look. I might also go to meet a friend or pay a visit while out. In this case I think a bracelet and small earrings are good. Pretty buttons also add a feminine touch.

A fashion sketch starts with a croquis. Here is how I make one and the reasons why a croquis is important.

The process of creating a preliminary sketch

10 1/2 heads tall croquis.

The function of the croquis is to provide a foundation upon which to project one’s vision of the style. It helps create an awareness of the body contours under the garment. Croquis can be shaped as you please. I use the 10 1/2 heads size because I like working with the elongated silhouette. I have a preference for the early 20th century artist Erte and take some inspiration from his work. You can also have croquis more life-like as to size and proportion. It is a kind of interaction between a person and their vision that will determine the kind of croquis to use.

To save money for fabric and notions I use simple supplies available at the 99 cent stores or Dollar General. Number 2 pencils, white tissue paper used for gifts, tracing paper, erasers, coloring pencils, and white copy paper. The croquis is drawn on white copy paper.

First sketch. Tissue paper over croquis. Shoulder pads added.

For the first layer, I use white tissue paper. This saves the tracing paper for the final sketch. Here I have drawn in a shoulder pad. Since I have slightly sloping shoulders I plan to make custom sized shoulder pads as a corrective which ensures a better fit. The pads will be no more than 1/8″ high. Having the shoulder pads drawn in results in the next sketch better reflecting how the shoulderline, collar and sleeve will look.

First sketch on 2nd layer of tissue paper.

Another layer of tissue paper is placed on top. The garment details are sketched in. I like the look of a paper doll so I use a ruler to draw most seams and lines. The hairstyle, jewelry, accessories and shoes are added in this sketch. Design details like tucks, gathers, and so on are also added.

Completed preliminary sketch.

The tracing paper is placed on top of the previous layer. All the lines, angles and measurements of the sheet underneath are not traced. Only the finished lines and features meant to convey the garment and style sense. I take the tracing paper off and color in on the opposite side using coloring pencils.

Notes about inspirations for notions and other details are penciled in. Swatches of the chambray fabric and underlining cotton are also pinned to the sketch. The chambray is light enough to give a graceful drape to the gored skirt. Since it is slightly transparent, I want an underlining. It will also add just a little extra body to support the in-seam buttonholes and in-seam pockets.

Notions

Once the sketch is completed ideas start to come. I pencil these on the sketch and then search them out. Right now I am thinking that porcelain or clay buttons will go well on this dress. If I go with this choice I’d like the buttons to have a white background and delicate blue designs or a border. Another possibility are vintage glass buttons. So that the buttons remain the key visual element I would make the belt and buckle of the same fabric as the dress. The jewlery can be silver or white.